In this guide, we will walk you through the process of creating an account, setting up the client, and performing everyday tasks with OneDrive. OneDrive is Microsoft’s cloud storage service that allows you to safely store all your data in one location that you can access from nearly anywhere. Please see how to Enable or Disable Inherited Permissions for Files and Folders in Windows, and how to change SQL Database Collation: ePO events DB and SQL server should match with ePO core collation.
When utilizing OneDrive with a corporate or school account, it’s often known as ‘OneDrive for work or school,’ but it’s more accurately labelled ‘OneDrive for Business.’ In contrast, OneDrive Personal serves individual accounts. The service functions similarly to a standard external drive, with the exception that it is accessible over the Internet and has extra functionality.
Furthermore, with the Microsoft 365 connection, OneDrive makes it simple to share files with others and collaborate in real-time. Here is a guide on how to convert a PEM Key to a PPK Key on a Linux VM in AWS or on Windows 10 and 11 in Azure Platform.
Enhance your experience on Windows 10 or 11 devices, with seamless syncing and roaming of preferences and settings, including BitLocker recovery keys, through Microsoft OneDrive Setup. Set the Value Data to “0, 1, or 2.
An excellent aspect of Microsoft OneDrive Setup is Files On-Demand. This feature lets you access files without local downloads, saving storage space. It’s also a valuable data recovery tool in case of computer crashes or theft. Adjust the Value Data to “0, 1, or 2” for optimal settings.
How to create an account for OneDrive
To set up Microsoft OneDrive, a Microsoft account is required, whether on Windows, macOS, iPhone, or Android. If you have @outlook.com, @live.com, or @hotmail.com email, an Xbox network account, you can access the cloud storage service, and set the Value Data to either ‘0, 1, or 2’.
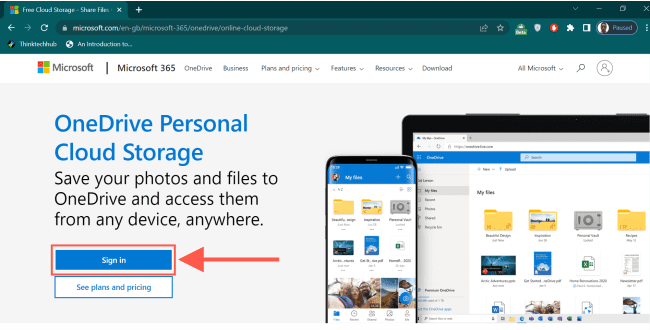
If you don’t already have a Microsoft account, follow these steps to set up a new OneDrive account: Go to the Microsoft OneDrive website. On the webpage, click the “Sign in” option.
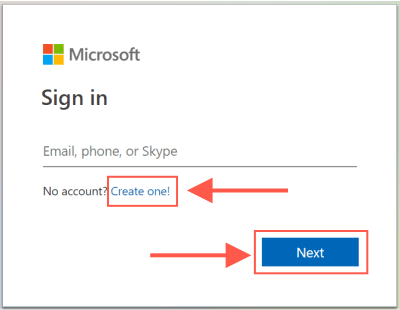
Select the “Create one” option and click “Next.” Note: Instead of getting a new email, you can use an email from another service (such as Gmail) to register an account.
Enter your preferred email address and hit the “Next” button. Follow the on-screen instructions to finish the process. After completing the process, you can link the account to a Windows 10 or 11 device and begin using OneDrive.
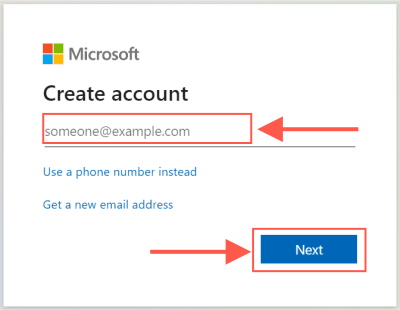
If you don’t have an email address or wish to use something different, select Get a new email address (optional).
Here are other interesting guides: How to add Registry keys via DISM in Windows. Here is how to remove Windows 10 Apps with DISM: How to remove pre-provisioned apps from Windows Image. And how to implement Interactive Authentication using MSAL dotNET.
Set up OneDrive on Windows 10 and 11
When installing Windows 10 or 11. OneDrive is normally installed automatically after you add a Microsoft account to establish a system account. If this is not the case, or if you are configuring the cloud service with a new account, you must setup the service manually.
To set up OneDrive on your device, follow the instructions below:
Launch the Windows Start Menu, search for OneDrive, and then select the top result to launch the program.
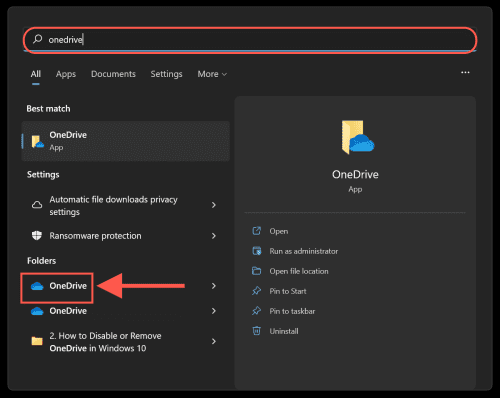
If you don’t see OneDrive on the Start menu, it’s likely that the client isn’t installed. Microsoft provides an offline installer for the OneDrive client.
When you click the link, your download should begin. To install the file, double-click it. If the setup process does not display after installation, click the cloud icon in the notification area to start it.
Enter your Microsoft account email address and click the Sign in button.

Enter your account password and click the “Sign in” button.

Customize Bckup location
To customize the backup location in Microsoft OneDrive Setup, select the “change location” option. You can specify a different folder for storing your cloud data (although the default location is typically recommended). Once done, simply click “Next” to proceed.

Clear the Desktop, Documents, and Pictures selections unless any of those system folders contain less than 5GB of files.

Although it is advisable that you use this option, you may not have enough space to upload all of your data if you are using the OneDrive free version with just 5GB of cloud storage space. You can always modify the backup settings from the Backup tab in the OneDrive settings to selectively backup a folder, as I will demonstrate later in this post.
If you are not ready to upgrade, click Not now.

Continue by pressing the Next button.

Click the “Later” button within the Microsoft OneDrive Setup section for the mobile app. Then, click “Open my OneDrive folder” to access your OneDrive’s default backup location.

After you complete the steps, OneDrive will be ready to start uploading files.
See How to Disable or Uninstall OneDrive on Windows 10 and 11, How to Move OneDrive Folder to a different location in Windows, and How to remove OneDrive from Windows.
How to upload files to OneDrive
OneDrive integrates smoothly with File Explorer to make file uploading a breeze. Follow these steps to upload documents and other items to OneDrive:
Open File Explorer and choose OneDrive from the left pane. If you have numerous OneDrive accounts, the folders may be titled differently. For example, “OneDrive — Personal” for your personal account and “OneDrive — Family” for company accounts.

Open the location of the file to backup, then drag & drop each file or folder to the OneDrive folder.

You can simply copy and paste the files into the OneDrive folder. You can also select the files and right-click to use the “Move to” option.

Once you complete the steps, the files and folders in the OneDrive location will sync to the cloud service in the background. Instead of constantly doing manual transfers, keep in mind that you can always save files straight into the OneDrive folder within the program.
Also, see How to Stop OneDrive from Starting Up Automatically on Windows 11, and How to Stop OneDrive from Starting Up Automatically on Windows 11.
Microsoft OneDrive Setup: Choosing Local Folders in OneDrive
You can also specify which folders are accessible locally through File Explorer. Follow these steps to access the OneDrive folders through File Explorer:
From the notification area in the bottom right corner, click the OneDrive (cloud) icon then click Settings from the Help & Settings Menu.

Click the Account tab. Next, click the Choose folders option.

Untick “Make all files available“, then select or deselect the directories you want to see in File Explorer. Press the OK button.

You won't be able to configure this feature if you also use the backup option. If this is the case, you must first stop the OneDrive backup for those folders before removing them.Alternatively, you can use the command to configure OneDrive to backup a specified system path. To begin, launch the Command Prompt.

Then run the following command:
mklink /j "C:\Users\tt_OjoM\OneDrive\Sample" "C:\Users\tt_OjoM\Music\Sample"
You will need to change the specified file path in the command to your own file path. In this example, you can see the linked folder “Sample” in the OneDrive folder below.

After you completed the steps, only the directories you chose will be available as files on demand, and any other folder will be hidden from File Explorer.
Files and folders statuses
- White cloud with blue borders icon — Indicates that the file is only accessible via an online connection and is not taking up any local storage space. To finish the download and open it with an app, double-click the file.
- A white icon with green borders and a checkmark icon – indicates that the file is available offline. It may be accessed without an internet connection and uses local storage space.
- Solid green with a white checkmark icon — This indicator indicates that you are utilizing the “Always keep on this device” option to guarantee crucial files remain accessible even when you are not connected to the internet.
- Solid red with a white X icon — Indicates an issue while attempting to sync a specific folder or file.
- Cloud icon with arrows forming a circle — This indicator indicates that a file is presently being synced to the cloud service.

Microsoft OneDrive Setup: Mastering Files On-Demand Usage
OneDrive Files On-Demand is a feature that allows you to use File Explorer to access your whole collection of files without having to download them to your device. When you enable the feature, OneDrive will only download small pieces of information to make the file viewable on the computer, allowing you to sync hundreds of gigabytes without fast consuming local space.
You will, however, require an internet connection to open files that you have not explicitly made available offline or have not already opened. Files On-Demand should be enabled by default, but if it isn’t, follow these steps to activate it:
From the notification area in the bottom right corner, click the OneDrive (cloud) icon then click Settings from the Help & Settings Menu.

Select the Settings tab. Under the “Files On-Demand” section, check the Save space and download files as you use them option. Similarly, if you do not want to use the feature, uncheck the box to disable it. Click the OK button to close the interface.

Once you complete the steps, OneDrive Files On-Demand will be enabled on the device.
Microsoft OneDrive Setup: Efficiently Manage Files On-Demand
You can also manage your files in various ways. Go to the OneDrive folder. Right-click the file or folder and choose one of the options:
- Free up space: Allows a file to be accessed mainly through an internet connection, conserving hard disk space.
- Always keep on this device: It ensures that the material is always accessible offline, but it consumes hard disk space.

Following completion of the processes, the files will be retained on the device or just with an online connection to preserve storage space, depending on your choices.
How to set up Personal Vault with OneDrive
Part of the Microsoft OneDrive Setup, Personal Vault creates a secure space within your account. It safeguards sensitive files, employing robust security measures like biometrics, PINs, email or phone codes, in addition to the usual sign-in process.
To set up OneDrive Personal Vault, use these steps:
- From the notification area in the bottom right corner, click the OneDrive (cloud) icon then click Unlock Personal Vault from the Help & Settings Menu.

- Click the Next button and click the Allow button on following screen.

- Continue with the on-screen directions to verify your account.
Once you’ve completed the steps, you can begin saving files to OneDrive’s protected area. If you have several devices, you will need to repeat the steps each time you wish to access the files.
The Personal Vault feature is free, but you must have a Microsoft 365 subscription to save more than three files. Although the capability is built into the client, but you need to enable it before you can start using it on your OneDrive account. If you need to access the files again, launch Personal Vault by double-clicking the icon inside the OneDrive folder and signing in as instructed on the screen. The folder will eventually close on its own, but you may lock it by right-clicking it and choosing the Lock Personal Vault option.I hope you found this guide on Microsoft OneDrive Setup helpful. If you have any questions, please let me know in the comment session.