
In this article, we shall discuss “Deploy MVC Application to AWS EC2 Using RDP and Web Deploy”. AWS EC2 is an amazon compute service, it is an instance of virtual server that can quickly be used to run applications on the Amazon Web Services (AWS) infrastructure. What is RDP? This is a remote desktop protocol that you can use to remotely connect to a Windows computer. If you want to read some other guides on AWS App deployments read these How to Deploy Dynamic Website to AWS EC2, How to host Static Website and Versioning on AWS S3, How to deploy an Angular App to AWS S3.
What is Web Deploy? Web Deploy is a Microsoft Deployment tool that simplifies how migration, management, and deployment of IIS web servers, web applications, and websites is done.
Setting up your AWS Account
- Create an account via https://portal.aws.amazon.com/billing/signup
Log in to the AWS management console: https://signin.aws.amazon.com/

After logging in go to the service section and click on EC2. And launch an EC2 instance.

How to Deploy MVC Application
In this guide I will be using Windows Server 2022 Base as the Machine I will be using for the deployment of the .Net App.

Continue to follow the installation wizard and click Next: Configure Instance Details

Configure your Security Group, check the below image and set your configuration accordingly.

The next step is to create a key pair that will give you access to the instance, enter your desired key pair and download and keep it.

Launch the instance and wait for the process to complete. Confirm that the Status check passed.

On the instance, on the summary click on connect button and click on RDP. Make sure you open the port 3389 for the RDP for access on the inbound rules.

Connecting and Initializing: Setting Up RDP Client and Password Retrieval
On the next page, click the RDP client and download remote desktop file which u will launch as the RDP interface to connect. Then click on the Get password and

In the next page browse to the location you kept the key pair file and click on Decrypt Password.

If everything goes fine you will get the below success message:
Password Decryption Successful

The password for instance i-003f9a78cbb964aa8 was successfully decrypted.
You will now be able to connect via RDP to the instance with username as Administrator and the password that was decrypted.

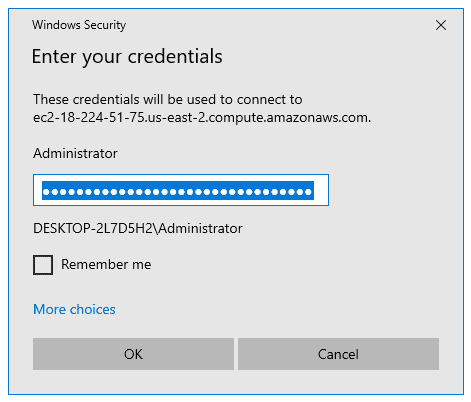
You will now need to launch the remote desktop file that was earlier saved and connect via RDP.

Click the Connect button and enter username and password and click OK.
Yipee!!! We have successfully accessed the Amazon Machine Image (AMI), the Windows Server 2022 Datacenter Edition.

From the Windows Server, download and install Microsoft Web Deploy

Configuring Server Roles and Services for MVC Application Deployment on AWS EC2
The next step is to add the role of the Server Manager. Add Web Server (IIS) and also .NET Framework 4.7 or Higher and under security role services you can also select Basic Authentication, under Application Development select .Net Extensibility 4.7 or Higher and ASP.NET 4.7 or Higher, under Management Tools select Management Service after adding all these you can start installing.

Confirm the IIS has been properly installed by typing inetmgr in the run
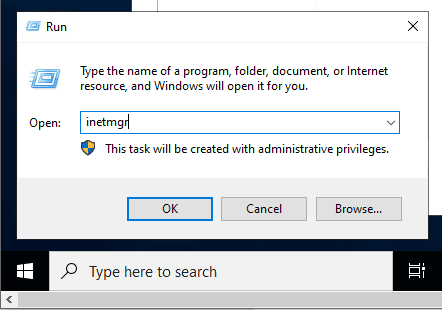
The below image will be displayed if the installation was successful

You also need to confirm the IIS via the HTTP by copying the public IP for our instance to a browser. The below display must be what you get at your end.

On the IIS Manager click on the Management Service and confirm that the enable remote connections is selected.

On the Authentication, page make sure that the Basic Authentication is Enabled.

On the same IIS Management go to the Sites section and remove the Default Web Site.

After removing the Default Web Site add a new Website

Add your Site name and in the Physical path locate inetpub folder and create a new folder for your app inside the wwwroot folder and select the new folder and click ok.

Now select the site you created and click on Deploy > Configure Web Deploy Publishing
- On the pop up box click on Setup so that a publish file will be created.

Initiating Local .NET MVC Project Creation in Visual Studio
The next step is to create a .Net project on Visual Studio and select MVC as the project template. I will be doing this on my local system.

After creating the project, you can build the project by clicking on IIS Express (Microsoft Edge)

The below image shows that the project builds successfully.

Now go back to the instance server and copy the published file that was saved on the desktop and paste somewhere on your local system.
- Go to the solution explore in Visual Studio and right-click on your project and publish.
- Import the publish file you copied from the AWS instance Windows Server.

Configuring Publish File with Your Instance’s Public IP Address
Next, you need to edit the publish file and replace it with the public IP of your instance
- Go to the instance and copy the public IP and replace anywhere we have “EC2AMAZ-MGO0TR-8172”.
- Enter the machine password too and click on Validate Connection.

Just like the image below:

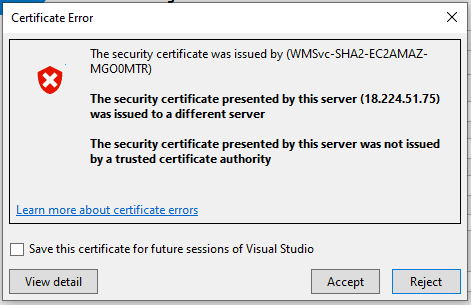
Immediately you click on the Validate Connection button you should see the below image. Click on the Accept button.
If the connection is fine you will see the Validation Connection passed. Then click Next.

On the next page leave the Configuration drop-down as Release then click on Save. Then click on Publish

Enter your server password to start the publish

You will see the published status

If the publication is successful, you will see the below

The below image is a confirmation that our ASP.NET app has been published to our AWS instance server with public IP 18.224.51.75

Now let’s try to edit the app and republish. Below is my result after editing and republishing:

I hope you found this blog post on how to Deploy MVC Application to AWS EC2 Using RDP and Web Deploy very interesting and helpful. In case you have any questions do not hesitate to ask in the comment section.


Fantastic! The granularity of the steps is perfect. It really does take all these steps and without this great article there would be no chance of success. Even a small mistake ruins the whole pudding. I noticed that he had no trouble getting past the dreaded Web Deploy flaw with the certificates and AWS. I hope he can help me with that.
Have you followed the above steps one after another and you still experience the error?