
In this article, we will be discussing “Modern Standby: PC is automatically encrypted”. Modern Standby, also known as S0 Lower Power Idle, is the most recent power-saving mode available on laptops and tablets. Here are some related guides: How to deploy MBAM Tool, Disable Sleep Mode: UEFI, TPM, and BitLocker FAQs. This feature is designed to provide you with a mobile-like feel on Windows.
Note: Thereby enabling you to transition between different power states. It allows Windows PCs to transition between on/off states faster. BitLocker provides offline data protection by ensuring that the drive has not been tampered with when the device is offline.
Also, see why was the BitLocker Recovery Mode Prompt can be prompted? BitLocker Recovery Mode prompted? I Cannot find my BitLocker Recovery Key, and how to enable BitLocker AES-XTX 256 Encryption Method.
Dell and Microsoft’s Mission on Modern Standby
This article aims to explain BitLocker’s automatic device encryption, and how to disable it. BitLocker is capable of encrypting entire hard drives, including both system and data drives.
BitLocker pre-provisioning can drastically reduce the time required to provision new PCs with BitLocker enabled. For more on this information, please see this guide “How to deploy MBAM Client as part of a Windows Deployment.
You must have noticed that when some devices when joined to the domain, these devices are automatically encrypted. Here are some statements from DELL and Microsoft on this issue.
- According to Microsoft, beginning with Windows 8.1, Windows automatically enables BitLocker Device Encryption on devices that support modern sleep. With Windows 10 and 11, there is a wider range of support BitLocker device encryption support.
This includes those that support modern sleep and devices running Windows 10 Home Edition or Windows 11. - Microsoft expects that most devices in the future will pass the requirements for automatic BitLocker Device Encryption. This will enable automatic BitLocker Device Encryption across modern Windows devices.
All computers currently shipped by Dell are modern stand-by compliant and the above applies. A registry key that Dell leaves in a neutral state controls this behavior and does not prevent encryption. Windows interprets this as permission for encryption”. Here is a guide on how to “disable modern standby on Windows 10 and 11“.
Microsoft BitLocker automatic device encryption uses BitLocker drive encryption technology to automatically encrypt internal drives after the user completes the Out Of Box Experience (OOBE) on Modern Standby or HSTI-compliant hardware
Contrary to the behavior of a standard BitLocker implementation BitLocker Device Encryption is enabled automatically so that the devices are always protected.
Device Encryption vs. BitLocker: What’s the Difference?
Both Device Encryption and BitLocker are Windows security features that provide disk encryption, but they differ in availability, functionality, and control options. The table below will give more explanation for “Modern Standby: PC is automatically encrypted”.
Device Encryption offers basic, automatic drive encryption for Windows Home users using TPM and Secure Boot, with minimal configuration and recovery key backup to Microsoft or Entra ID accounts.
while, BitLocker provides advanced, full-disk encryption with extensive configuration options, external drive support, and enterprise management features, designed for Windows Pro, Enterprise, and Education environments.
| Feature | Device Encryption | BitLocker |
|---|---|---|
| Windows Editions | Home, Pro, Enterprise, Education | Pro, Enterprise, Education (not Home) |
| TPM Requirement | Mandatory (TPM 2.0 + Secure Boot) | Optional (can use passwords, USB keys) |
| Automatic Enablement | Yes | No (manual setup required) |
| External Drive Encryption | No | Yes (BitLocker To Go) |
| Admin Control (GPO, Intune, AD) | No | Yes |
| Choice of Encryption Method | No | Yes (AES-128, AES-256, XTS, CBC) |
| Unlock Methods | TPM-only | TPM, PIN, USB key, network unlock, password |
| Use Case | Casual users who want automatic encryption | Businesses & power users needing advanced security |
The behavior of BitLocker Encryption on devices with Modern Standby
After a fresh installation of Windows 11 or Windows 10 is completed and the out-of-box experience is finished, the device is prepared for its first-time use. As part of this preparation, BitLocker Device Encryption is initialized on the OS drive, and fixed data drives on the PC with a clear key that is the equivalent of a standard BitLocker suspended state.
In this state, the drive is shown with a warning icon in Windows Explorer. The yellow warning icon is removed after the TPM protector is created. And the recovery key is based on the points below.
Criteria for Automatic BitLocker Encryption
1: If the PC isn’t domain joined, a Microsoft account that has been granted administrative rights is required. When the administrator uses a Microsoft account to sign in, the clear key is removed, a recovery key is uploaded to the online Microsoft account, and a TPM protector is created.
Should a PC require the BitLocker Recovery Key? The user will be guided to use an alternate PC, and navigate to a Recovery Key access URL to retrieve the recovery key by using their Microsoft account credentials.
2: If the user uses a domain account to sign in, the clear key isn’t removed until the user joins the device to a domain, and the recovery key is successfully backed up to Active Directory Domain Services (AD DS). Here is a similar way to back up existing and new BitLocker recovery keys to Active Directory using a simple script.
The following Group Policy settings must be enabled for the recovery key to be backed up to AD DS:
Computer Configuration > Administrative Templates > Windows Components > BitLocker Drive Encryption > Operating System Drives > Do not enable BitLocker until recovery information is stored in AD DS for operating system drive.With this configuration, the recovery password is created automatically when the device joins the domain. And the recovery key is backed up to AD DS, the TPM protector is created, and the clear key is removed.
3: Similar to signing in with a domain account, the clear key is removed when the user signs in to an Azure AD account on the device. As described above, the recovery password is created automatically when the user authenticates to Azure AD. Then, the recovery key is backed up to Azure AD, the TPM protector is created, and the clear key is removed.
Determine your Device’s sleep state?
To determine if your device supports this feature, run Command Prompt, and right-click on it to choose Run as administrator. This will open the Command Prompt window. Type “powercfg /a and hit Enter.” or “powercfg -a and hit Enter“.
As you can see from the image below, it shows Modern sleep (S0) is available on the device. If you see Standby (S0 Lower Power Idle) Network Connected/Disconnected.
Note: I do not recommend enabling the Sleep states if they are available on your device. Here is why “Disable Sleep Mode: UEFI, TPM, and BitLocker (MBAM) Frequently Asked Questions“.

Determine BitLocker Encryption Status
As you can see from the image below, the encryption method and conversation status are different from what we have specified in the GPO.
I have specified full-volume encryption, and the protection status is off because protection is only enabled after a user signs in with a Microsoft Account or an Azure Active Directory account. 
Used space-only encryption scheme for speed
TPM only as the authentication method for protecting the VMK
As discussed previously, BitLocker automatic device encryption uses BitLocker drive encryption technology to automatically encrypt internal drives after the user completes the Out Of Box Experience (OOBE) on Modern Standby or HSTI-compliant hardware.
Note: Protection is enabled only after users sign in with a Microsoft Account or an Azure Active Directory account. Until that, protection is suspended and data is not protected.
BitLocker automatic device encryption is not enabled with local accounts, in which case BitLocker can be manually enabled using the BitLocker Control Panel. Here is an interesting guide on Local Accounts, Authorization, and Access Control in Windows.

Please see How to Disable BitLocker on Windows 10, how to check if Microsoft BitLocker Administration and Monitoring (MBAM) is installed on Windows, How to disable power plan in Windows via GPO and Windows Settings, and How to Manage MS365 Account with PowerShell.
Can MBAM automatically take over devices that are encrypted?
The answer is Yes and No at the same time. I will explain further. System Administrators can manage domain-joined devices that have BitLocker Device Encryption enabled through Microsoft BitLocker Administration and Monitoring (MBAM).
In this case, BitLocker Device Encryption automatically makes additional BitLocker options available. No conversion or encryption is required, and MBAM can manage the full BitLocker policy set if any configuration changes are required
But because I am using a different Encryption Method (XTS-AES 256-bit encryption), MBAM is not capable of automatically taking over this encrption automatically.Why does MBAM not automatically re-encrypt MBAM or Bitlocker-protected devices.

If a different encryption method and/or cipher strength is needed but the device is already encrypted, it must first be decrypted before the new encryption method and/or cipher strength can be applied. After the device has been decrypted, different BitLocker settings can be applied.
MBAM or the Configuration Manager is capable of taking over a BitLocker-protected device if it is automatically encrypted with the same encryption key (encryption algorithm).
Here are some interesting guides: How to fix the MBAM Client Deployment is only supported on MBAM 2.5 SP1, and Unable to install Microsoft Bitlocker Administration: Uninstall your current version of MBAM and run setup again.
Disable BitLocker Device Encryption
Please disable the encryption with the following command manage-bde -off c:. When the device is fully decrypted, re-apply the group policies using the following GPO switch gpupdate /force or have your device restarted.
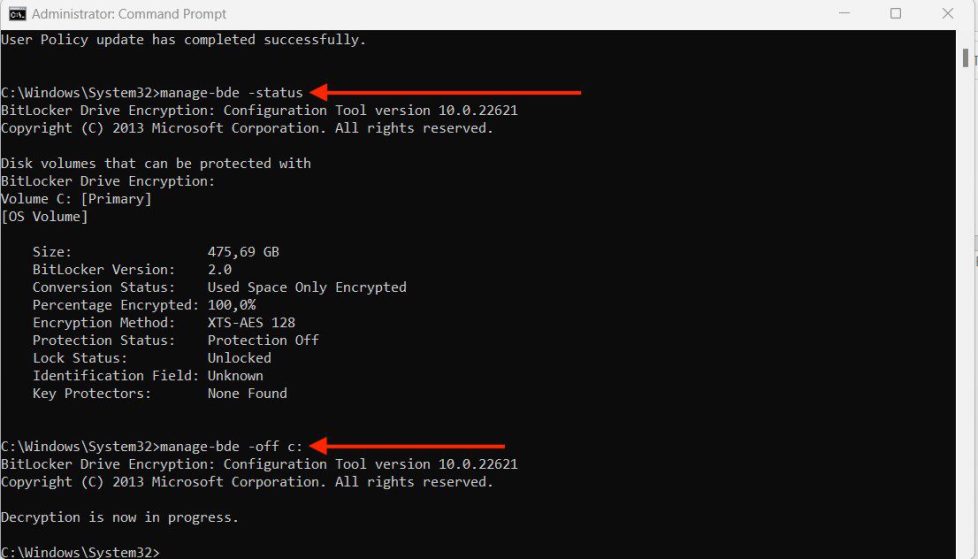
As you can see below, the drive has been decrypted. 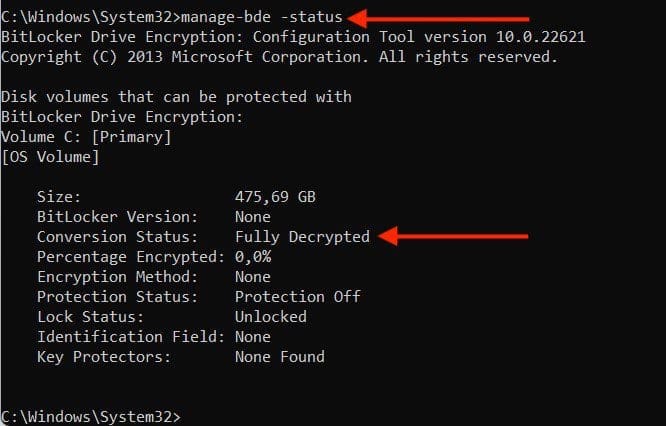
Now, To resolve this issue. You will have to re-encrypt a device by installing the MBAM agent and have the policies applied.

Here are some related guides: Disable BitLocker (MBAM): How to correctly disable Microsoft BitLocker Administration and Monitoring encrypted devices, and how to decrypt Files and Folders Encrypted with the Encryption File System in Windows 10.
Prevent Automatic BitLocker Encryption
Microsoft recommends automatically enabling BitLocker Device Encryption on any systems that support it. However, the automatic BitLocker Device Encryption process can be prevented by changing the following registry setting.
Subkey: HKEY_LOCAL_MACHINE\SYSTEM\CurrentControlSet\Control\BitLocker
Type: REG_DWORD
Value: PreventDeviceEncryption equal to 1 (True)
FAQs
BitLocker automatic device encryption uses BitLocker drive encryption technology to automatically encrypt internal drives after the user completes the Out Of Box Experience (OOBE) on Modern Standby or HSTI-compliant hardware
BitLocker automatic device encryption is enabled only after users sign in with a Microsoft Account or an Azure Active Directory account. BitLocker automatic device encryption is not enabled with local accounts, in which case BitLocker can be manually enabled using the BitLocker Control Panel
This is a Windows feature that provides a simple way for some devices to enable BitLocker encryption automatically. Device encryption is available on all Windows versions. It requires a device to meet either Modern Standby or HSTI security requirements and cannot have externally accessible ports that allow DMA access.
Device encryption uses the XTS-AES 128-bit encryption method, by default. In case you configure a policy setting to use a different encryption method. You can use the Enrollment Status Page to avoid the device to begin encryption with the default method. BitLocker has a logic that doesn’t start encrypting until the end of OOBE, after the Enrollment Status Page device configuration phase is complete. This logic gives a device enough time to receive the BitLocker policy settings before starting encryption.
As mentioned already, If a different encryption method and/or cipher strength is needed but the device is already encrypted. It must first be decrypted before the new encryption method and/or cipher strength can be applied. After the device is decrypted, you can apply different BitLocker settings.
Summary Modern Standby: PC is automatically encrypted
A PC that supports the Modern Standby power model must be capable of waking from standby in response to certain events, even if the platform has entered a very low-power idle state.
I hope you find the post helpful on “Modern Standby: PC is automatically encrypted”. If you have any questions, please leave a comment below.


