
MDT provides a unified collection of tools, processes, and guidance for automating desktop and server deployments. See this guide for more information on how to add an OS to MDT and WDS. We shall learn about “MDT accidental OS deletion: Mistakenly deleted your Operating Systems over Microsoft Deployment Toolkit”. Please see Delete or Rename and Create a Protected Organisation Unit in AD, how to retrieve deleted WhatsApp messages on iPhone, and What are the differences between MDT and WDS?
The Operating system (OS) image deployment is crucial for quickly configuring and Image deployment throughout the organization. Therefore, the MDT needs an operating system to capture or deploy. Therefore, MDT will use an operating system file from the Windows installation ISO or capture it from a custom installation. Either way, the file format for the operating system must be in Windows Image (WIM) format.
The consequence of this mistake is that, when the OS is completely deleted over the MDT, this will also delete the OS folder in the Deployment Share file system. To mitigate this, the following steps showed be followed to fix this issue.Fix MDT accidental OS deletion by Importing Windows Installation Image
Solution: To get started, the original installation image for the version of Windows to be deployed must be imported into MDT.
On the Deployment Workbench console, Right-click on the Operating System Folder and click Import Operating System

Next, we will have to decide on how you wish to have the OS imported to your Deployment
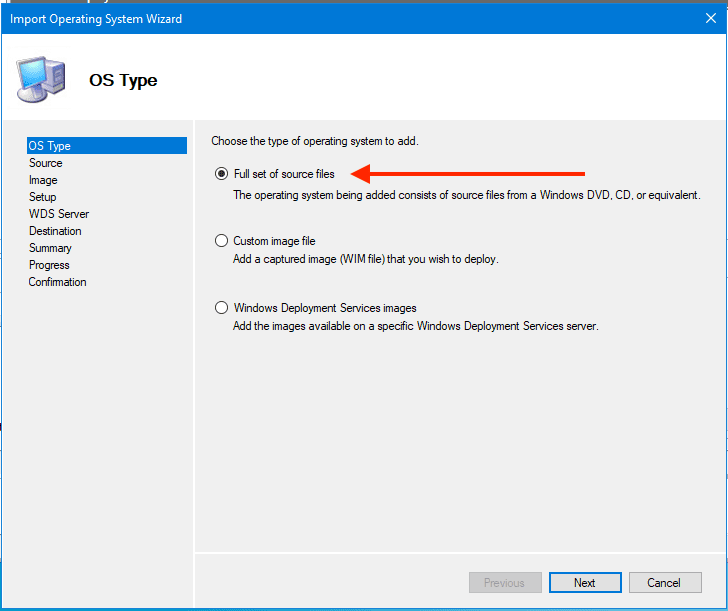
1: Full set of source files: This is my preferred choice of importing the Operating System into MDT.
On the OS Type wizard, click on “Full Set of source files” and then click Next.
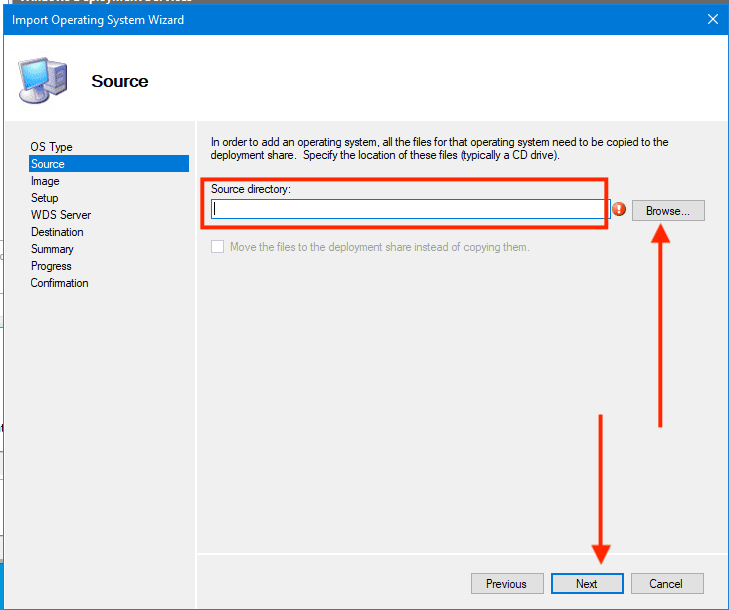
Next, you will have to select the location of the ISO or CD drive as shown below.
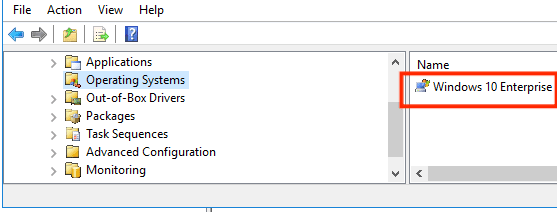
I will stop here because the rest steps are easy and for more information on the next steps, see the following link.At the end, you will suceed in importing the OS into the MDT as shown below.
Here are some interesting articles: MDT Warning: Unable to set working directory, the application returned an unexpected code 2, and How to remove an MDT Deployment Share
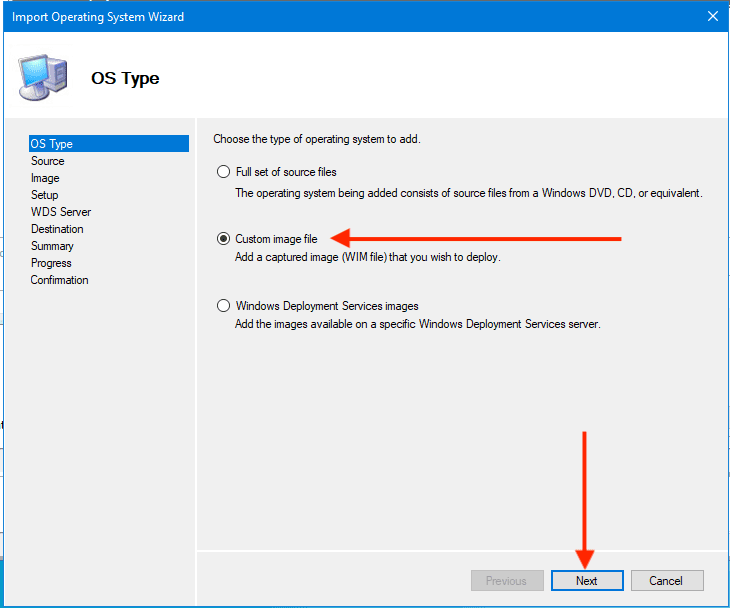
2: Custom Image
Operating system images are stored in the Windows Imaging (WIM) file format and represent a compressed collection of reference files and folders that are required to successfully install and configure an operating system on a computer.
You will have to extract the install.wim file from an ISO file. Alternatively, you may want to mount and modify the install.wim file. See the following guide on how to mount and unmount a Windows image file.
In this step, instead of selecting the first option “Full set of source files” as shown above, you will have to select the Custom image file “install.wim”.
Note: Ensure to add this image (install.wim) to your WDS server. See the following link on how to add images to WDS as well.
These steps are similar to the steps described above. Work through other steps as described on how to configure Windows via MDT and WDS.
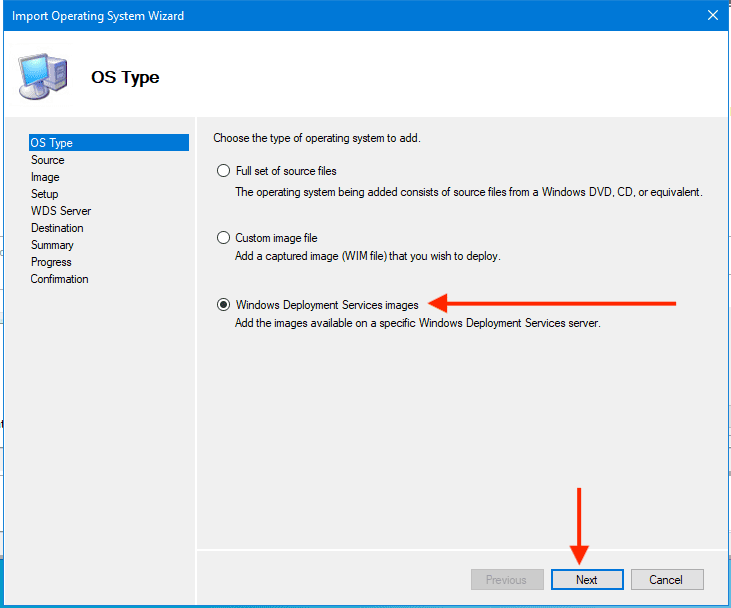
3: Windows Deployment Services Image
In this step, you will point MDT to the install.wim image that is available on WDS. Other subsequent steps are similar to the steps discussed in methods 1 and 2 above.
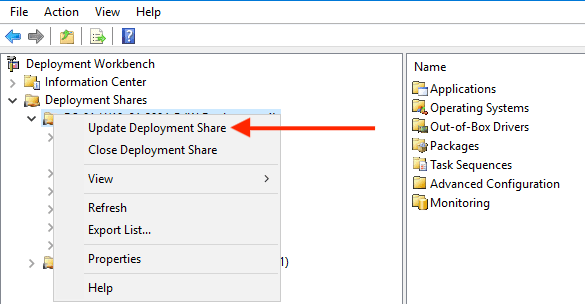
Note: It makes sense to generate a new LiteTouch.wim file file for this successfully importing the OS to MDT. As there can be other changes as well.
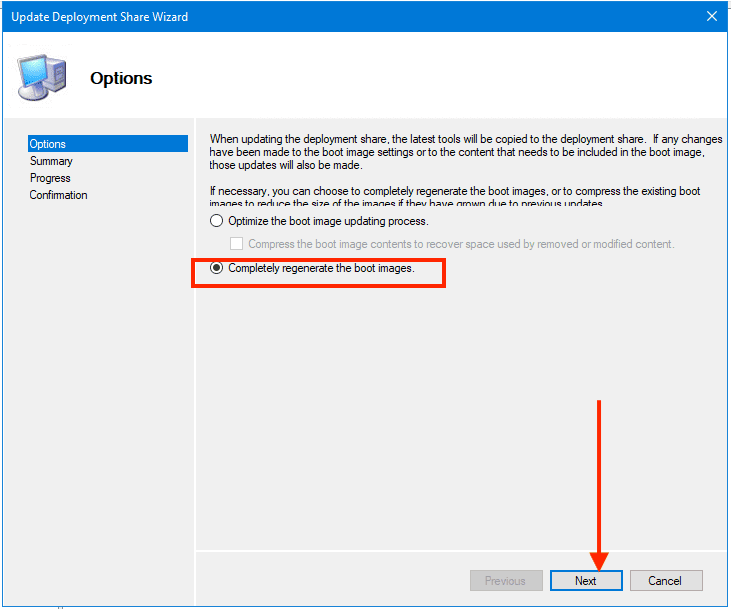
LiteTouchPE Generation Guide and Image Types
Follow the steps below to complete the LiteTouchPE generation. See this guide for the differences between Capture image, Discover image, Install and Boot images (Windows PE).
Note: In your task sequence, ensure that you point the “install operating system” to this new OS path to install, or else your installation will not work and you will get an error that the operating system is missing.
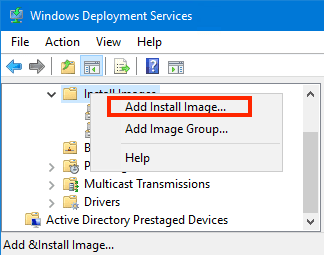
After generating this new Boot image (LiteTouchPE_x64.wim file), ensure the boot file is added to WDS. For information can be found here. To add the Install Image (install.wim) into WDS, you will have to perform the following steps below.
– Right-click Install Images and
– Click Add Image Group.
– Enter the Group Name of your Choice
This will work you through to select the image location. Browse and select the install.wim file your deployment share.
This can be found under the Operating System, sources folder in your Deployment Share file system.

More of these steps can be found in the following guide “How to add boot and install images to WDS and configure Multicast transmission via the GUI and WDSUTIL“.
Now, you can start your OS deployment. See the following guide below for how to set up a VM via PXE boot.
– How to set up a VM via PXE boot on a Generation 1 VM – Hyper-V.
– How to set up a VM via PXE boot on a Generation 2 VM – Hyper-V
FAQs on OS accidental deletion over Microsoft Deployment Toolkit
If you’ve mistakenly deleted an operating system in MDT, you can typically recover it if you have a backup of your MDT deployment share. Check if you have a recent backup and restore the deleted operating system from that backup. If you don’t have a backup, you may need to reimport the operating system source files and configure the deployment settings again.
Unfortunately, MDT does not provide a built-in “undo” feature for operating system deletions. It’s essential to regularly back up your MDT deployment share to avoid data loss due to accidental deletions. In the absence of a backup, you’ll need to manually re-add the operating system to MDT.
To minimize the risk of accidental OS deletions in MDT, consider implementing the following best practices:
– Regularly MDT Deployment Share backup to ensure you can recover deleted items.
– Restrict access to the MDT console to only trusted administrators.
– Implement version control or change tracking for your MDT deployment share to monitor changes and identify accidental deletions.
Yes, you can use PowerShell or scripting to automate the process of re-importing operating system configurations in MDT if you have a backup of the source files and configuration settings. Creating custom scripts can help streamline the recovery process and reduce the manual effort required to recreate deleted OS configurations.
I hope you found this blog post helpful. If you have any questions, please let me know in the comment session.


