Skip to content

TechDirectArchive

Hands-on IT, Cloud, Security & DevOps Insights

  • Home
  • About
  • Advertise With US
  • Contact
  • Reviews
  • Toggle search form
Home » Windows Server » Configure WSUS Email Notification for Office365

Configure WSUS Email Notification for Office365

Posted on 10/03/201816/03/2024 Christian By Christian 2 Comments on Configure WSUS Email Notification for Office365
WSUS email setup

Configuring WSUS Email Notifications ensures effective communication. It’s a powerful way to inform subscribers about changes or updates to a website or service alongside push notifications. For related content, see these guides, Windows Server Update Services Commands, WAUACLT, PowerShell, and USOClient. How to Start, Stop, and Restart Windows Server Update Services (WSUS) via PowerShell and CMD, Windows 2016 Servers does not show up on WSUS console, and WSUS clients appear and disappear from the WSUS Update Services console.

To effectively configure WSUS Email Notification, as WSUS lacks SSL/TLS support, an SMTP relay setup is essential for connecting to the Mail Server (Office365).

For more articles I have written, see the following hyperlinks below: How to set up and configure Windows server update services (WSUS), important Areas to Master on WSUS (Installed and not applicable, Install 1/4, and Installed / Not applicable 100),

SMTP-Relay server

To Solve this problem, you will have to setup an SMTP-relay server: Setting up smtp relay on windows server 2012:

Install SMTP on Windows Server

To do this, open Server Manager and select Add Roles and Features.

roles-and-features

Select Server Selection and make sure that the server that will be running the SMTP server is selected and then select Features.

On the Select Features screen. Choose SMTP Server. You may be prompted to install additional components. If that’s the case, select Add Required Features and Click Next.

SNMP-feature

Select Install to install the SNMP Server. After the installation is finished, you may have to start the SMTP service by using the Services snap-in for the Microsoft Management Console (MMC).

install-the-SNMP-Server

See how to configure WSUS Clients to get Updates from the WSUS server using Registry settings, how to apply Windows Updates from WSUS to the server using AWS RunCommand, how to Configure SSL between WSUS servers (Upstream and Downstream Servers).

Configure SMTP on Windows Server

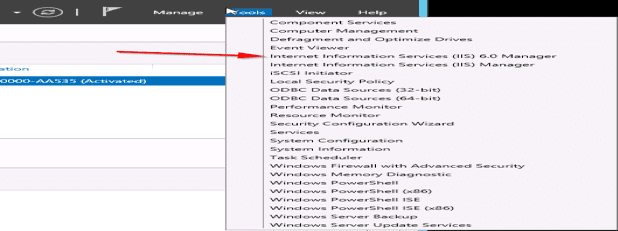
Open Server Manager, select Tools, and then select Internet Information Services (IIS) 6.0.

WSUS notification

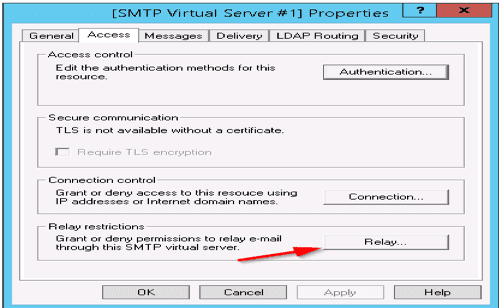
Adjust Server Settings: SMTP Virtual Server Properties

Expand the current server, right-click the SMTP Virtual Server, and then select Properties.

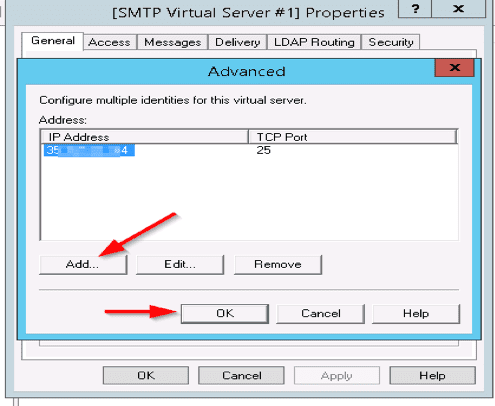
On the General tab, select Advanced, and then click on Add. Enter the Public IP of the WSUS/SMTP server if they are installed on the same server but if not enter the IP of the SMTP server followed by port 25

Office 365 WSUS integration

In the IP Address box, specify the address of the server that’s hosting the SMTP server. In the Port box, enter 25 and select OK.

WSUS email configuration

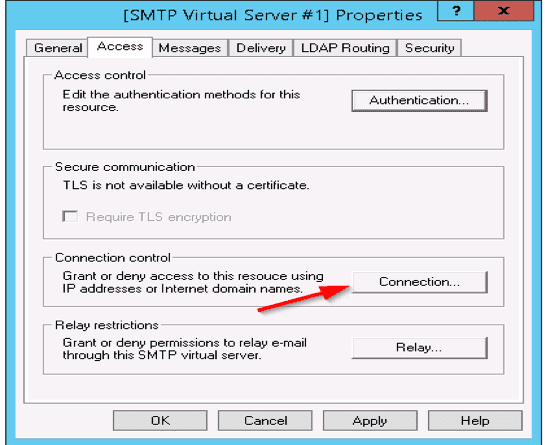
Step 3: On the Access tab, do the following: Select Authentication

WSUS email setup

and make sure that Anonymous Access is selected.

WSUS notification

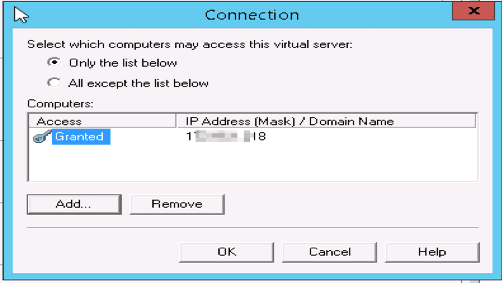
Select Connection as shown below

Office 365 WSUS integration

Select “Only the List” below, and then specify the IP addresses of the devices that will be connecting to the SMTP server, such as the WSUS server itself or a printer

WSUS email configuration

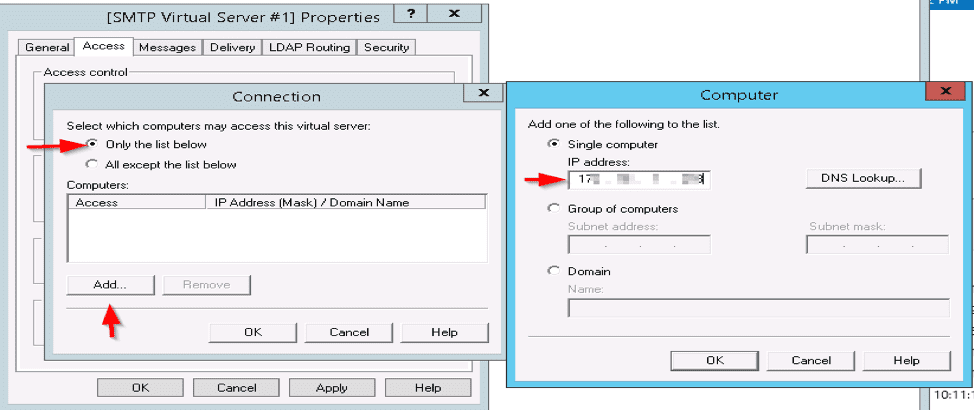
Upon click ok, this will be granted to the Private IP address

WSUS email setup

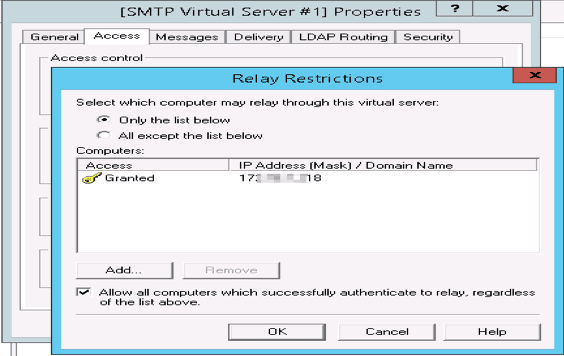
Select Relay > Only the List Below, and then specify the IP address of the devices relaying through this SMTP server

WSUS notification

While we’re here, click on “Relay” and check that the box labeled “Allow all computers which successfully authenticate to relay…” is ticked and also enter the Private IP Address here.

Office 365 WSUS integration

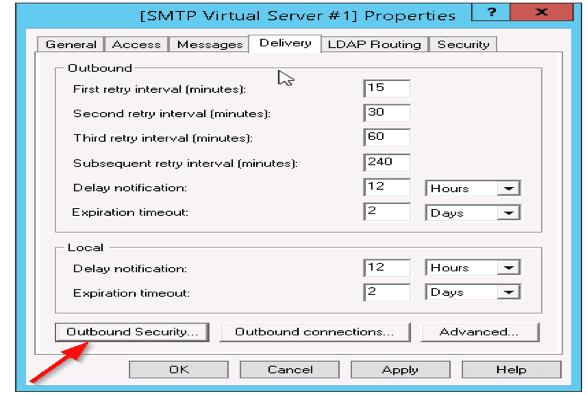
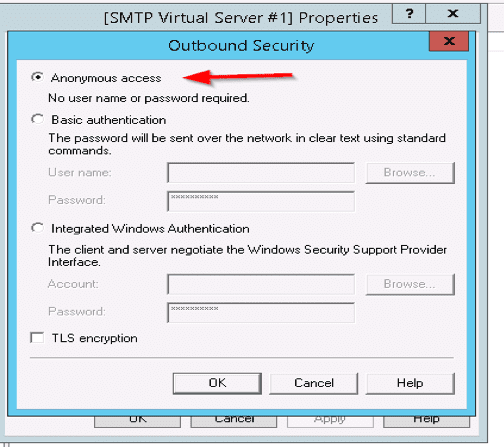
On the Delivery tab, select Outbound Security, and then do the following:
Select Basic Authentication.

And select Anonymous access as shown below

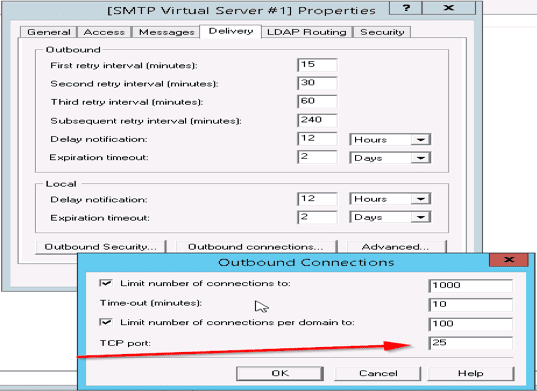
Select Outbound Connections, and in the TCP Port box, enter 25 and select OK.

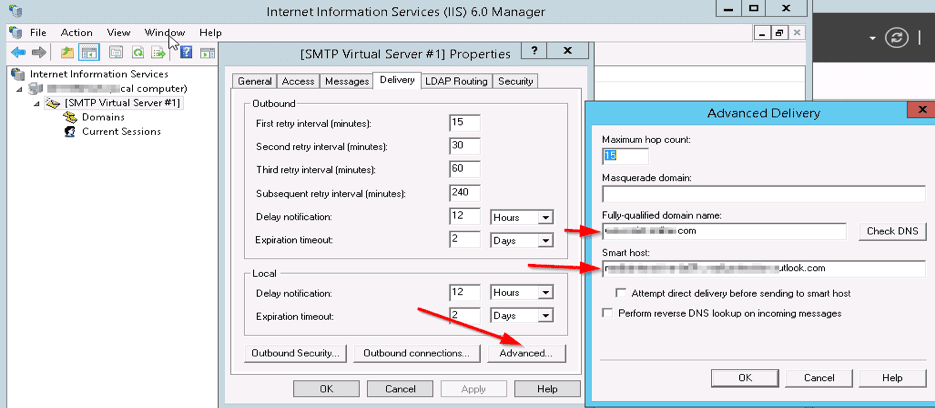
Finally, Select Advanced and specify the SMTP server as smart host as the Smart Host.

Configure WSUS Email Notification: Admin Center Connection

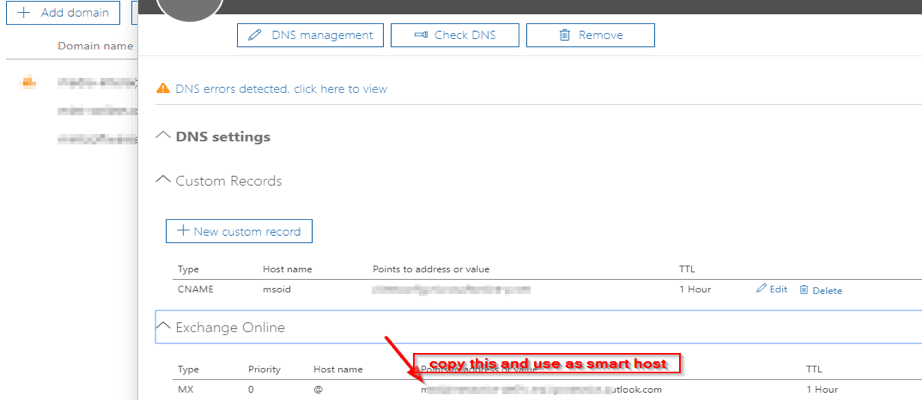
Note: This is not smtp.office365.com. You can find this when you connect to the Office365 admin center

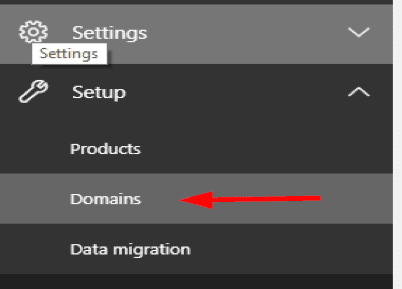
Go to settings on Office365 and select domain as shown below

Note: Create a connector on Office365 using the EIP (Public IP Address of the SMTP server). This process is very simple. Now go back to the SMTP-Relay server,

Select Advanced and enter the FQDN and the MX record for your office365

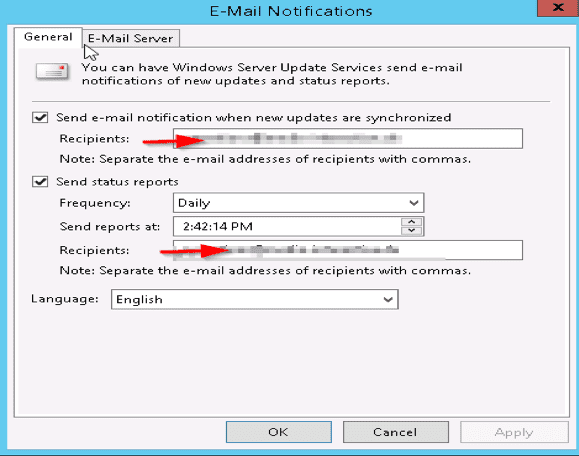
Now restart the IIS service and the SMTP service. Now go to the WSUS server (Enter your email here in order to get status report)

Test the configuration

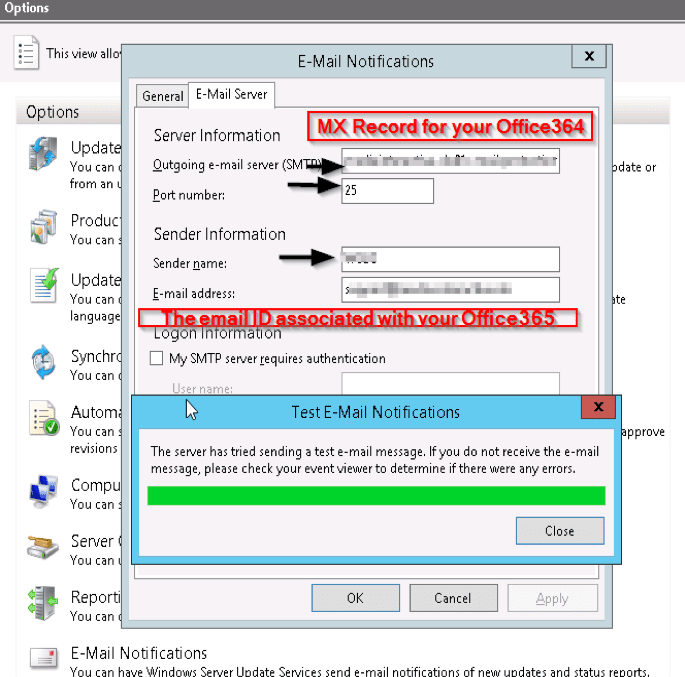
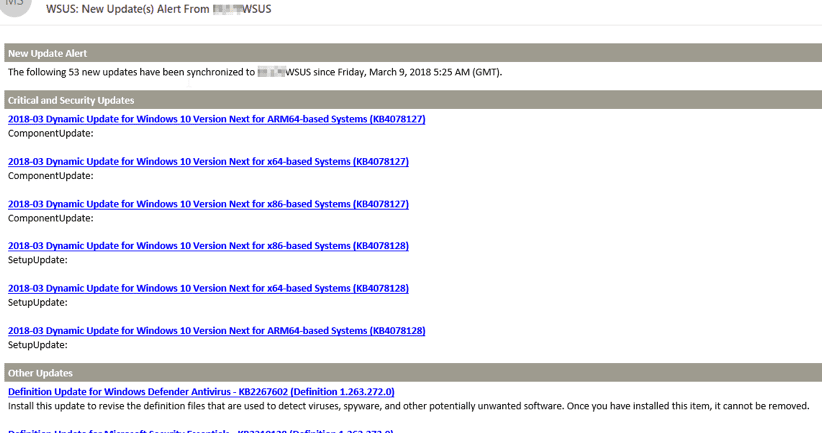
However, Now, you should get an email notification showing your smtp server-relay setup is working

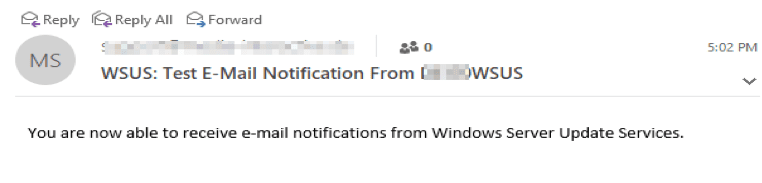
Subsequently, you should get emails from time t time showing updates status and windows updates available as shown below

I hope you found this blog post helpful. If you have any questions, please let me know in the comment session.

Rate this post

Thank you for reading this post. Kindly share it with others.

  • Share on X (Opens in new window) X
  • Share on Reddit (Opens in new window) Reddit
  • Share on LinkedIn (Opens in new window) LinkedIn
  • Share on Facebook (Opens in new window) Facebook
  • Share on Pinterest (Opens in new window) Pinterest
  • Share on Tumblr (Opens in new window) Tumblr
  • Share on Telegram (Opens in new window) Telegram
  • Share on WhatsApp (Opens in new window) WhatsApp
  • Share on Mastodon (Opens in new window) Mastodon
  • Share on Bluesky (Opens in new window) Bluesky
  • Share on Threads (Opens in new window) Threads
  • Share on Nextdoor (Opens in new window) Nextdoor
Windows Server Tags:email, Exchange Server, Microsoft Windows, office365, services, Windows Server 2016

Post navigation

Previous Post: Configure SSL connection for WSUS Upstream and Downstream Servers
Next Post: How to uninstall Applications with PowerShell Script

Related Posts

  • a3a5a8be58fa09468cd4f70d36869e98
    Restore AD Objects: How to restore deleted user accounts in Active Directory with Microsoft LDP and PowerShell Windows Server
  • OOBEZDP
    OOBEZDP: Something went wrong during the Windows deployment Windows
  • image 9
    Fix Error 853: The remote access connection completed, but authentication failed because the certificate that authenticates the client to the server is not valid Network | Monitoring
  • original
    Error 0x800710E0: Operator or Administrator has refused request Windows Server
  • sdgfdhx
    MDT Warning: Unable to set working directory, the application returned an unexpected code 2 Windows Server
  • unnamed 1
    NSlookup Displays Error: UnKnown Default Server Windows Server

More Related Articles

a3a5a8be58fa09468cd4f70d36869e98 Restore AD Objects: How to restore deleted user accounts in Active Directory with Microsoft LDP and PowerShell Windows Server
OOBEZDP OOBEZDP: Something went wrong during the Windows deployment Windows
image 9 Fix Error 853: The remote access connection completed, but authentication failed because the certificate that authenticates the client to the server is not valid Network | Monitoring
original Error 0x800710E0: Operator or Administrator has refused request Windows Server
sdgfdhx MDT Warning: Unable to set working directory, the application returned an unexpected code 2 Windows Server
unnamed 1 NSlookup Displays Error: UnKnown Default Server Windows Server

Comments (2) on “Configure WSUS Email Notification for Office365”

  1. Avatar photo Adam Marshall says:
    07/07/2022 at 3:05 AM

    Why not just use direct send? MX Endpoint, port 25, no authentication, no SSL. Sending to a mailbox or distribution group or alias.

    Log in to Reply
    1. Avatar photo Christian says:
      07/07/2022 at 11:15 AM

      Thank you, Adam! I haven’t used O365 Direct Send. I will check this out…

      Log in to Reply

Leave a Reply Cancel reply

You must be logged in to post a comment.

Microsoft MVP

VEEAMLEGEND

vexpert-badge-stars-5

Virtual Background

GoogleNews

Categories

veeaam100

Veeam Vanguard

  • CloudFrontAWS
    Serve Private S3 Bucket Contents Via CloudFront AWS/Azure/OpenShift
  • Featured image SmartScreen
    Fix SmartScreen can’t be reached right now on Windows 10 and 11 Anti-Virus Solution
  • Hide or Show User Accounts from Login Screen on Windows 10 and 11
    How to Hide or Show User Accounts from Login Screen on Windows 10 and 11 Windows
  • BitBucket Repo
    How to create Bitbucket Repository Version Control System
  • Featured image What are system partition and boot partitions in Windows
    What are System Partition and Boot Partition in Windows? Windows
  • Open Outlook links from your default browser
    How to stop Outlook from opening links in Edge Browser Network | Monitoring
  • WAMPServer Virtual Host
    How to create Virtual Hosts in a WAMPserver Web Server
  • banner
    How to Edit Windows Hosts File via PowerToy Editor Utility Web Server

Subscribe to Blog via Email

Enter your email address to subscribe to this blog and receive notifications of new posts by email.

Join 1,808 other subscribers
  • RSS - Posts
  • RSS - Comments
  • About
  • Authors
  • Write for us
  • Advertise with us
  • General Terms and Conditions
  • Privacy policy
  • Feedly
  • Telegram
  • Youtube
  • Facebook
  • Instagram
  • LinkedIn
  • Tumblr
  • Pinterest
  • Twitter
  • mastodon

Tags

AWS Azure Bitlocker Microsoft Windows PowerShell WDS Windows 10 Windows 11 Windows Deployment Services Windows Server 2016

Copyright © 2025 TechDirectArchive

Loading Comments...

You must be logged in to post a comment.