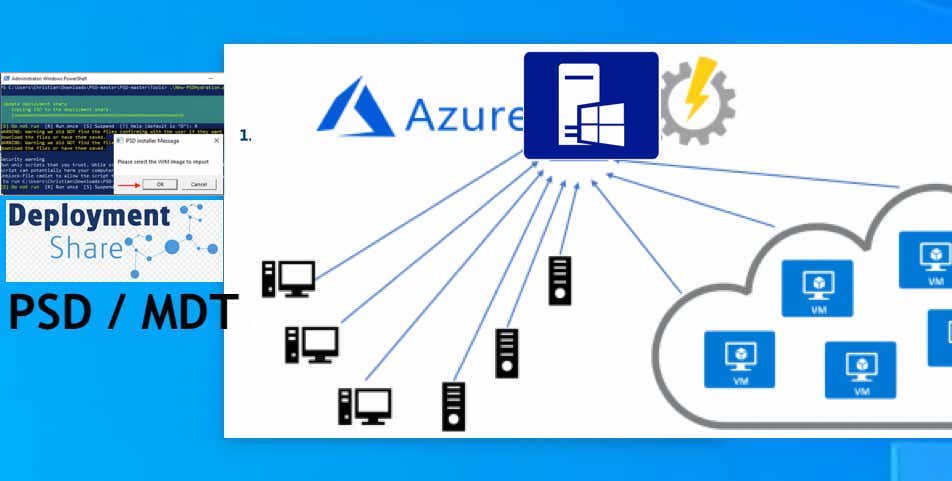
PowerShell Deployment Extension for MDT (PSD) enables you to extend your MDT Lite Touch Installation capabilities beyond the traditional IT boundaries. The purpose of PowerShell Deployment for MDT is to create a new deployment solution that provides the same level of automation as MDT but built on a more modern framework “PowerShell”. See the following guides: WDS/DHCP scenarios: How to configure DHCP Server option 60, 66, and 67 for Windows Deployment Services, and Uninstall WDS: How to remove Windows Deployment Services role via the GUI and PowerShell.
Kindly see What happens when WDS and DNS are installed on the same server, how to configure Windows Deployment Services on Windows Server 2019, and how to install and configure Active Directory Certificate Services.
This tool is currently still in development. Meanwhile, installation and the deployment process is subject to change.
PowerShell
PowerShell is the tool of choice, so it makes sense to use that for Windows deployment too as “against the traditional VBscript, ActiveX and lots of other command-line tool used previously”. PSD is not a “replacement” or “the new MDT.”
Thus, it is an add-on to the existing MDT and does not replace the Deployment Workbench. However, it only provides new task sequences and scripts to use within the existing framework.
Therefore, it is an extension, not a replacement! You may want to see how to deploy Windows using PSD, Microsoft Deployment Toolkit, and Windows Deployment Services.
Microsoft Deployment Toolkit (MDT)
Microsoft Deployment Toolkit (MDT): MDT is a FREE tool that provides you with a framework to create custom images for deployment in your environment. MDT helps you put together all the necessary components (such as the operating system, applications, and drivers) into a standard image.
Additionally, you can create task sequences to make sure your deployment is run in the proper order and correctly. Then MDT will put all the pieces together in a custom image that you can deploy in your infrastructure.
For a detailed scenario on how MDT helps in accomplishing this task, please see the following guide “ADK, MDT, and WDS: How to deploy Windows using MDT, and WDS“.
Hydration Kit Installation
The native PSD installation script is used to either create a new or extend an existing MDT deployment share. It is also possible to use the Hydration script on a new server to set up a complete PSD lab environment from scratch, fully automated.
Requirements to Install PSD Hydration Kit
To install PSD via the Hydrant Kit, please ensure the following prerequisites below are met.
– Download Windows ADK 10,
– Downloads MDT,
– Ensure the Windows PE Add-on is available.
– Ensure have an account created with sufficient rights for the following:
——-> To access the PSD/MDT Share(s)
——-> To access the log folder location(s)
——-> Joining computers to Active Directory
Ensure the Web-Server role is installed. Else the installation will fail at a later process. If you are not interested in deploying windows remotely over the internet, you can ignore this step.
Make sure the install.wim file is available. Else you will have to copy an image very quickly or start all over again 🙂
Installation Process
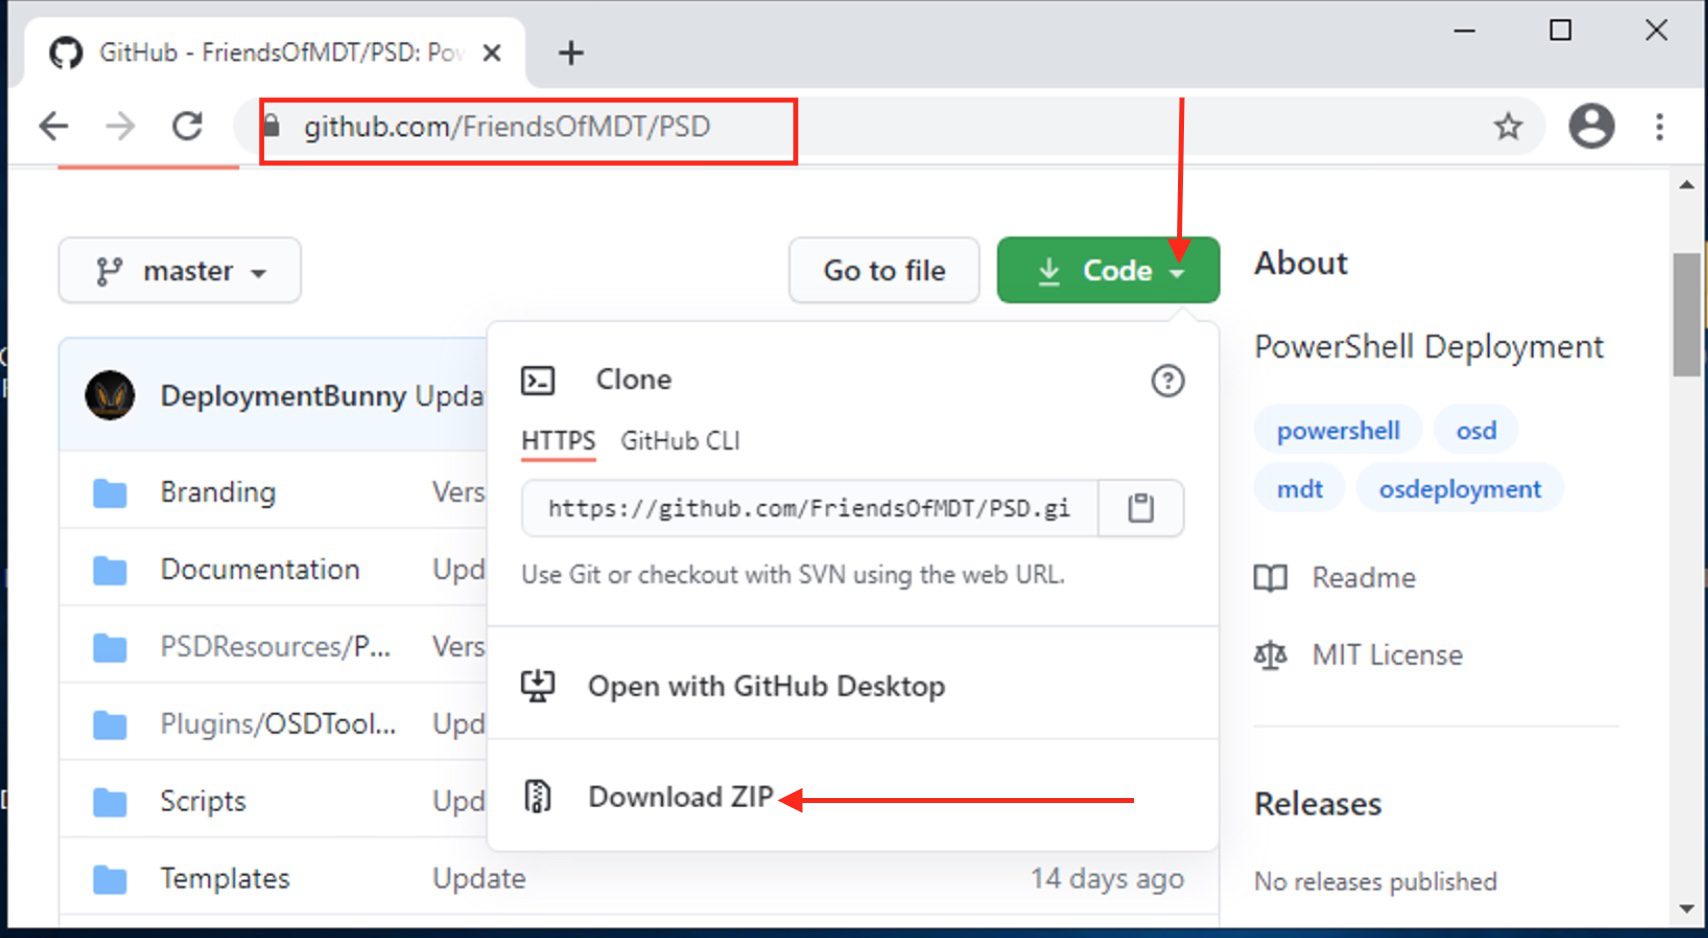
Next, you will have to download the PSD GitHub repository and follow the installation guides in the PSD Documentation. Please refer to this official guide and download the Tool as shown below
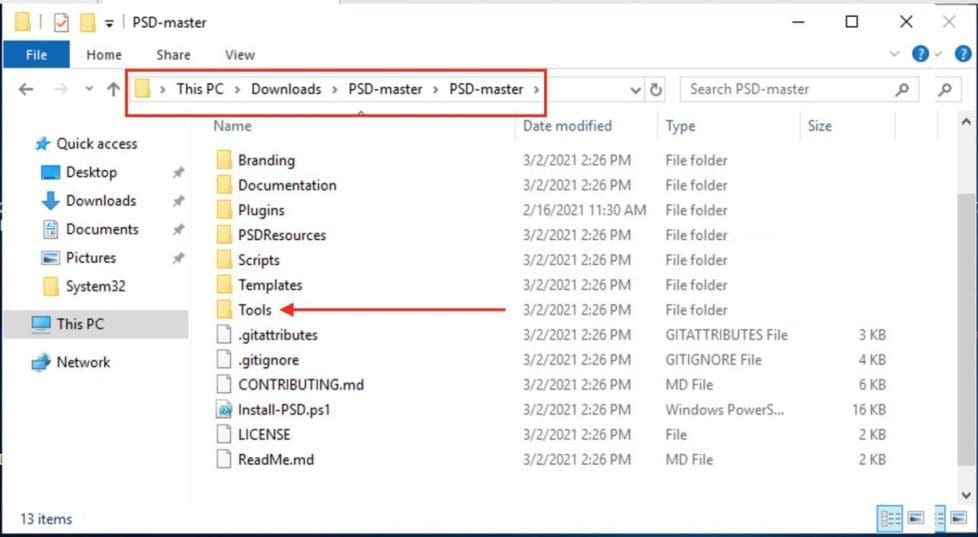
Upon download, extract the tool with 7Zip or any other tool of your choice. Then, you will have to browse to the extracted folder and navigate to the “tools” folder as shown below
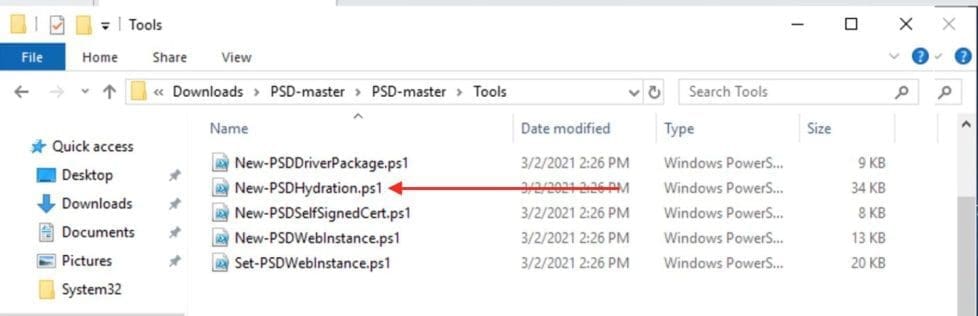
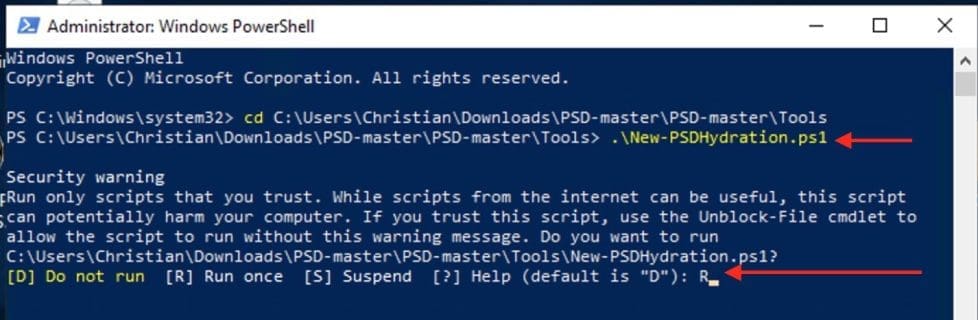
From the Tools folder run the following script ” .\New-PSDHydration.ps1″
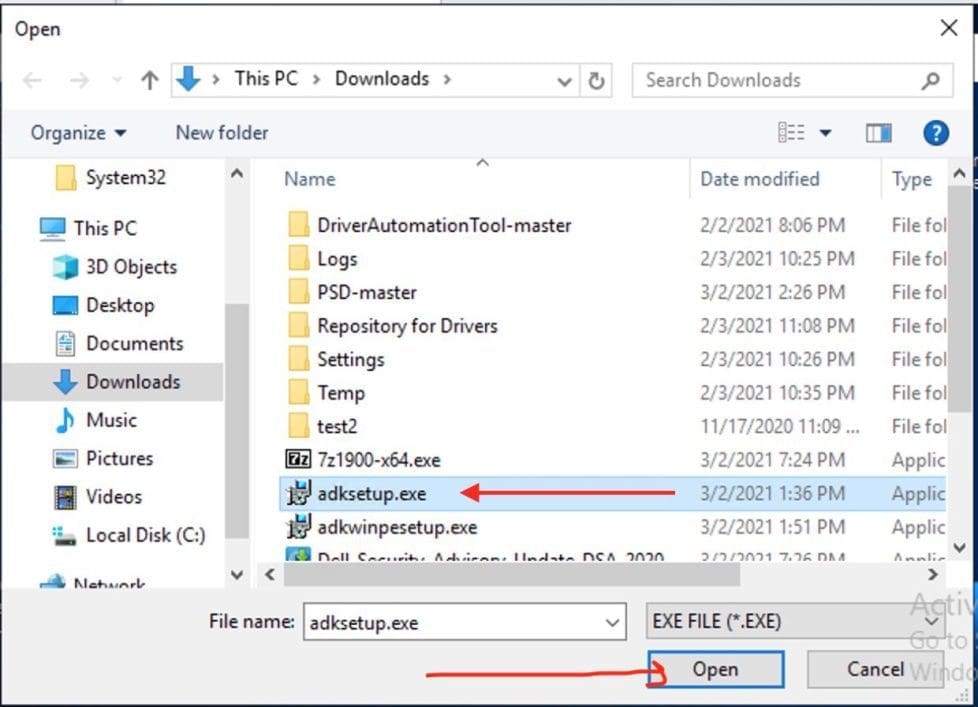
Now let’s run the script as shown below. When prompted for ADK, select the adksetup.exe file you have downloaded.

The file is selected below. Thus, click on Open to proceed.
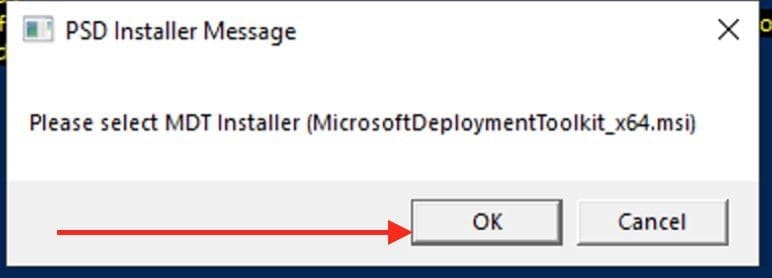
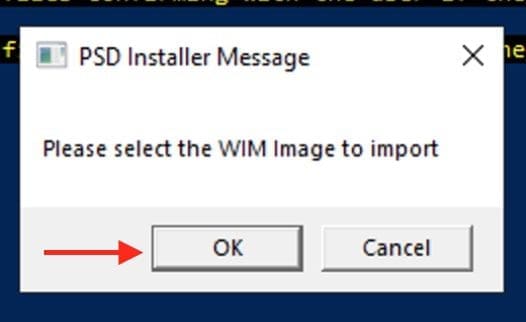
Currently, this tool is not in its perfect state, so you MAY be prompted to click on "OK" to download the setup files from Microsoft.
Next, you will be required to select the WinPE Add On as shown below.

Afterward, click on Ok to download the supporting files as shown below

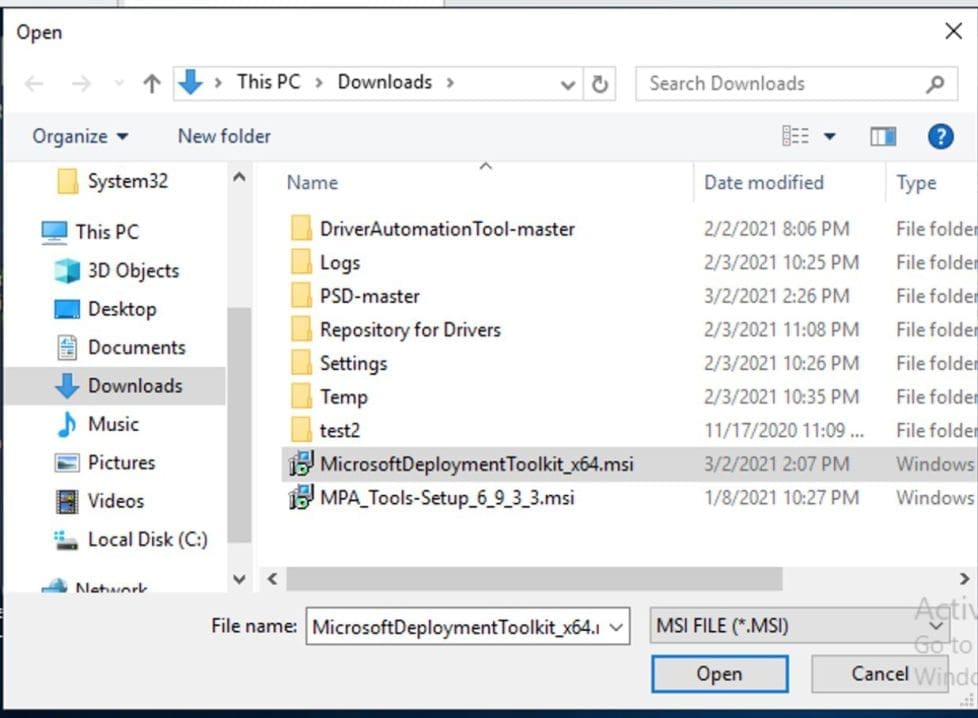
During the installation process of the PSD Hydration Kit, you will have to select MDT you have downloaded,
Select the MDT installer “MicrosoftDeploymentToolkit_x64.msi” and click on open.
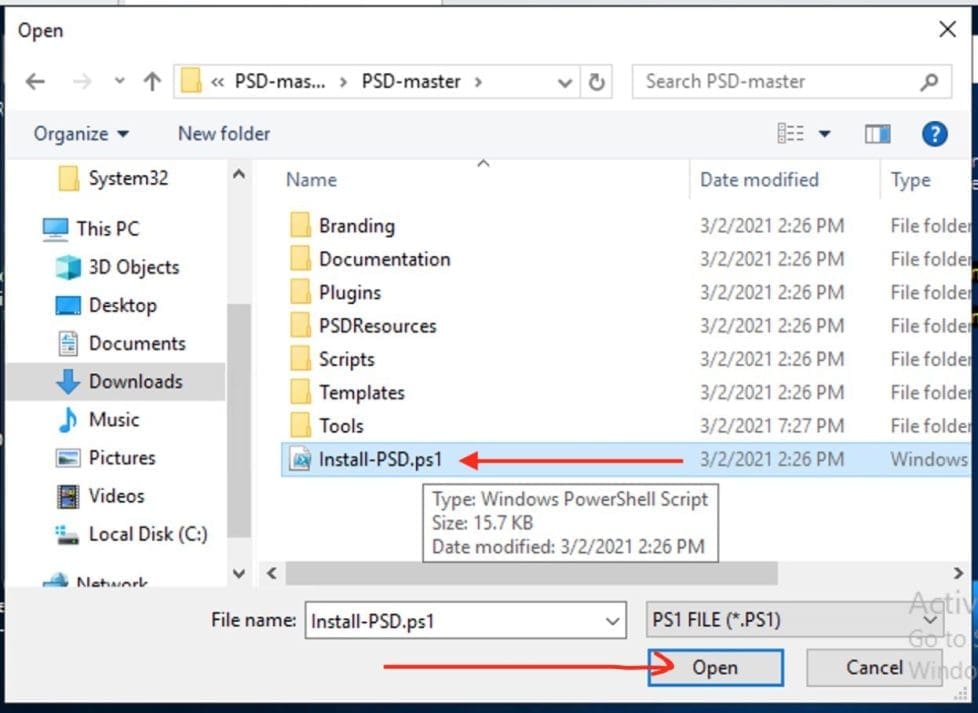
You will have to select the “Install-PSD.PS1” file as shown below. Then, click on OK to continue.
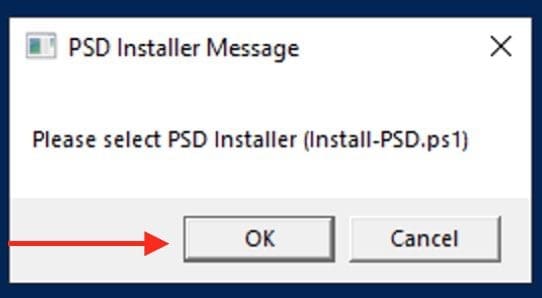
Select the installer script “Install-PSD.PS1” in the “extracted folder” as shown below and click on OK.
If you already have an image you have prepared with DISM, kindly select it as well. Kindly refer to the following articles on DISM: Install Wim: How to Add Packages to Windows image the DISM Tool, and how to remove pre-provisioned apps from Windows Image.
Select your install.wim file as shown below

The Deployment Process
To install PSD hydration kit, there’s a need for deployment. Therefore, you will need to select a deployment share you wish to use for this deployment. Then, click on OK and select or create a new deployment share. In my case as you can see below, I created a deployment share.
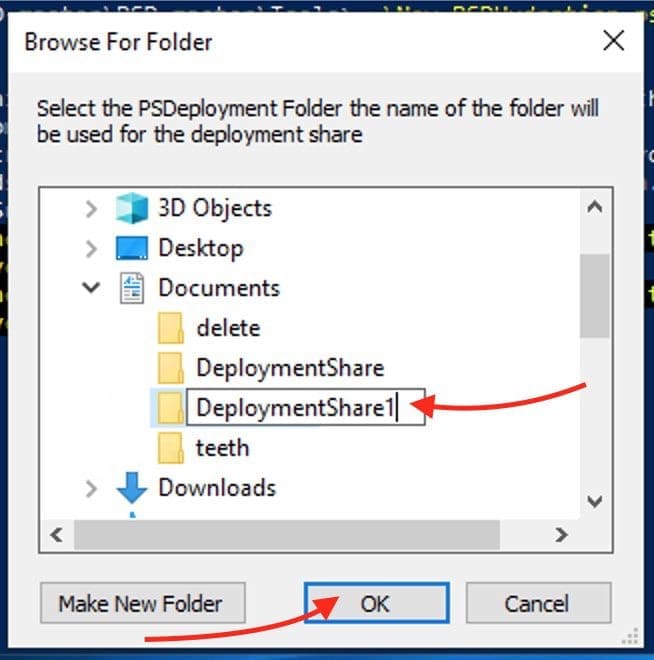
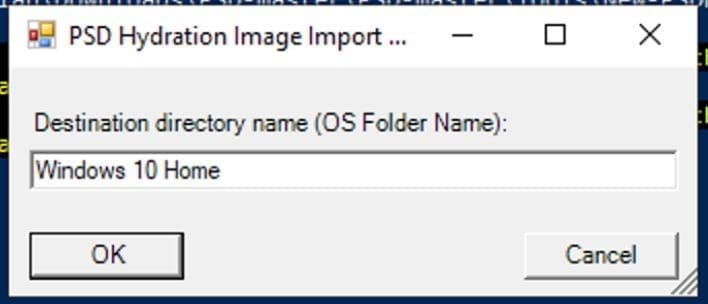
So, you will receive a prompt with the Windows below. I left the directory name as default and clicked on OK.
Furthermore, you will need to enter a user name, password, and domain name with access to the share. Ensure you create these names beforehand and can access the new share or existing share you will be using.!

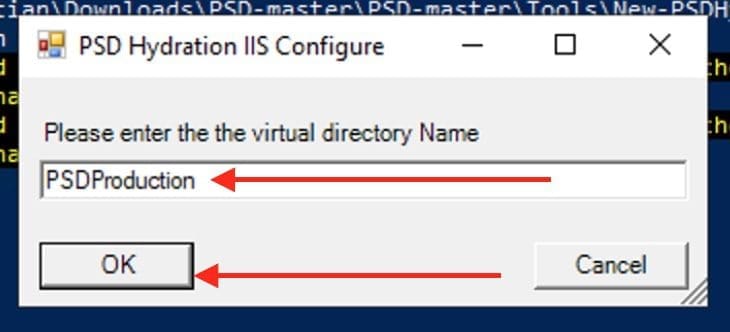
If you have IIS configured for remote installation of bare-metal servers, you will have to enter the directory name here. This is crucial to install PSD hydration kit.
Enter the IIS website Virtual directory name. The name below is the default name that will be prompted, you are welcome to change yours.
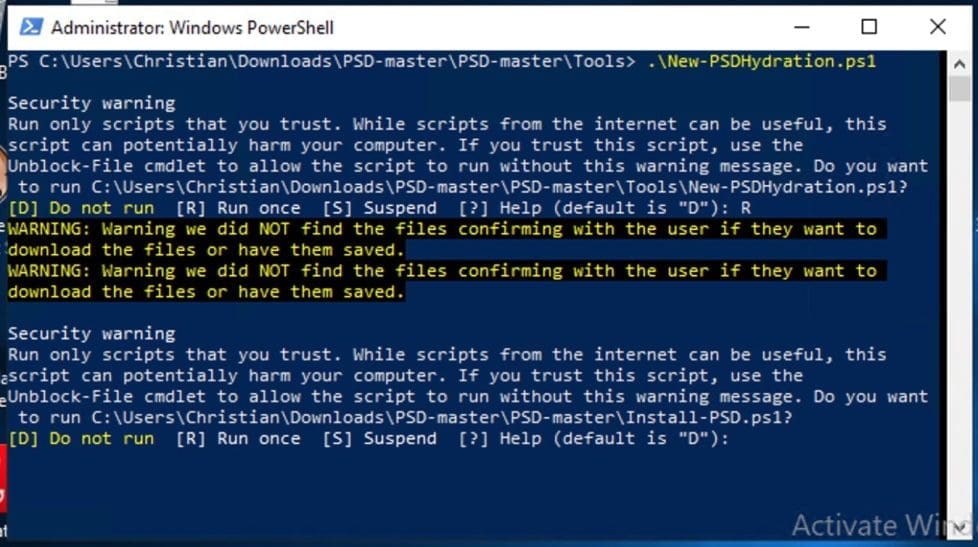
Permit the script to run
Note: This will take a while and you will be prompted to select (R) to permit the script to run once.
Below are some action that are being performed. Meanwhile, this might take forever for you, just sit back and relax.


This will update the deployment share, copy the ISO to the deployment share etc as shown below.

Restart Device
Now, you will be required to restart your device in order to complete the installation of PSD hydration kit. You can restart the device however you want. Hence, I will be using the switch “shutdown -r” or “shutdown /s” as shown below.

We got a prompt to start the script once again. Just navigate to the folder and start the script.

Before we proceed, lets quickly verify the if the OS has really been imported. Launch the MDT and navigate to the Operations systems. - You can see below, the deploymentshare1 we selected to use for this deployment has been created.
As you can see below, the OS has been imported and corrected. We have everything setup for us by the Hydration Kit.

Be very comfortable analyzing system logs. The PSD log will look this way. Kindly refer to the extracted PSD file and locate the log file. This is just to show you that your efforts are not in vain that your configuration is working. Below is a log file for your analysis. Now let’s proceed with the PSD with Hydration Kit installation.
Install IIS and configure WebDAV for PSD Hydration Kit
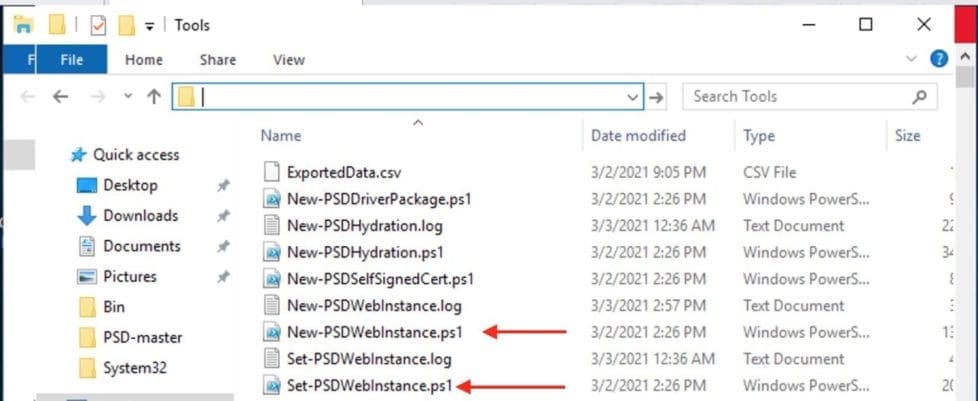
To install IIS and configure WebDAV for PSD you need to run two scripts, one for setup, and one for configuration, with a reboot in between. To run the IIS Setup, run the first script (New-PSDWebInstance.ps1) without any parameters, and after completion, reboot the server.
The “New-PSDWebInstance.ps1” script is found in the Tools folder of PSD. You can optionally install the IIS web server role and the WebDAV-Redirector with the following guide “how to add and remove IIS Web Server on Windows Server 2019 via the Server Manager and PowerShell“.
But there is no need for this as the Hydration kit provides scripts that are capable of performing these installations.
Note: The IIS Setup script does currently NOT support a server that already has IIS installed, it has to be run on a clean Windows Server installation For what these scripts do, please click on this link.
New-PSDWebInstance.ps1

Please proceed and restart (reboot) your server. Next, you will to run the configuration, you run the second script (Set-PSDWebInstance.ps1), specifying your deployment folder, and the name of the virtual directory to create. The Set-PSDWebInstance.ps1 script is also located in the Tools folder of PSD.
.\Set-PSDWebInstance.ps1 -psDeploymentFolder C:\Users\Christian\Documents\DeploymentShare1 -psVirtualDirectory PSDProduction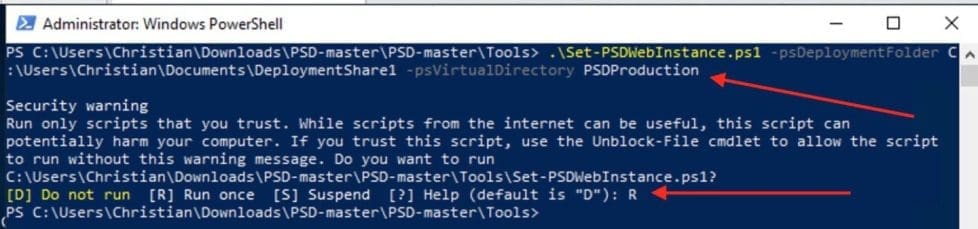
In theory, the Hydration setup is complete, but I will love to configure a certificate to support remote imaging via HTTPS. To do this, please follow the steps below.
See Local Experience Packs: How to add languages to Windows image using DISM and PowerShell, and how to fix the system cannot find the file specified when adding LP, LIP, and FoD packages to Windows Images.
HTTPS and Certificate
HTTPS and certificate are essential in installing PSD hydration kit. If you wish to support imaging via HTTPS you need to install a proper web server certificate, and make sure you add the Root CA to WinPE.
If you export the Root CA to the PSDResources\Certificates folder, PSD will automatically add it to WinPE when updating the deployment share. Since I am currently testing this out in a lab, I will be using a self-signed certificate.
Here are some related guides: How to import certificates into the Trusted Root and Personal file certificate store in Windows, how to import a certificate into the Trusted Root and Personal file certificate store, and how to install and configure Active Directory Certificate Services.
I will also be using the scripts provided by the PSD team for this deployment “New-PSDSelfSignedCert.ps1“, This script is also located in the Tools folder of PSD that creates a self-signed certificate and exports it to the PSDResources\Certificates folder.
You need to specify the deployment folder, the DNS Name of the cert, the validity period, and a friendly name. Below is how the syntax should look like. If you do not want to use a self-signed certificate, you can get one for free from Let’s encrypt (CA).
.\New-PSDSelfSignedCert.ps1 -psDeploymentFolder C:\Users\Christian\Documents\DeploymentShare1 -DNSName techdarchive.techdirectarchive.com -ValidityPeriod 2 -FriendlyName PSDProduction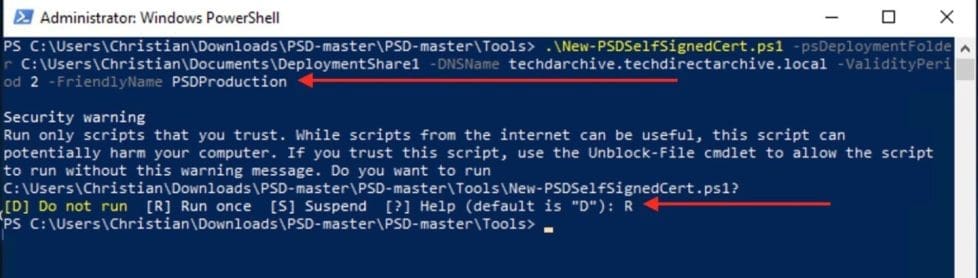
Configure Firewall
Depending on your setup, in Azure or AWS, you will need to configure the Windows Firewall and Network Security Groups as well. See the following guide on how to create a Windows firewall rule on Windows.
Port 80 for HTTP (not recommended)
Port 443 for HTTPS
Port 9080 for MDT Event Monitoring if enabled (disabled by default)
Next, you will have to update the “Bootstrap.ini” rule by editing on the “Bootstrap.ini”. Kindly add the username and password under UserID and UserDomain. Also, ensure that the PSDeployRoots have your HTTPS URL or HTTP. When you are through, please save and close.
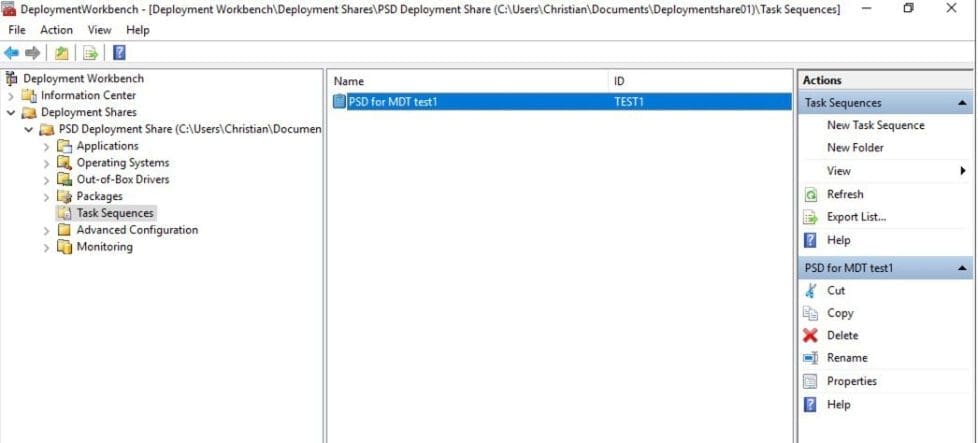
Next, kindly add all your necessary packages, task sequence etc before updating the deploying share. These steps are similar now to the steps discussed here: ADK, MDT, and WDS: How to deploy Windows using MDT, and WDS.
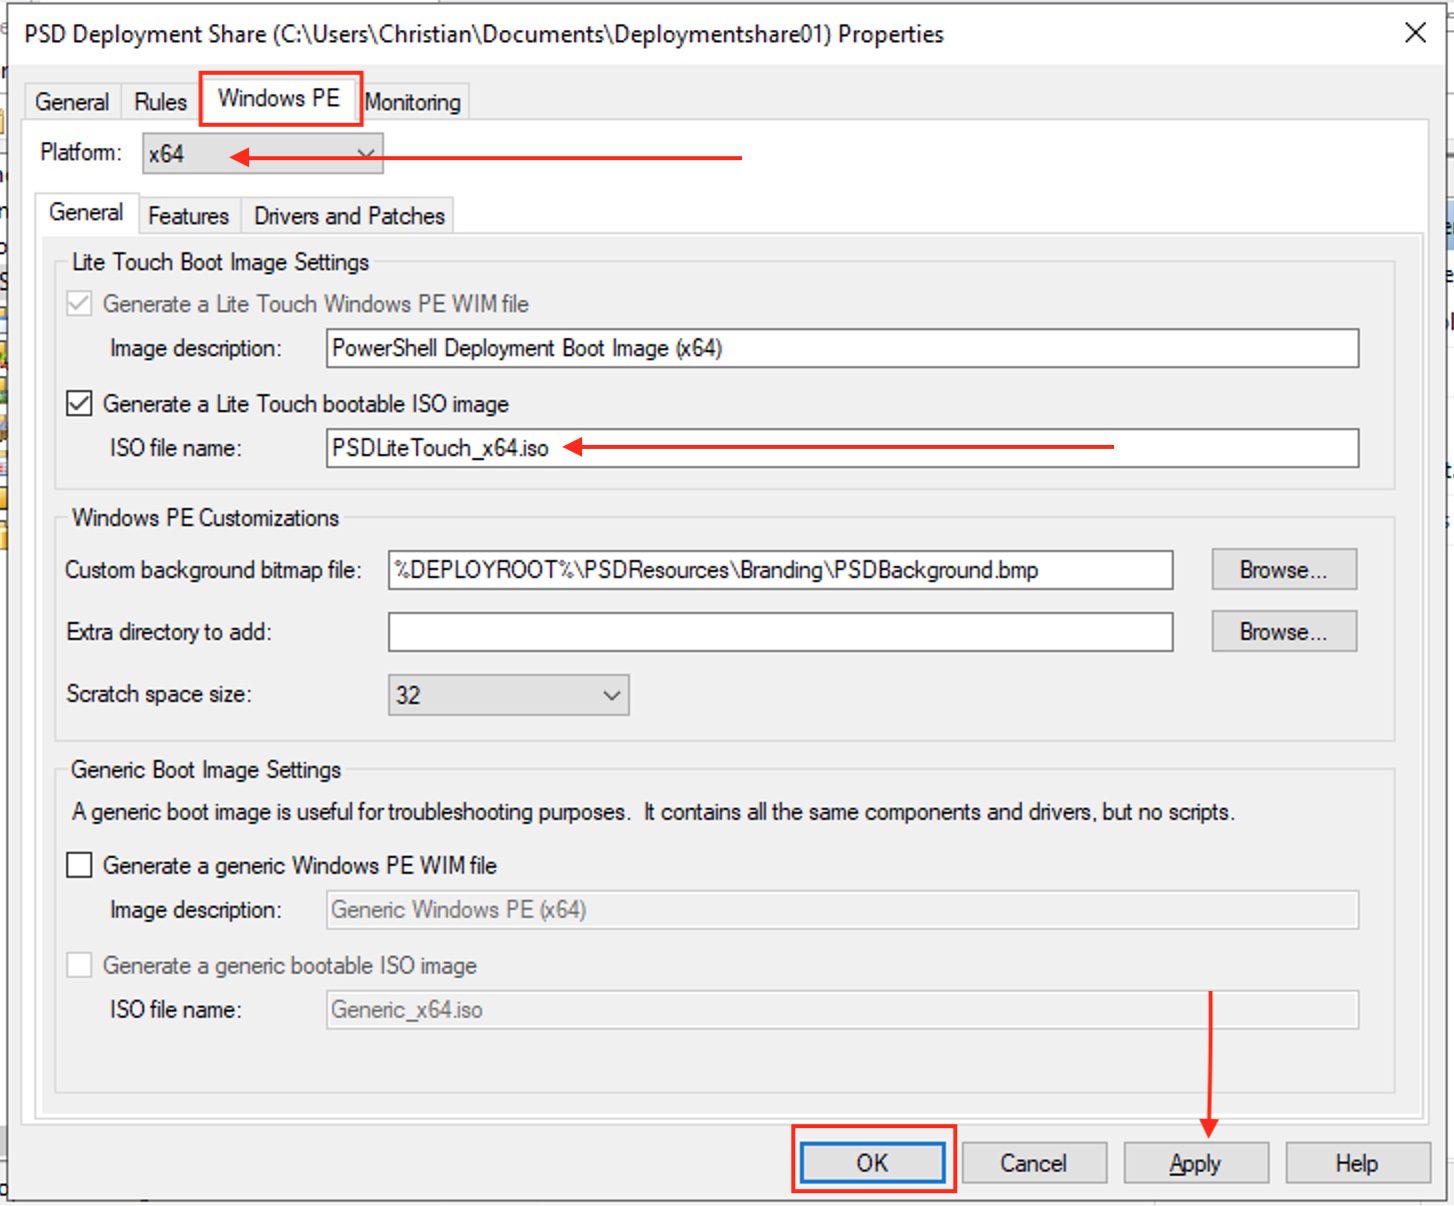
Now that we have added all needed applications, right click on the PSD Deployment Share”, and select “Properties”

Navigate to the “Windows PE” tab and change the Platform from the drop-down to “x64” as shown below. Also, remember to tick the box to generate ISO. Click on Ok when these satisfied with these settings on this window.
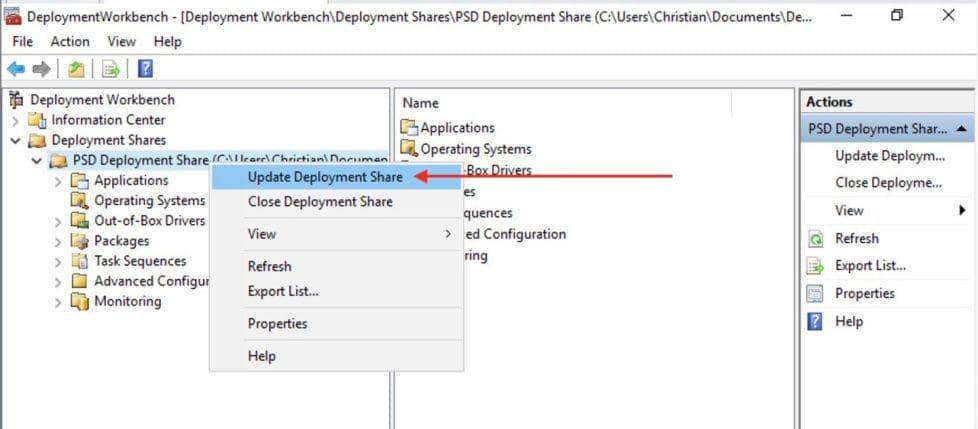
Update Deployment Share
Please update the Deployment Share. To update the deployment share, right-click on the MDT Deployment Share, and then click on Update Deployment Share.
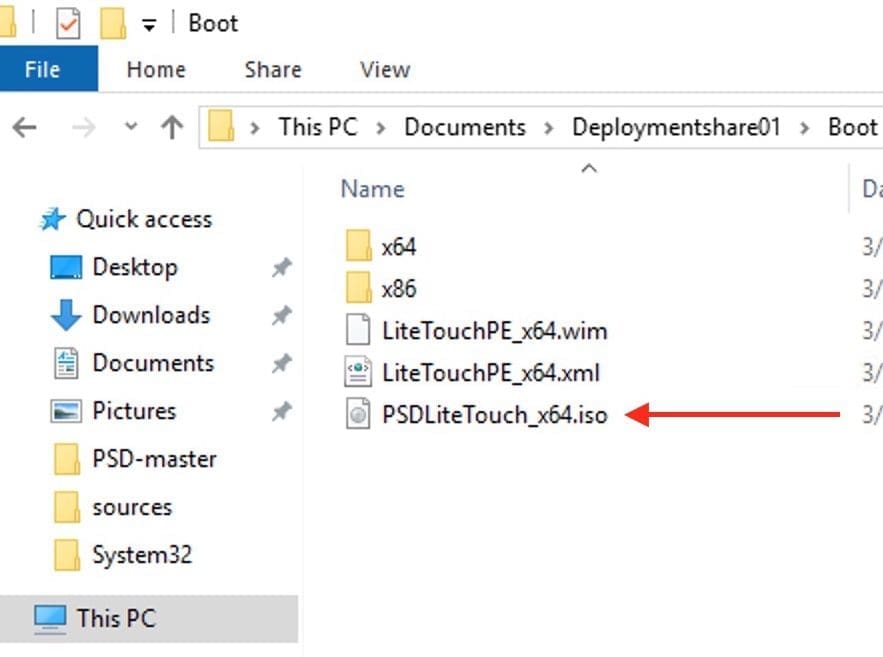
This will end up creating the ISO file we need to deploy (install our bare-metal servers). As you can see below, these are all PowerShell scripts now 🙂

Now that our ISO file is available, we can now download the boot image (ISO file) and create a USB stick with Rufus or any similar tool. See how to create a bootable USB using Rufus on Windows and how to create a Bootable USB Drive Using dd Command on Linux.
You can deploy the MDT images via DVD, USB, a network share, or via PXE boot and the deployment can be physical or virtual. You should be able to proceed from here. Please refer to the official guide and “ADK, MDT, and WDS: How to deploy Windows using MDT, and WDS“ for more information you may need to proceed with the OS deployment.
I hope you found this blog post helpful. If you have any questions, please let me know in the comment session. With the above-listed steps, you can install PSD hydration kit without any stress.