
Creating and deploying a Docker registry gives you the autonomy to manage your images within your network, ensuring security, compliance, and faster access without relying on external resources.
First, What is Docker Registry? The Registry is a stateless, highly scalable server-side application that stores and lets you distribute Docker images. In addition, the Registry is open-source, under the permissive Apache license. It is also considered as a storage and content delivery system that holds named Docker images, available in various tagged versions. Hence, you can use it for hosting your own registry using the open-source Docker Registry. This tutorial explains how to create and deploy Docker registry.
For information about Docker Hub, which offers a hosted registry with additional features such as teams, organizations, webhooks, automated builds, etc, use Docker Hub which is a managed cloud-based registry. Therefore, for full steps on how to pull an image from Docker Hub, see the related article.
Docker has become one of the most popular, largest and one of the most widely adopted containerized platforms by organization for hosting and sharing their application codes with their team. It is an open source containerization platform that enables developers to package applications into containers. For deep insights into what Docker is all about see this article. For further reading check this out.When to use registry
You should use the Registry if you want to:
- tightly control where your images are being stored
- fully own your images distribution pipeline
- integrate image storage and distribution tightly into your in-house development workflow
Few differences between Docker Registry and Docker Hub
- Docker registries are used to host and distribute Docker Images
- Docker Hub is Docker’s official cloud-based registry
- To get started with Docker Hub, you can pull (download) an image or push (upload) one of your local images
So, in this writeup, I will take you through the steps required to pull a docker image, tag it to your local registry and push it to your own registry. See related articles where I took time to explain how to Pull your first Nginx Container Image from Docker Hub and deploy it to your local machine. In this related article, I covered the steps on how to download and install Docker Desktop including Windows Subsystem for Linux (WSL2), the difference between Containers VS Virtual Machine as well as the difference between Docker Image and Container.
Deploying your Docker Registry
Before you can deploy your registry server you need to have the Docker Desktop host installed on your local system following the steps in the related article on how to Pull your first Nginx Container Image from Docker Hub and deploy it to your local machine. Thus, it is time to launch the application after installation and inspect the interface as shown in the screenshot below.

As you can see there are no containers currently running on our runtime environment. Let’s manage some containers by creating before we start pushing them to Docker Hub.
The following steps will take you through how to deploy a registry server
- Run a local Registry
To create local docker registry, use the command below:
docker run -d -p 5000:5000 --restart=always --name registry registry:2The registry is ready now. See screenshot.

Please note that these first few examples show registry configurations that are only appropriate for testing. You must protect a production-ready registry with TLS. For more information on deploying a production-ready registry see configuration guide.Pull an image from Docker Hub to your registry
You can pull an image from Docker Hub and push it to your registry. The following example pulls the nginx image from Docker Hub and re-tags it as my-nginx, then pushes it to the local registry. Finally, the nginx and my-nginx images are deleted locally and the my-nginx image is pulled from the local registry.
- Pull the
nginximage from Docker Hub.
docker pull nginx 2. Then, tag the image as localhost:5000/my-nginx. Following this, it creates an additional tag for the existing image. When the first part of the tag is a hostname and port, Docker interprets this as the location of a registry, when pushing.
docker tag nginx:latest localhost:5000/my-nginx
From the screenshot above, you can see the registry we created earlier, the nginx image pulled from docker hub and the image we just tagged as localhost:5000/my-nginx
So, having tagged the image as confirmed from the screenshot below, it’s time to push the image to my local registry. My local registry is located at localhost:5000

3. Push the image to the local registry running at localhost:5000:
docker push localhost:5000/my-nginx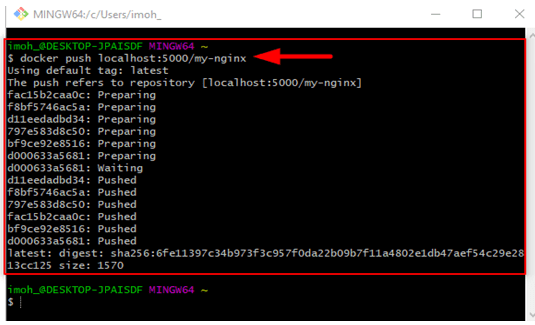
4. Next step is to remove the locally-cached nginx and localhost:5000/my-nginx images, so that you can test the pulling of the image from your registry. However, this does not remove the localhost:5000/my-nginx image from your registry.
 docker image remove nginx
 docker image remove localhost:5000/my-nginx
5. Pull the localhost:5000/my-nginx image from your local registry.
docker pull localhost:5000/my-nginx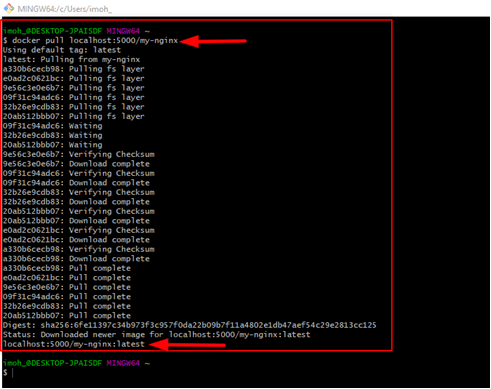
Start the Nginx container image
Use the docker run command to run the image you have just pulled from your registry:
docker run -d -p 8080:80 localhost:5000/my-nginx
The command above shows that the image will run in detached mode, and use tcp port 8080 while the tcp port for the image on the local registry is 80.
Congratulations! You can now browse to your container at http://localhost:8080 to view the running container as shown in the screenshot below.

Now, we’ve successfully created and deployed Docker Registry.


people should be aware that this method is useless for deploying to kubernetes which ignores local registries and tries to use docker.io