Users can search for files in Linux by a single line of command. When it comes to using Linux one of the most common operations is to search for files and directories. Linux systems have several commands, including find, locate and grip. In this article, we shall learn “Locate, Find and Grep: Search for files and patterns in Linux or Unix-like OS”. Please see How to remove (uninstall) a printer on a macOS, and How to update Printer Drivers on your Windows device.
While find and locate are popular ones, the grep command is a search utility that allows you to return lines from a file, or files, that match a particular search term.
Kindly refer to the following related guides: How to install and remove Microsoft Edge Browser on Linux, how to install and configure BigBlueButton on Ubuntu Linux 16.04 LTS Xenial Xerus, How to setup SELinux on a Linux server, a brief introduction to Linux, and how to create disk partition in Ubuntu Linux and how to create, edit, save a file and quit Vim Editor in Linux.
How to use the Locate, Find and Grep Command
In this write-up, I will take you through how to use locate, find and grep command to search for files and patterns in Linux/Unix-like OS. Before I proceed, if you are just getting familiar with Linux, you need to be conversant with the grep, locate and find command.
The first command on our list is the locate command. The locate command is the quickest and simplest way to search for files and directories by their names.
When using the locate search command for the first time that is, if you have just done setting up your Linux OS such as Ubuntu, you need to install the command before it can be found to return results for any search you want to do.
Installing locate command
Depending on the Linux distribution and how the system is configured, the locate package may or may not be pre-installed on your Linux system.
To check whether the locate utility is installed, open up your terminal, type locate and press Enter. If it is installed, the system will display locate: no pattern to search for specified. Otherwise, it will return something like locate command not found.
If locate command is not installed, you can easily install it using the package manager of your distro.
Install locate command on Ubuntu and Debian
$sudo apt update$ sudo apt install locate

From my screenshot above, the system is reporting that my locate package was automatically installed and it’s no longer required. I am running an Ubuntu distro from the Debian family. If you’re running CentOS, see below the command for installing locate on your system.
Install locate on CentOS and Fedora
$ sudo yum install locateHaving installed the locate command, let’s go further to look at how it works. Thelocate command searches for a given pattern through a database file that is generated by the updatedb command. The found results show on the screen, one per line.
The database can be manually updated by running updatedb as root or user with sudo privileges:
$ sudo apt updatedbHow to use the locate command
The syntax for the locate command is as follows:
locate [OPTION] PATTERN…I have a text file titled “searchcommads.txt” on my system. Now I want to know the directory in where the file is located. To so, I will run the below command.
$ locate searchcommands.txt
From the I used the ls command to display the list pf files on my system. This will help you to know the exact name of the files you wish to locate its directory through the locate command. From the screenshot, the output that shows the directory to my file is /home/imohweb/searchcommands.txt
Before I move to another popular search command called find, let’s run another example of a search pattern using the locate command.
locate .bashrcThe output will include the names all files containing the string .bashrc in their names as shown below in the screenshot.

The /root/.bashrc file will not be shown because the command was ran in normal user mode that doesn’t have access permissions to the /root directory. To show the /root/.bashrc, run the below command:
$ sudo locate .bashrcIf the result list is long, you can pipe the output to the less command for ease of readability. For example:
locate .bashrc | lessThe locate command also accepts patterns containing globbing characters such as the wildcard character *. When the pattern contains no globbing characters, the command searches for *PATTERN*. That’s why in the previous example, it displays all files containing the search pattern in their names.
The wildcard is a symbol that represents zero, one, or more characters. For example, to search for all .md files on the system, you would type:
$ locate *.mdTo limit the search results for the sake of readability, use the -n (dash N flag) option followed by the number of results you want to display. The following command will search for all .py files and display only 5 results:
$ locate -n 5 *.py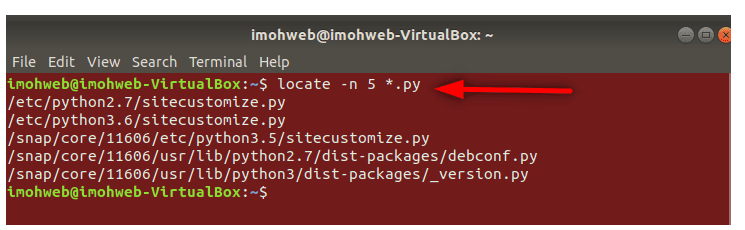
Searching for Files and Patterns with find Command in Linux
After you’ve installed the locate command, next is to how to use the find and grep command to search for files in Linux.
The find command is one of the most powerful search tools in the Linux system administrators job routine. In addition, it searches for files and directories in a directory hierarchy based on a user given expression and can perform user-specified action on each matched file.
You can use the find command to search for files and directories based on their permissions, type, date, ownership, size, and more. It can also be combined with other tools such as grep or sed.
How to use the find Command
The general syntax for the find command is as follows:
find [options] [path…] [expression]To do your first search with the find command syntax, run find directory name, the –name flag option and the specific filename you wish to find. For instance, my directory name is /home/imohweb and my filename is contactform.html, so we will run the command as:
$ find /home/imohweb -name contactform.html
This is just one of the ways to use the find commands. Furthermore, there are many other ways of making the find command one of the most powerful file searching commands in Linux.
How to use the GREP Command to find a word
Now, you have a clear understanding of how the locate and find commands work, let’s discuss the grep command. To search within files, the most popular command to use is the grep command. Grep stands for global regular expression print.
It is a small family of commands that search input files for a search string, and print the lines that match it. Furthermore, Grep initiates print lines of a file matching the patterns. For example, consider the file with name techdircetarchive.txt, using the cat command to reveal the content of the file and then run the following commands:
$ grep second techdirectarchive.txt
In above output screen, the word "second" is the word we searched for while the techdirectarchive.txt is the filename. This will print out the word matching the search pattern which is second.
The grep command is case sensitive and will only print the line matching the case of the pattern. The case insensitive uses the –i flag.
$ grep -i pass techdirectarchive.txt
The output above detected the word "Pass" as case-sensitive and highlighted in red.
The grep –r can be used to search for a pattern recursively within the directory. This is especially useful when you don’t know which file contains the specific pattern that you are looking for. In this example we’re printing all files that contain the string exam in /home/imohweb directory. We run:
$ grep –r "exam" /home/imohweb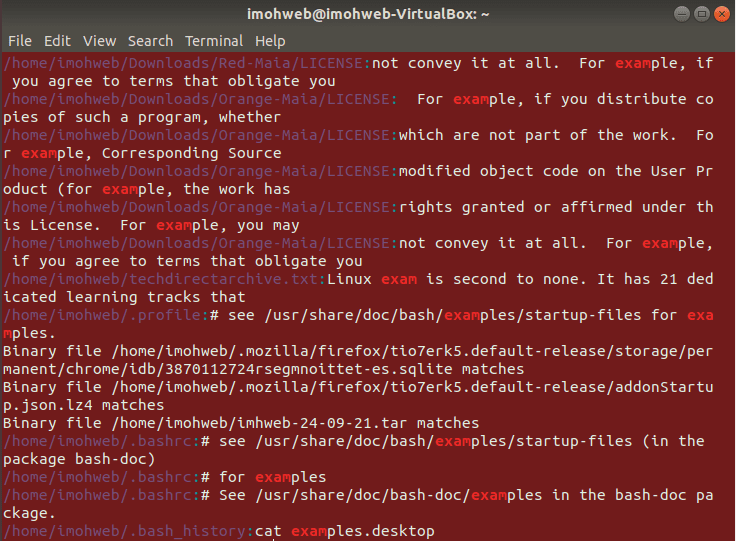
In the output screen, we have all the words containing exam printed and highlighted in red.
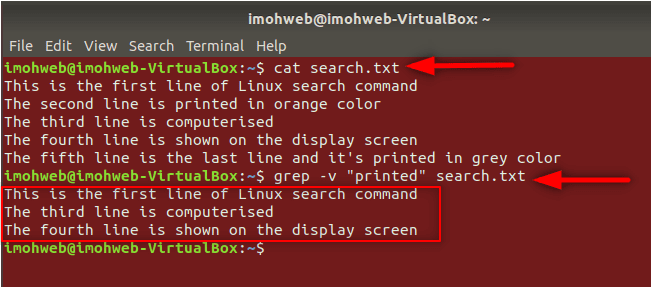
Using the grep -v command to search for files and patterns
What if we want to do the opposite that’s, print all lines that do not match the search pattern. In that case, we use the –v flag option.
This option lists all lines that do not contain the particular string or pattern you search for. In this case the second and the fifth line contain the string printed it’s not printed to the output screen. Refer to the output screen below:
Printing Part of whole Word with the grep command
What if you want to match the search pattern that forms whole word? For instance consider the example in the txt file “techdirectarchhiveblog.txt” that contains two lines.
The first line of the file has the word "tech" and the second line contain the prefix "tech" in the word "technology" you will find out that this will print out the two lines at once and not just the first line.
This is because in the second line also has the word tech as part of the pattern we are looking for in the word “tech”.
$ grep "tech" techdirectarchhiveblog.txt
Grep –w commands
To search for the whole word “technology”, use grep –w followed the word “technology” and the filename i.e. grep -w technology techdirectarchhiveblog.txt
Combining the grep –w & -vTo search for files and patterns in Linux or Unix-like OS, you may need to combine grep-w and -v. You can also combine multiple options together.
For example, to reverse the search and print all lines of the same word which does not match the whole word exam use the grep –vw tech followed by the filename grep –vw tech techdirectarchiveblog.txt. This will only print the second line of the txt file containing the string technology .

Using the grep –A & -B flag option
Finally, you can use the dash (-) uppercase A and dash uppercase –B command flags to print a number of lines before and after matching the pattern.
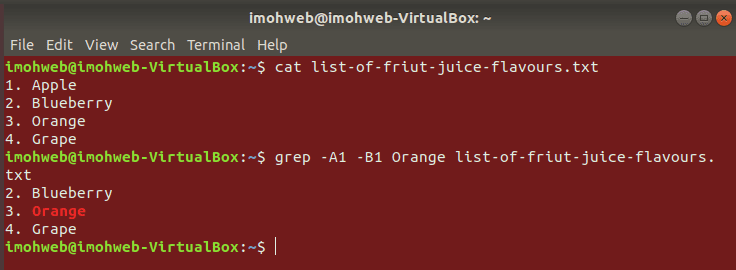
For example, consider the text file titled “list-of-fruit-juice-flavors” i.e. by running the cat fruit-juice-flavours.txt (Apple, Blueberry, Orange and Grape). To see the flavor that finish one ranking below the “Apple” fruit juice flavor. Run the command:
$ grep –A1 Apple fruit-juice-flavours.txtThe above command will print the line matching the pattern and one line immediately below. The pattern in this case is Apple. So we print the first two lines as shown in the below screenshot:

Similarly, use the –B flag to print the line before a matching pattern. Thus, in this example, we are using the grep –B1 with pattern 4 (grep –B1 4 filename.txt). Therefore, the display shows the line containing the number 4 and the one before. See the command below:
$ grep -B1 4 list-of-friut-juice-flavours
Note that, instead of A1 or B1 you can use any positive integer number with the dash –A or–B flag. It will print that number of lines after and before the matching pattern.
Lastly, the –A and –B i.e. grep –A1 –B1 Orange friut-juice-flavours.txt can be combined into one single source to print a number of lines after and before matching the search pattern as shown below:
By becoming adept at utilizing locate, find and grep, you’ll unlock unparalleled search capabilities within your Linux or Unix-like OS. Whether you’re a system administrator, developer, or casual user, these tools empower you to swiftly navigate and manage your files and data with precision.
What a great guide. Cheers! You’ve learned how to Locate, Find and Grep: Search for files and patterns in Linux or Unix-like OS. Please feel free to leave a comment below.