Skip to content

TechDirectArchive

Hands-on IT, Cloud, Security & DevOps Insights

  • Home
  • About
  • Advertise With US
  • Contact
  • Reviews
  • Toggle search form
Home » Linux » How to setup SELinux on a Linux server

How to setup SELinux on a Linux server

Posted on 03/09/202028/09/2023 Christian By Christian No Comments on How to setup SELinux on a Linux server
SELinux configuration

Security-Enhanced Linux (SELinux) is a security architecture for Linux systems that allows administrators to have more control over who can access the system. It was originally developed by the United States National Security Agency (NSA) as a series of patches to the Linux kernel using Linux Security Modules (LSM). In Linux, file permissions have been the method of securing Linux systems. But in most cases, file permissions are just not enough. Therefore, SELinux was invented. Explore how to setup SELinux on a Linux server.

Please refer to the following guides for information: How to locate directory file context and restore it with SELinux, and other related guides such as how to create and deliver a report based on system utilization on a Linux-based OS and how to install Static pods in Kubernetes and how to use container insights to get the full benefits of Azure Monitor for Azure Kubernetes workload. 

SELinux (Security-Enhanced Linux) provides access control to a Linux server, where every system call is denied unless it has been allowed. I will critically explain how to use SELinux to make sure that serious security incidents will never happen on your server/Infrastructure.

NOTE: If SELinux is enabled and nothing else has been configured, all system calls are denied.

SELinux keywords needed for setup on a Linux server


– Policy – A collection of rules that define which source has access to which target.
– Source domain – The object that is trying to access a target. (A user or process)
– Target domain – The object that a source domain is trying to access. (A file or port?
– Context – A security label that is used to categorize objects in SELinux.
– Rule – A specific part of the policy that determines which source domain has which access permissions to which target domain.
– Labels – Same as context label, defined to determine which source domain has mandatory access control to which target domain.

SELinux can be in 3 Modes. Enforcing, permissive and disabled. If you disable SELinux, no SELinux activity will be happening at all, but if you enable SELinux, you can select to put SELinux in enforcing mode or in permissive mode. In enforcing mode, SELinux is fully operational and enforcing all SELinux rules in the policy. If SELinux is in permissive mode, it logs all SELinux related activity, but doesn’t block access.

SETTING UP SELINUX ON A LINUX SERVER
To set the default SELinux mode while booting, use the file /etc/sysconfig/selinux.

Linux server security

On a server that currently has SELinux enabled, you can use the getenforce command to see whether it is currently in enforcing or in permissive mode. To switch between permissive and enforcing mode, you can use setenforce . The command setenforce 0 puts SELinux in permissive mode, and setenforce 1 puts SELinux in enforcing mode.

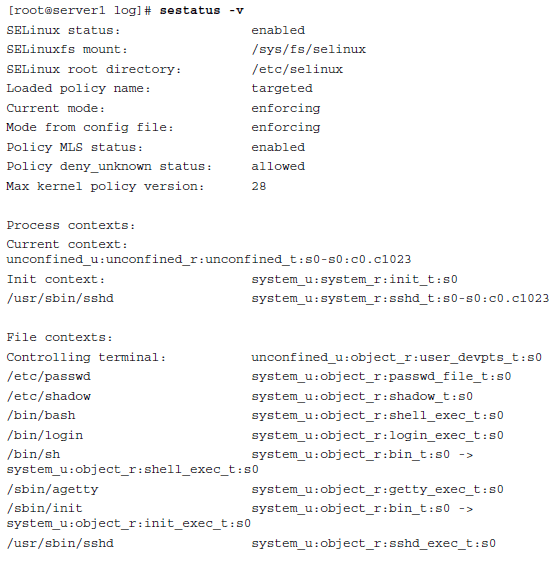
Another useful command is sestatus . If used with the option -v , this command shows detailed information about the current status of SELinux on a server.

Hope this was helpful in setting up and checking basic SELinux configurations. We guess you have insight on how to setup SELinux on a Linux server.

Rate this post

Thank you for reading this post. Kindly share it with others.

  • Share on X (Opens in new window) X
  • Share on Reddit (Opens in new window) Reddit
  • Share on LinkedIn (Opens in new window) LinkedIn
  • Share on Facebook (Opens in new window) Facebook
  • Share on Pinterest (Opens in new window) Pinterest
  • Share on Tumblr (Opens in new window) Tumblr
  • Share on Telegram (Opens in new window) Telegram
  • Share on WhatsApp (Opens in new window) WhatsApp
  • Share on Mastodon (Opens in new window) Mastodon
  • Share on Bluesky (Opens in new window) Bluesky
  • Share on Threads (Opens in new window) Threads
  • Share on Nextdoor (Opens in new window) Nextdoor
Linux

Post navigation

Previous Post: The service could not be started either because it is disabled or because it has no enabled devices associated with it
Next Post: How to remove an MDT Deployment Share

Related Posts

  • dfeef
    How to automatically resolve errors associated with failed dependencies Linux
  • PersonalHow to Create Symbolic Links in Linux
    All You Need to Know About Symbolic Links in Linux Linux
  • unionfsfeature
    How to Overlay two files with UnionFs in a Linux System Linux
  • FEATUREDC
    How to create Confidential VMs in Azure AWS/Azure/OpenShift
  • images copy
    How to clean packages lying around in Linux Linux
  • whois4578uh
    How to get Domain information using WHOIS Command in Linux Linux

More Related Articles

dfeef How to automatically resolve errors associated with failed dependencies Linux
PersonalHow to Create Symbolic Links in Linux All You Need to Know About Symbolic Links in Linux Linux
unionfsfeature How to Overlay two files with UnionFs in a Linux System Linux
FEATUREDC How to create Confidential VMs in Azure AWS/Azure/OpenShift
images copy How to clean packages lying around in Linux Linux
whois4578uh How to get Domain information using WHOIS Command in Linux Linux

Leave a Reply Cancel reply

You must be logged in to post a comment.

Microsoft MVP

VEEAMLEGEND

vexpert-badge-stars-5

Virtual Background

GoogleNews

Categories

veeaam100

Veeam Vanguard

  • HyperV VM disk size increase
    How to Increase Disk Size in Hyper-V Virtualization
  • plain blue background
    Request a certificate signing request in Windows using Microsoft Management Console Windows Server
  • Screenshot 2022 04 26 at 12.04.14
    Differences between Directory Services and Databases Windows
  • Veeam Backup for Microsoft Azure
    Set up Veeam Backup for Microsoft Azure AWS/Azure/OpenShift
  • maxresdefault
    Error 0x8007232B: Can’t activate Windows on this device as we can’t connect to your organization’s activation server Windows
  • Dockerxx1
    How to install and uninstall Docker Desktop on Windows 10 and Windows Server Containers
  • Create an S3 Bucket
    Backup Repository: How to Create Amazon S3 buckets AWS/Azure/OpenShift
  • Screenshot 2022 04 27 at 00.50.35
    How to create a BitLocker System Partition [Part 2] Windows

Subscribe to Blog via Email

Enter your email address to subscribe to this blog and receive notifications of new posts by email.

Join 1,814 other subscribers
  • RSS - Posts
  • RSS - Comments
  • About
  • Authors
  • Write for us
  • Advertise with us
  • General Terms and Conditions
  • Privacy policy
  • Feedly
  • Telegram
  • Youtube
  • Facebook
  • Instagram
  • LinkedIn
  • Tumblr
  • Pinterest
  • Twitter
  • mastodon

Tags

Active Directory Azure Bitlocker Microsoft Windows PowerShell WDS Windows 10 Windows 11 Windows Deployment Services Windows Server 2016

Copyright © 2025 TechDirectArchive


Loading Comments...
 

You must be logged in to post a comment.