A load balancer provides scale and availability by spreading incoming requests across multiple virtual machines within a load-balancing pool. It is also used to distribute traffic loads to backend virtual machines or virtual machine scale sets, by defining your own load balancing rules you can use a load balancer in a more flexible way. In this article, I will show you how to create a load balancer for Azure Stack Hub. Also, we shall show you how to create a pool of back-end servers and a load balancer to spread traffic across them. Moreover, the load balancer spreads traffic across two web servers. Also, you can refer to some of the related guides: How to install and configure Ansible on Ubuntu, and how to install Ansible on Windows with Cygwin.
Here are some interesting articles: Setup Public Load Balancer in Azure, How to Configure Network Load Balancing In Windows Server, How to disable power plan in Windows via GPO and Windows Settings, How to Configure Network Load Balancing In Windows Server, and How to Deploy a load balancer from scratch and adding backend servers.
Create an Azure Load Balancer
Before creating a load balancer, understand that it is either create an internal load balancer or an external load balancer. Whereas, An internal load balancer can only be from accessed private resources that are internal to the network. While An external load balancer can route traffic from the public to internal resources.
- Log In to your Azure Portal
- In the Azure portal, go to the resource group that contains the virtual machines.
- In the favorites panel, select Create a resource.
- In the New blade, select Networking.
- In the Featured section, select Load Balancer.
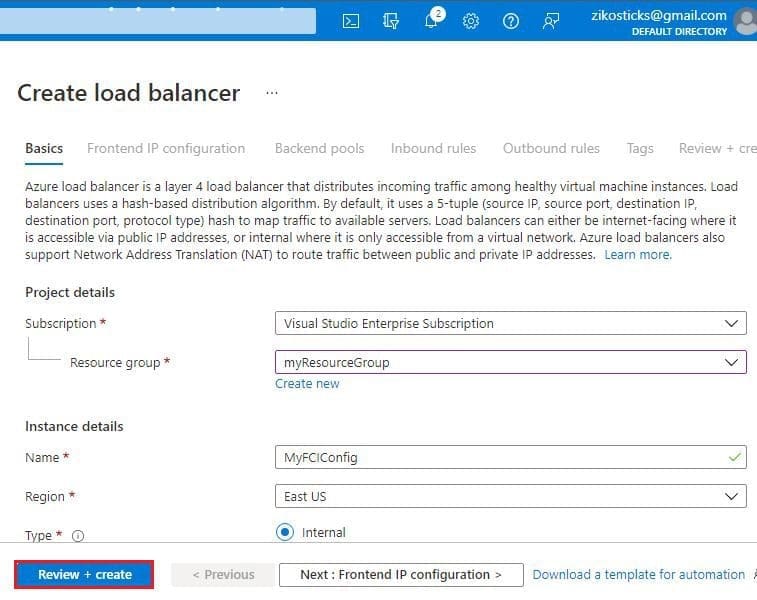
- In the Create load balancer blade, enter the following information below:
- Click Review + create, then click Create on the review blade.
Subscription - Your Azure subscription.

Resource group - The resource group that contains your virtual machines.

Name - A name that identifies the load balancer.

Region - The Azure location that contains your virtual machines.

Type - Either public or private. A private load balancer can be accessed from within the virtual network. Most Azure applications can use a private load balancer. If your application needs access to SQL Server directly over the internet, use a public load balancer.

SKU - Standard.

Virtual network - The same network as the virtual machines.

IP address assignment - Static.

Private IP address - The IP address that you assigned to the clustered network resource.
Kindly enter the following information in the Window below.
Create back-end servers
In this section, we’ll create a virtual network and two virtual machines which exist on this network. This will form the back-end pool of the load balancer.
Please see how to automate infrastructure deployments in the cloud with ansible and azure pipelines, how to install Kerberos packages in Windows via Cygwin, how to configure a remote server (windows) to Support Ansible, and how to deploy azure vmware solution private cloud.
Create a virtual network
Azure Virtual Network (VNet) is the fundamental building block for your private network in Azure. VNet enables many types of Azure resources, such as Azure Virtual Machines (VM), to securely communicate with each other, the internet, and on-premises networks.
VNet is similar to a traditional network in that you’d operate in your own data center but brings with it additional benefits of Azure’s infrastructure such as scale, availability, and isolation.
- In the favorites panel on the Azure Portal Environment, select Create a resource.
- In the New blade, select Networking.
- In the Featured section, select Virtual network.
- In the Create virtual network blade, enter the following information below:
Subscription - Your Azure subscription.

Resource group - Select an existing resource group, or create a new one by clicking the Create new link and then typing a name for your new resource group in the pop out window.

Name - The name of the virtual network.

Region - Select your preferred Region, which is the location of the Azure Stack Hub.

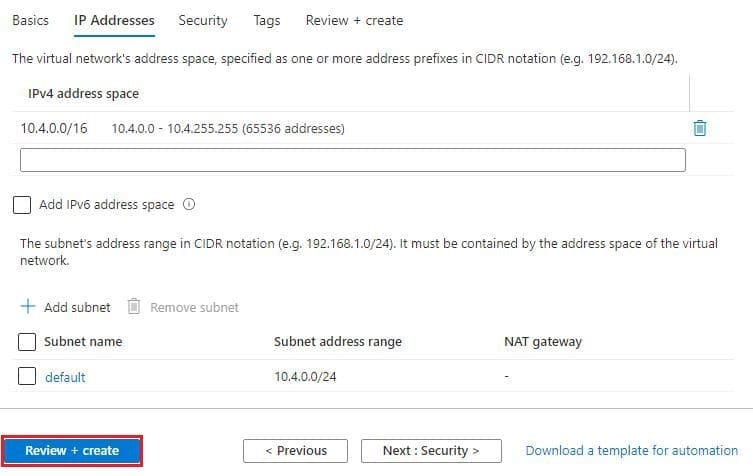
IP Addresses Tab

IPv4 address space - The virtual network's address range in CIDR notation (for example, 192.168.1.0/16).

Subnet name - The name of the first subnet within the virtual network.

Subnet address range - The subnet's address range in CIDR notation (for example, 192.168.1.0/24). It must be contained by the address space of the virtual network. The address range of a subnet which is in use can't be edited.
Click Review + create, then click Create on the review blade.
Create the virtual machines
In the favorites panel, select Create a resource. In the New blade, select Compute. In the Compute blade, select the template that you want to use for your VM. Please see how to create a Windows firewall rule on Windows, and how To Configure VM Update Management on Azure Stack Hub.
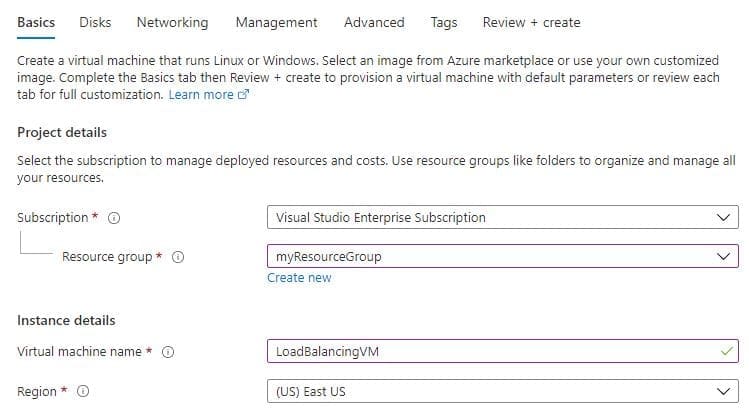
In the Create virtual machine blade, in the Basics step, enter general information about the VM, including a name, credentials, and resource group.
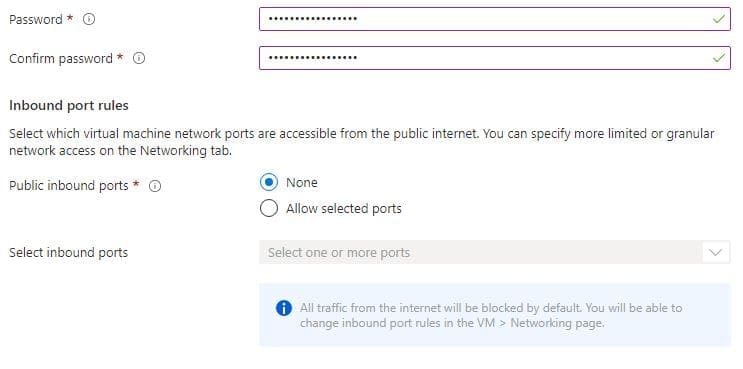
Please populate the Availability options, select the right image and the Administrator account as shown below.
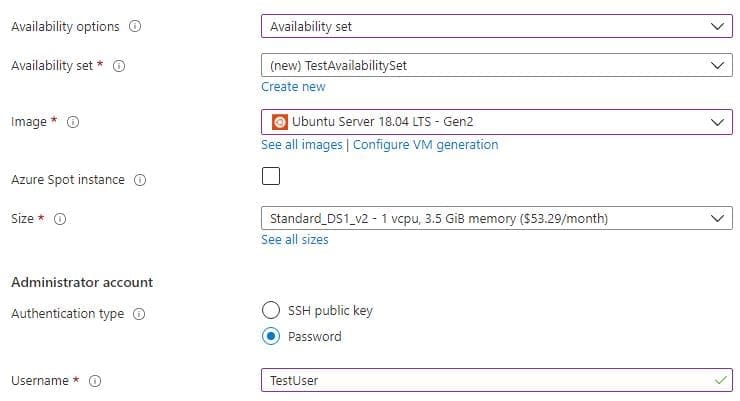
Do not forget to enter your password and the Public inbound port.
After completing the information on the Basics tab, select the Networking tab. Ensure that the Virtual Network and Subnet you created earlier are selected, then click Review + create

In the Review + Create step, review the selections you’ve made and then click Create to start the deployment. Create another VM, ensuring that the Availability set, Virtual network, Subnet and Network Security Group are the same.
Create network security group rules
In this section I’ll be showing you how to create network security group (NSG) rules to allow inbound traffic.
- Navigate to your network security group by clicking All Services in the favorites panel, then selecting Network security groups under the Networking section.
- Select the network security group your VMs are using from the list.
- In the blade for your network security group, select Inbound security rules under the Settings section.
- Click the Add button.
- In the Add inbound security rule blade, enter the following information as shown below:
Source - The source filter can be Any, an IP address range, or a default tag. It specifies the incoming traffic from a specific source IP address range that will be allowed or denied by this rule.

Source port ranges - Provide a single port, such as 80; a port range, such as 1024-65535; or a comma-separated list of single ports and/or port ranges, such as 80,1024-65535. This specifies which ports traffic will be allowed or denied by this rule. Use an asterisk (*) to allow traffic on any port.

Destination - The destination filter can be Any, an IP address range, or a default tag. It specifies the outgoing traffic for a specific destination IP address range that will be allowed or denied by this rule.

Destination port ranges - Provide a single port, such as 80; a port range, such as 1024-65535; or a comma-separated list of single ports and/or port ranges, such as 80,1024-65535. This specifies which ports traffic will be allowed or denied by this rule. Use an asterisk (*) to allow traffic on any port.

Protocol - Select whether to allow inbound traffic using UDP, TCP or both.

Action - Select whether the rule allows or denies the traffic specified.

Priority - Rules are processed in priority order; the lower the number, the higher the priority. We recommend leaving gaps between rule priority numbers, for example, 100, 200, 300, so that it's easier to add new rules without having to edit existing rules.

Name - The name of the security rule.

Description - A description of the security rule.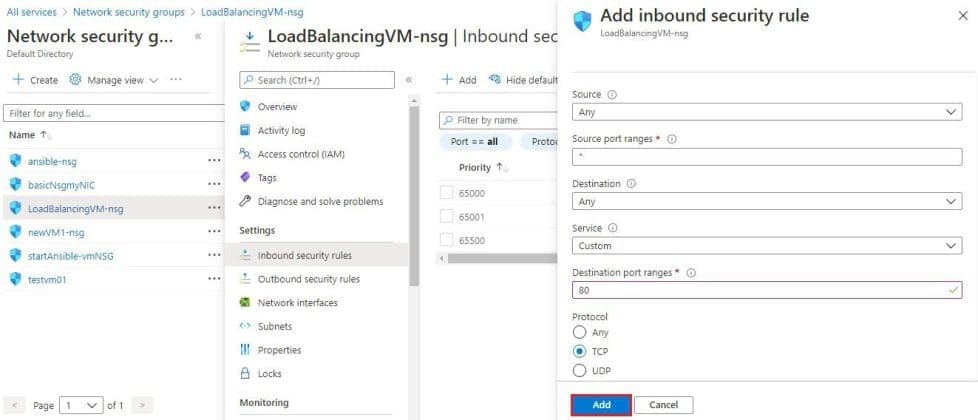
Click Add.
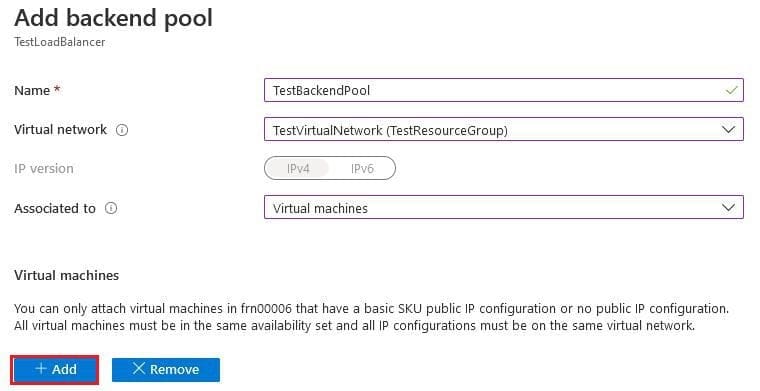
Create a back-end address pool in Azure
In order to spread traffic load across the VMs, you must create a back-end address pool. This pool contains the IP addresses of the VMs.
- Navigate to your load balancer by clicking All services in the favorites panel, then selecting Load balancers under the Networking section.
- From the list, select the load balancer you created earlier.
- In the blade for your load balancer, select Backend pools under the Settings section.
- Click the Add button.
- In the Add backend pool blade, enter a name for the backend pool.
- Select the virtual network you created earlier.
- Select Virtual machines for the Associated to option.
- Click the Add button in the Virtual machines section.
- In the Add virtual machines to backend pool blade, select the two virtual machines you created earlier and click Add.
Click the Add button at the bottom of the Add backend pool blade.
Create a health probe
Understand that when creating a load balancer, you can use a health probe to monitor the status of your application. In Azure Stack Hub, the health probe adds and removes VMs from the load balancer back-end pool based on their current status.
- Navigate to your load balancer by clicking All services in the favorites panel, then selecting Load balancers under the Networking section.
- From the list, select the load balancer you created earlier.
- In the blade for your load balancer, select Health Probes under the Settings section.
- Click the Add button.
- In the Add health probe blade, enter the following information as shown below:
Name - The name of your health probe.

Protocol - The protocol that the health probe uses to monitor the status of your VMs.

Port - The port that the health probe uses to monitor the status of your VMs.

Interval - The number of seconds between probe attempts.

Unhealthy threshold - The number of consecutive probe failures that must occur before a virtual machine is considered unhealthy and is removed from the pool.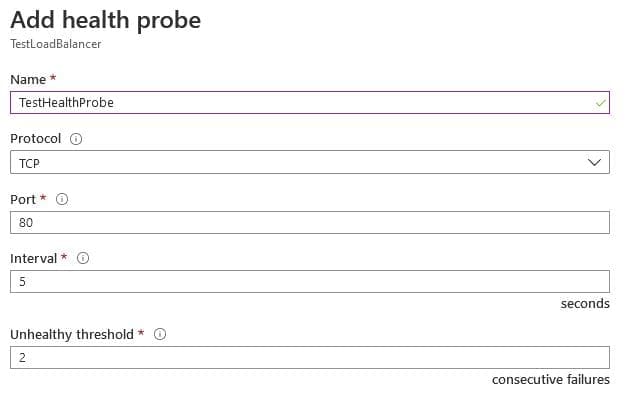
Then Click OK.
Create a load-balancing rule
A load balancer rule defines how traffic is distributed between VMs. The rule listens for traffic on a front-end IP address, then distributes it among the back-end pool.
- Navigate to your load balancer by clicking on All services in the favorites panel, then selecting Load balancers under the Networking section.
- From the list, select the load balancer you created earlier.
- In the blade for your load balancer, select Load balancing rules under the Settings section.
- Click the Add button.
- In the Add load balancing rule blade, enter the following information as shown below:
Name - The name of your load balancing rule.

Frontend IP address - Clients communicating with this load balancer on the selected IP address and service will have their traffic routed to the target virtual machine by this NAT rule.

Protocol - The protocol that the rule redirects traffic for.

Port - The front-end port that the rule listens on.

Backend port - You can choose to route traffic to the virtual machines in the back-end pool using a different port than the one clients use to communicate with the load balancer.

Backend pool - The virtual machines in the selected back-end pool will be the target for the load-balanced traffic of this rule. Select the pool that you created in the previous section.

Health probe - The selected probe is used by this rule to determine which virtual machines in the back-end pool are healthy and can receive load-balanced traffic. Select the probe that you created in the previous section.

Session persistence - Session persistence specifies that traffic from a client should be handled by the same virtual machine in the back-end pool for the duration of a session.

       - None specifies that successive requests from the same client may be handled by      any virtual machine.

       - Client IP specifies that successive requests from the same client IP address will be handled by the same virtual machine.

       - Client IP and protocol specifies that successive requests from the same client IP address and protocol combination will be handled by the same virtual machine.

Idle timeout (minutes) - Keep a TCP or HTTP connection open without relying on clients to send keep-alive messages.

Floating IP (direct server return) - Can be enabled to change the IP address mapping scheme to allow for additional flexibility.
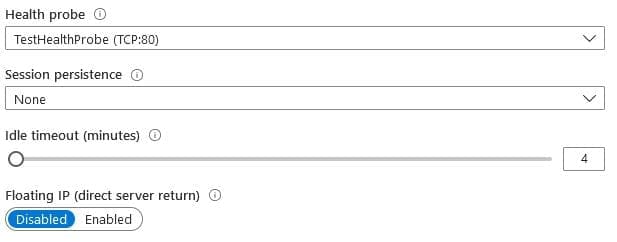
Then Click OK.
Test the load balancer
After installing the load balancer application on each of the VMs, then the load balancer is ready to test.
- Navigate to the load balancer you created by clicking All services in the favorites panel, then selecting Load balancers under the Networking section.
- From the list, select the load balancer you created earlier.
- Then copy the Public IP address from the Overview section.
- Test the connection to your application. Let’s say for instance, if the application is a web server application, copy and paste the public IP into the address bar of your browser. The home page of the web server should be displayed.
This article provided a step-by-step overview of How to create a load balancer for Azure Stack Hub. We also created a back-end server, also tested the load balancer we have deployed.