
Windows 10 is best for the productivity of any level and as such to improve your PC’s performance and to keep it free from junk or unwanted files and folders, you need to regularly clear various caches on your PC. Cache files are the temporary files created by various apps and services. Clearing these files usually doesn’t cause any issues with your apps, as your apps will recreate them whenever they need. You may ask, how do I clear cache on my Windows 10? If this sounds like your question, then this post is the right one for you. Firstly, before we move on one thing we need to understand is Windows 10 is still in wider use by individuals and organizations despite the official release of Windows 11 in September 2021 and will continue till the end of its extended support in 2025 by Microsoft.
To give answers to the above question, working with a PC that has low performance in terms of speed can make your job more monotonous which can be tiring at times thereby leading to employees' apathy towards their job as well as remaining detached from their co-workers. Of course, when employees start developing some level of apathy towards their job, they typically become uninterested in everything having to do with their workplace, except making money and going home 😀In this post, you will learn about the different ways to clear the cache on Windows 10 and make your PC run faster again in terms of performance and speed in 6 different methods. To fully understand the various methods we are about to show you, you need to grab your PC and be applying the steps in this post as you’re reading it.
You may be interested in the following related posts:
- How to create and configure a Shared Folder on Windows Server
- Network File System: How to install NFS Server on Windows Server
- How to block upgrade to Windows 11 through Local Group Policy or Registry Editor from Windows 10
- How to upgrade Windows 10 with an unsupported CPU and TPM 1.0 to Windows 11
Different Methods of Clearing Cache on Windows 10
Method One – Clear Windows 10 Cache Using Disk Cleanup
Disk Cleanup being a software utility first introduced by Microsoft in their Windows 98 version and included in all subsequent releases of Windows, aallows users to remove files that are no longer needed or that can be safely deleted. Removing unnecessary files, including temporary files, helps speed up and improve the performance of the hard drive and that of your PC in general. It is advisable that you run Disk Cleanup at least once a month. This is considered as an excellent maintenance task to do in order to keep your PC at its best performance and speed. By using the Disk Cleanup Utility, the user can clear various types of cache files in the system.
Follow the below instructions to proceed.
- From the search bar, search for
disk cleanuporcleanmgr.exeand press enter to open it. - Now, select the drive you want to clean up that is if you have more than one drive partition. In my case, I have only the C: drive. So, running the
cleanmgr.execommand opens up my C: drive straight up (see the screenshots below)
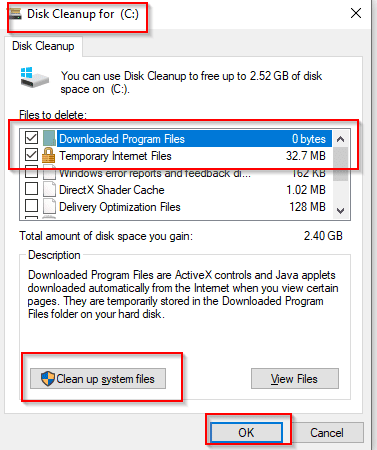
From the above screenshot, you can scroll down to select other folders and files such as the Recycle Bin, Temporary files, and Thumbnails to clean up (see the second screenshot below). When you’re done selecting them, click on clean up system files.

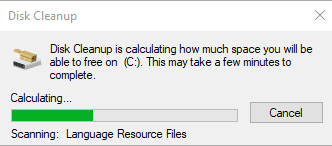
From the above clicking, the clean up system files will give a dialog box similar to the one below here.
Immediately after this, click “OK”. You will be queried if you’re sure you want to permanently delete these files, click Ok

Method Two – Clear Windows Store Cache
This creates temporary files when you are downloading the apps. If there is a problem with the store, clear the store cache. Follow the given below instructions to proceed.
Step 1 From the Start menu, open the Run dialog box or you can press the “Window + R” key to open the RUN window. In the Run Window, type wsreset.exe and press the enter key.
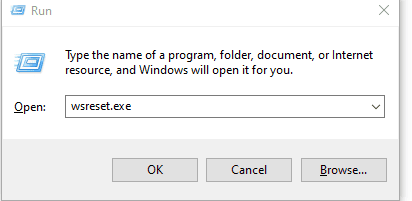
Executing this action clears the Windows store cache, revealing the Store once the process concludes.


Method Three – Deleting the prefetch Files in Windows 10
Prefetch Files is a feature of Windows 10 that was introduced by Microsoft in Windows XP. It is used to speed up the Windows boot process and shorten the amount of time it takes to startup programs. It is a component of the Memory Manager. If your system is infected with viruses or malware and if you want to free up some space in your system then you can delete the prefetch files. But remember, it will slow down your next boots.
The below instructions will get you started with it
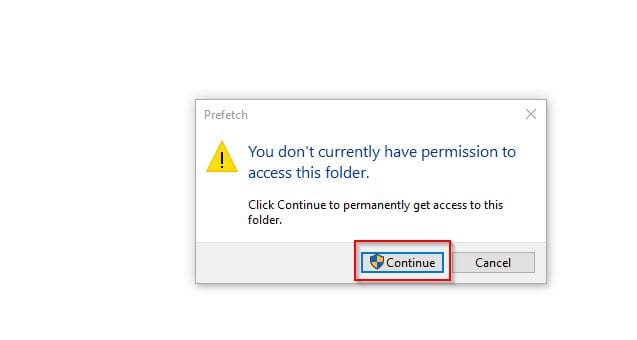
- From the Start menu, open the Run dialog box or press the
Window + Rkey to open theRUNwindow. - Next, type “prefetch” and press the enter key. You will be given a prompt similar to the screenshot below. Click on continue to carry out the action.

Now, you can delete all the files by selecting them.
Method Four – Clear DNS Cache in Windows 10
DNS Cache is the temporary storage area maintained by a system that records all your visits to the system and web browser. DNS Cache also stores the IP addresses of every website you visited.
To get it cleared, follow the below instructions to proceed.
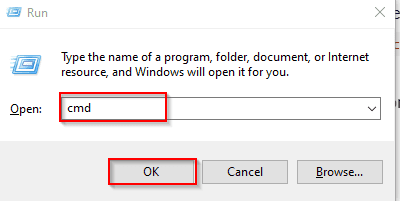
- Open Command Prompt. From the Start menu, open the Run dialog box or press the
Window + Rkey to open theRunwindow, then type incmdin theRuncommand dialog box and press the enter to open command prompt window
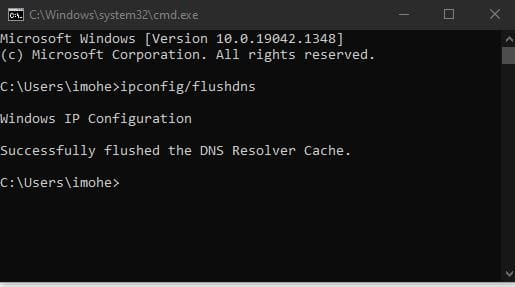
2. Type the ipconfig/flushdnscommand in the command prompt window and press the enter key.
Note: You can also check the DNS Cache by typing the ipconfig/displaydns command in Command Prompt (CMD)Method Five – Clear All Temporary Files in Windows 10
Temporary files are created by the operating system when the user is performing a task. But, when the temporary files are created in a large number in the system, they are responsible for making the PC slow down. By getting rid of the temporary files and folders, you can give your PC quite a significant amount of free space and enhance the speed and performance of the operating system.
The users can delete the temporary files and folders by using various in-built tools such as the Disk Management tool and the Disk Cleanup tool or by simply launching the Run window and typing in the %temp% command and pressing the enter key. Using the Disk Clean Up tool has been described in method 1 above.
To clear the temporary files using the %temp% command, follow the below instructions.
- Press the Windows + R key to open the Run window
- Next, type the %temp% command in the Run dialog box and press the enter key (see the screenshot below)

Pressing enter at this stage will open up the directory where all the temporary files are stored.

From the screenshot above, you can see that I have up to 542 items in the temp files folder. Next, is to highlight everything and press the delete key to delete everything.
Note: If you have any active program that is currently runing on your system, it will give a prompt that the action can't be completed because the folder or a file in it is open in another program. See screenshot below.
You can check the “Do this for all current items and click on skip or cancel to suspend the action for a later time when the open files and folders have been closed.
Method Six – Clear Web Browser Cache in Windows 10
The last step in our series is to clear the web browser cache. As many of us are already aware that some cached files are being created when we browse the internet. You can easily clear all these cache files stored in your web browser. Follow the below instructions to proceed.
Open the Web Browser that you want like Microsoft Edge or Google Chrome or Operamini.
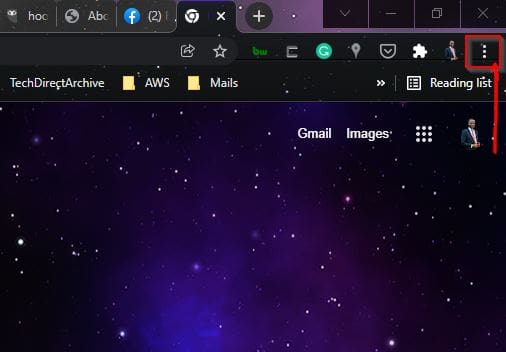
In the top-right corner, click on the Customize and control Google Chrome option indicated by 3-dots and then select More Tools -> Clear browsing data.

Alternatively, you can press the Ctrl + Shift + Delete key to open the Clear browsing data window directly (see screenshot below). Using the Ctrl + Shift + Delete applies to all other browsers apart from Google Chrome.

Ctrl + Shift + Delete Opens up the clear browsing data.In conclusion, the point stated above can be term as little things that matter as ignoring them can make your system slow down such that it will impact your productivity level negatively. So, it’s necessary to carry out these steps as part of your PC routine maintenance once in a while so as to keep your PC at its optimum performance and speed.


In the case of browsing, clearing the browser is a critical step in practically any troubleshooting process. But first, let us define the browser cache and explain how it works. Online browser cache, on the other hand, keeps information on your browser for the purpose of storing web pages, photos, and other web information. Clearing browsing data from your web browser can improve the quality of your surfing experience, whether it’s due to connection difficulties or slow page loading. As a result, you must understand how to delete browsing data from your internet browser. This post will go through how to remove browser cache and cookies for various browsers.