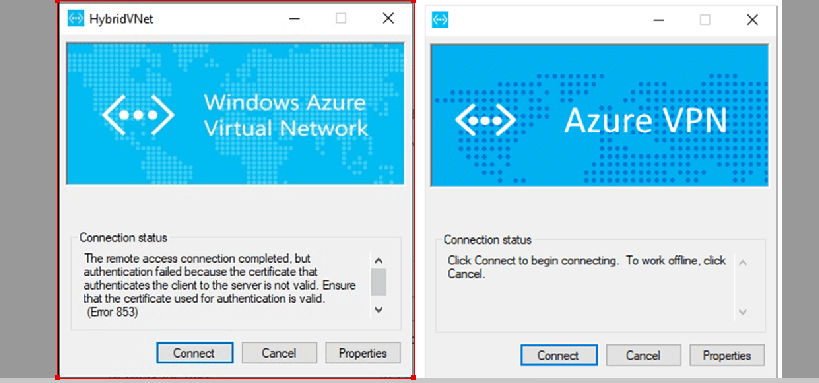
Every computer that you connect to a Virtual Network with a Point-to-Site connection must have a client certificate installed. All what is required is just to generate it from the root certificate and install it on each computer and make sure it is valid client certificate, if not the authentication will fail when the computer tries to connect to the Virtual Network and you will get this error “The remote access connection completed, but authentication failed because the certificate that authenticates the client to the server is not valid. Ensure that the certificate used for authentication is valid. (Error 853)”. I will show you how to fix this Error 853 below.

For more related Windows Operating System errors you can read this: How to Resolve Microsoft RDP Connection Black Screen, How to Fix “Insufficient System Resources Exist to Complete the Requested Service” error,.
Generate a unique certificate for your workstations
When fixing connection error 853, you should note that it is possible to generate a unique certificate for each workstation or generate the same certificate for all the workstations. The benefit of generating the same certificate is the ability to be able to revoke any certificate you decide to revoke.
But when multiple workstations use the certificate for authentication, then each time you revoke a certificate you will need to generate a new certificate and start installing on each workstation again.
Generate your certificate by following these methods:
- Enterprise certificate:
- Generate a client certificate with the common name like
tech@yourdomain.com. This format is better than the domain name\username format. - Confirm the client certificate is based on a user certificate template with Client Authentication in the user list.
- Self-signed root certificate:
After generating a certificate from a self-signed root certificate, it’s automatically installed on the generating workstation. However, keep in mind that if you plan to install the certificate on a different computer, exporting it as a .pfx file is necessary.
This file should also encompass the entire certificate chain. By performing this action, you’ll be able to generate a .pfx file containing essential root certificate data for computer authentication.
Point-to-site configuration
In this guide, we will be demonstrating how to generate a compatible certificate that you can export, distribute and install on all computers.
As soon as the virtual network gateway is established, proceed to the Point-to-site configuration. Click “Configure now” for the configuration page.
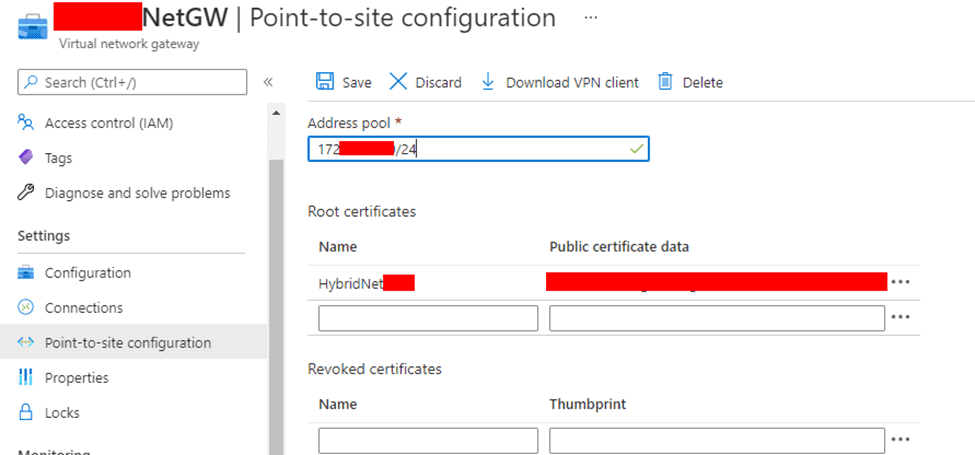
In the Address pool box, add the private IP address range that you want to make use for your connectivity. VPN clients dynamically receive an IP address from the range of IP’s that you already specify here.
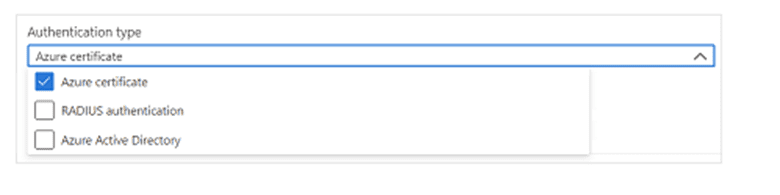
Continue to the next part of configuration which is the authentication and tunnel types. Here you specify the tunnel type and the authentication type. Note that if the Point-to-site configuration page lacks tunnel or authentication types, your gateway employs the Basic SKU.
The Basic SKU does not support IKEv2 or RADIUS authentication. However, opting for these settings requires deleting the current gateway and setting up a new one with an alternative SKU.
Select Azure certificate as your authentication type
Upload Root Certificate Public key to Azure
The next thing is to upload a root certificate public key information to Azure. This authenticates computers that have installed certificates generated from the trusted root certificate.
Now move to the Root certificate section of the Point-to-site configuration page. This section is only visible if you have selected Azure certificate for the authentication type.
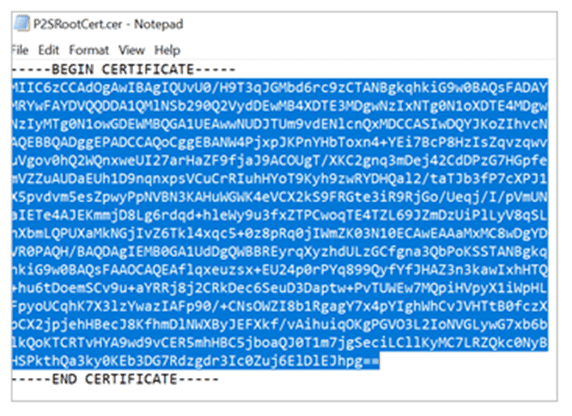
Verify the export of the root certificate as a Base-64 encoded X.509 (.CER) file. The reason for this is because you will be able to open the certificate with any text editor, there is no need for exporting the private key.
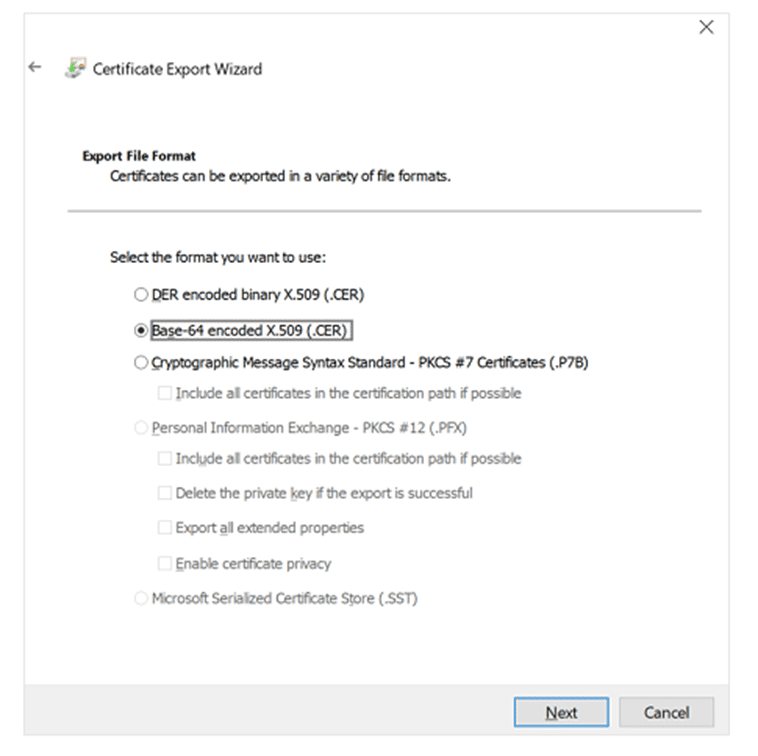
You can open the certificate with a text editor like notepad and by the time you are copying the certificate confirm that you copy the text without any line feeds.
In the Root certificate section, it is very possible you add up to 20 trusted root certificates.
- Paste the certificate data into the Public certificate data field.
- Give the certificate a Name.

Click Save to save all configuration settings.

Install Exported Certificate
Another thing we are looking at is installing exported client certificates. Let us assume you want to create a point-to-site (P2S) connection from a computer that was not used to generate the certificate then it is a must that you have to install the exported certificate on the computer before P2S connection can be possible. But while installing the certificate you will need the password that was created while exporting the client certificate.
Always confirm that the client certificate was exported as a .pfx with the entire certificate chain. If this confirmation is not done then the root certificate information will not be complete or present on the client’s computer and the client won’t be able to authenticate properly.
Please see How to fix the issue “The Security Database on the Server does not have a Computer Account for this Workstation Trust Relationship” on Windows Server [Part 2], and How to Quickly Fix Windows Search Bar Not Working.
Configuring settings for VPN clients
For connection to the virtual network gateway via P2S to be possible then each computer will make use of the VPN client which is part of the Windows operating system programs.
To access this VPN service just type VPN in the search box, this will display the VPN setting where you carry out your VPN connection. Installing a separate VPN client isn’t necessary; simply configure each VPN client using a client configuration package. This client configuration package is unique in the sense that it only contains settings that are specific to the VPN gateway that you created on Azure.
You can as well generate and download VPN client configuration files, then install them on the computer. After the installation, you can then go ahead to connect to Azure.
Also, see Windows Out Of Box Experience: OOBESETTINGSMULTIPLEPAGE error on Windows 10, and Windows cannot connect to the printer: Operation Failed with error 0x000004f8.
How to connect from a Windows VPN client
Navigate to VPN settings on your computer and select the VPN connection that you created through the VPN client configuration that you downloaded and installed.
On the Connection status page, click Connect to start the connection. You will see a message about “connection manager needs elevated privilege” you can just click continue.
If you see a Select Certificate screen, confirm that the client certificate displaying is the one that you need to connect. If it is not, use the drop-down arrow to select the correct certificate, and then select OK.
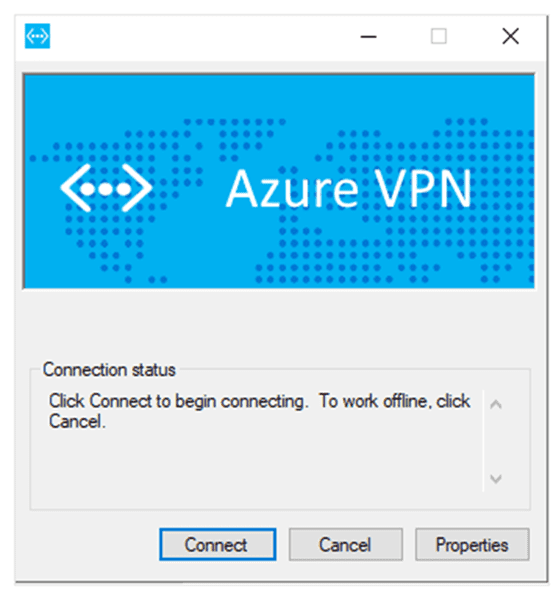
Connection Error 853 has now been fixed because the correct certificate was installed and selected then the P2S connection will be successfully established.

I hope you found this blog post on How to Fix Error 853: The remote access connection completed, but authentication failed because the certificate that authenticates the client to the server is not valid. Ensure that the certificate used for authentication is valid. (Error 853). very interesting and helpful.
In case you have any questions do not hesitate to ask in the comment section.