How to sync S3 Bucket with an EC2 instance

It’s another time to discuss in detail the Amazon Elastic Compute Cloud (Amazon EC2) and AWS’s popular storage service, Amazon Simple Storage Service (Amazon S3). This post is focused on how to sync up data in an EC2 instance with an Amazon S3 Bucket. At the end of reading this article, you will have a better understanding of Amazon EC2, Amazon S3, and S3 buckets and the sync command. Please see how to deploy an Angular App to AWS S3 and how to redirect requests for your bucket’s website endpoint to another bucket or domain.
For the sake of those just getting started with AWS Cloud or those who have just recently been introduced to Amazon EC2 and S3, we will spare a few minutes to explain the meaning of these two resources (EC2 and S3).
Before moving forward, you may want to look at the following articles: How to integrate AWS CodeBuild and AWS CodeCommit to SonarCloud, and how to deploy a React Application to AWS S3,
What is Amazon EC2?
AWS EC2 is a web service that provides secure and resizable compute capacity in the cloud. It can be used to launch as many virtual servers as we need. For each virtual server launched from an Amazon EC2, we have what is known as an Amazon EC2 Instance. The purpose of EC2 is to provide you with scalable computing power.
Using Amazon EC2 reduces the requirement for upfront hardware investment, allowing you to develop and deploy apps more quickly. Creating an Amazon Machine Image (AMI), which comprises an operating system, apps, and configurations, is the first step in the EC2 setup process.
That AMI is uploaded to Amazon Simple Storage Service (S3) and registered with EC2, allowing you to launch virtual machines whenever you need them. For example, EC2 instances are regional.
This doesn’t mean that applications hosted in one region cannot communicate with others in another region. Through Internet Gateway, applications hosted on an EC2 instance from one region can be exposed to the public Internet. This way, even if your app is hosted in the Asia-Pacific region, it will be accessible from anywhere.
Simply put, an EC2 is a virtual machine that replicates a physical server on which you can run your applications. Rather than acquiring and deploying your hardware, Amazon provides you with practically unlimited virtual machines on which to execute your apps while they handle the underlying hardware.What is Amazon S3?
Amazon S3, on the other hand, is a simple storage service provided by Amazon Web Services. Using Amazon S3, you can store and retrieve any amount of data at any time on the web. Amazon states, “Amazon S3 is object storage designed for storing and retrieving any volume of data from any location.”
It provides industry-leading durability, availability, performance, security, and nearly unlimited scalability at minimal costs. It is an object storage service that stores data in buckets as objects. A file and any metadata that describes the file are considered objects.
A bucket is a container that holds objects. To store data in Amazon S3, you must first create a bucket and specify a unique bucket name as well as an AWS region. With that said, AWS S3 stands as a global service on the AWS Cloud.
Therefore, you must specify a unique name for your bucket. In addition, to meet the recommended security requirements for the S3 bucket, there must be a bucket policy in place to help control public access to the bucket.
An S3 bucket policy is a type of object that lets you control who has access to which Amazon S3 storage resources. To approve or prohibit actions requested by a principal, you can specify permissions for each resource.A Snapshot of the Steps Required
Create an AWS S3 Bucket, create an EC2 Instance and then sync up with an S3 bucket from an EC2 instance.
Prerequisite
To follow along without missing a step in this post, you need to have an active AWS account with access to the AWS Management Console. If you lack an active AWS account with a subscription, Amazon enables you to benefit from the cost-free AWS Free-Tier usage.
If the above prerequisites are in place, proceed with me to the steps below:
Step 1: Create an AWS S3 bucket to sync with an EC2 instance
To achieve this, sign in to the AWS Management Console as either a root user or an IAM user, or sign up for an AWS account if you’re a new user.
Note: A root user is one identity that has complete access to all AWS services and resources in the account. A root user's access cannot be controlled, but with an IAM user you can securely control user access to AWS services and resources in your AWS account. For instance, if you need administrator-level access, you can create an IAM user for that purpose. An IAM user is a user within an account that performs daily tasks.
Let’s assume you’re on the page as shown above and have logged in or signed up accordingly. Now it’s time to create an S3 bucket.
Navigate to S3
To do so, search for and click on S3 from the horizontal search bar at the top of the AWS Management Console. At times, it will appear in the list of recently accessed services.

Click on it to take you to the S3 Console, as shown below:

Create a bucket
Take note that the top right corner of the S3 dashboard labels it as “Global.” This confirms that S3 is a global service in the AWS Cloud. Here, what you need to do is to create a bucket.
Click on "Create bucket". You can click either the upper button highlighted in yellow or the button below.

Give your bucket a unique name and pick your desired AWS region from the drop-down list. Here we have chosen the US East (Ohio) us-east-2 as the location and named our bucket "techda-bucket1".
In the process of creating the bucket, there are many other settings aside from the name and the location that you can modify depending on your needs. Such settings include Object Ownership and Block Public Access settings for this bucket (here, blocking all public access will not allow any access to the bucket).
You can uncheck the “Block Public Access settings” to make access to the bucket open depending on your needs. Review this article to learn how to set a policy to allow public access to the S3 bucket.
After you have checked all the settings and confirmed that they are the settings you want, go ahead and click "Create bucket" using the button at the end of the Create bucket page.

Create a folder
Once you’ve successfully created the bucket, double-click it, and then click “Create folder.” Give a name to the folder as desired.

Once you save the folder, the path will look like this and the folder will be empty because we’re yet to sync up the bucket with the EC2 instance.

Step 2 – Create an EC2 Instance to sync with an S3 Bucket
Next is to create an EC2 instance. Search for and click on EC2 from the horizontal search bar on top of the AWS Management Console.

Launch the instance
Double-click to open the EC2 dashboard, scroll down and click on the "launch instance" button.

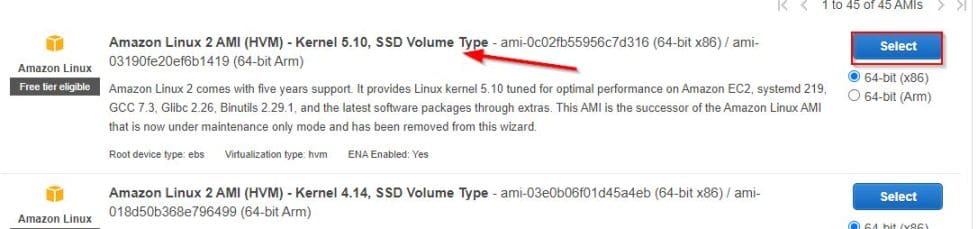
Choose an AMI
Next, choose an Amazon Machine Image (AMI). Here I have chosen an Amazon Linux Machine and will log on to the machine once the instance is up.
Connect to Web Console
Now that the instance is up, I will connect to it using the web console.

Now it’s time to sync up the S3 bucket with the EC2 instance. This takes us to the last step.
Step 4-Sync up the S3 bucket with the EC2 instance
The last step is to sync up the S3 bucket with the EC2 instance.
If you are an IAM user, run the aws configure command and type in the access key ID and secret access key provided to you when your IAM account was created, as well as the location and the output format as JSON.

Install the HTTPD service in the EC2 instance, and make sure you are logged in as the root account.

sudo -i -   Change to the root account from the normal user.
yum install httpd - To install the HTTPD service
Once the execution is complete, create an index.html file as shown below.

cd /var/www/html   - Specifies the path
touch index.html  -  Create an index.html file
echo “Hello World! Welcome back” >index.html   - Print a string and save to the index.html file
cat index.html  -  Display the content of index.html file
Now to sync up the S3 bucket with the EC2 instance, type:
aws s3 sync /var/www/html/ s3://your-bucket-name/folder-nameMake sure you enter the right bucket and folder name. Here our command will look like this:
aws s3 sync /var/www/html/ s3://techda-bucket1/Ec2InstancSync
Below is an explanation of the sync command:
aws s3 sync  -    To sync
/var/www/html/  - Path where the file is placed in EC2 Instance
s3://your-bucket-name/folder  - Path where to Sync in S3 bucket
Go back and refresh the folder page with the S3 bucket to observe the synced ‘index.htm’ file.

Congrats, you have successfully synced up to your S3 but with an EC2 Instance!


