
In this article, you will learn how to grant public access to S3 Bucket using Policy. This means you will be acquainted with the steps to generate and add a bucket policy to an Amazon S3 bucket to grant public access to any data stored on it, but first, let’s take a look at what Amazon S3 is all about. Please see How to sync S3 Bucket with an EC2 instance, Hosting Static Website and Versioning on AWS S3, and How to delete AWS S3 Bucket and Objects via AWS CLI from Linux.
What is Amazon S3?
Amazon S3, also known as Amazon Simple Storage Service, is a service provided by Amazon Web Services that offers object storage via a web service interface. It is one of the most popular storage solutions when compared to file and block storage solutions such as Amazon Elastic File System (EFS) and Amazon Elastic Block Stores (EBS).
When we talk about an object storage solution with industry-leading scalability, availability, and security that allows you to store and retrieve any amount of data from any location, we are simply referring to Amazon S3.
All data stored on the S3 storage solution are stored in a component known as an S3 Bucket. Also, see how to enable Amazon S3 default bucket encryption using S3 Console.
S3 Bucket policy
By default, Amazon S3 blocks all public access to data stored in the S3 bucket. This means that access to an S3 bucket’s data is restricted. However, you can grant public access by adding a policy – known as an S3 Bucket Policy.
But why is a bucket policy necessary? Well, it’s essential to provide multiple users with access to a bucket. Moreover, it allows you to control account access for reading and uploading files.
In situations involving critical data, implementing a bucket policy can prevent users from unauthorized additions or removals of buckets.
You may also be interested in reading these related articles: How to integrate AWS CodeBuild and AWS CodeCommit to SonarCloud, How to deploy a React Application to AWS S3, How to deploy an Angular App to AWS S3 and How to redirect requests for your bucket’s website endpoint to another bucket or domain
An S3 bucket policy is a type of object that allows you to control who has access to specific Amazon S3 storage resources. Note: You should only do this on selected occasions or based on a special request authorized by your organization, as granting access to the S3 bucket with critical data can expose your data to the public, which can also be subject to abuse. Therefore, you should only grant access to temporary data that you know needs public access!
Prerequisite to accessing S3 Bucket
To follow along without missing a step in this post, you need to have an active AWS account with access to the AWS Management Console. If you don’t have an active AWS account with a subscription, Amazon has made it very easy for you as you can enjoy the AWS Free-Tier without being charged.
If the above requirements are in place, proceed with me to the next steps below:
Step 1: Sign in to your AWS Management Console
To get started, sign in to the AWS Management Console as either a root user or an IAM user, or sign up for an AWS Free account if you’re a new user.

Step 2: Select S3 in your Console
Search for and click on S3 using the horizontal search bar on the AWS Management Console

Step 3: Create the S3 Bucket you want to grant public access to
When you click on the S3, you will be taken to the console. In the S3 Console, click on “Create bucket” as shown below:

Step 3: Give your S3 Bucket a unique name
Next, give your bucket a unique name and proceed to supply other information.
Note: Because S3 is a global service on the AWS Cloud, your bucket name must be unique and must not already be taken. It must not also contain a special character like an underscore (_).Step 4: Uncheck “Block all public access”
Remember to uncheck “Block all public access ” and mark the checkbox below to acknowledge your consent to grant public access to the S3 bucket.
Unchecking the "Block all public access" is the first step to granting public access to the S3 bucket.


After the public access has been unchecked, proceed to create the bucket. As you can see the access level to our bucket in the below screenshot is indicated as “Objects can be public” which means it’s not public yet.

Step 5: Add the files grant public access to in your S3 Bucket
Next, we will create a bucket policy, but before then, we need to add a file to the bucket and try to access the file URL to get an access denied prompt, which is the issue we’re about to solve in this article.
Here, we will upload a simple text.txt file to the bucket. You can upload any kind of file provided that granting public access to the file on your S3 bucket won’t cause any damage to you.
To upload a file to the bucket, double click on the bucket name > Objects > Upload > Add files >Click on upload

Step 6: Navigate to the Object URL
Now, navigate to the Object URL by double-clicking on the file name. The URL should look like https://bucket-name.s3.amazonaws.com/filename. You will be denied access to the content of the file from your browser when you double click to open the URL. See the screenshot below:

Step 7: Edit an S3 Bucket policy to grant public access
Now, let’s generate an S3 bucket policy to public allow access. To do so, click to go back to the bucket. Click on the permission tab and scroll down to where you have "Bucket Policy" and click on the Edit button.


After clicking on the edit button to open the policy creation console, click on Policy generator to open on a new browser tab.
Note your Amazon Resource Name (ARN) as it will be required in the new browser tab where you will generate the policy – ARN is a file naming convention used to identify a particular resource in the Amazon Web Services (AWS) public cloud.

Step 8: Generate an S3 Bucket policy to grant public access
On the new browser tab to generate the policy, under Select Type of Policy, select S3 bucket policy from the list of policies in the drop-down menu leaving the Effect directly below it as “Allow”. Under the principal column, type asterisk (*) which means it will grant public access.
Next, move to the Actions column and select the GetObject action, copy and paste your ARN arn:aws:s3:::techda-store/* from the Edit Bucket Policy Console. Add a forward slash(/) and asterisk to the ARN.
What this means is that it will allow all objects stored in this bucket to be accessible. Now, click on “Add statement”

Now, click on generate policy to generate the policy.

After generating the policy, a dialog box containing the policy script will pop-up. Now highlight and copy the policy script and paste it under the policy section within the bucket console.
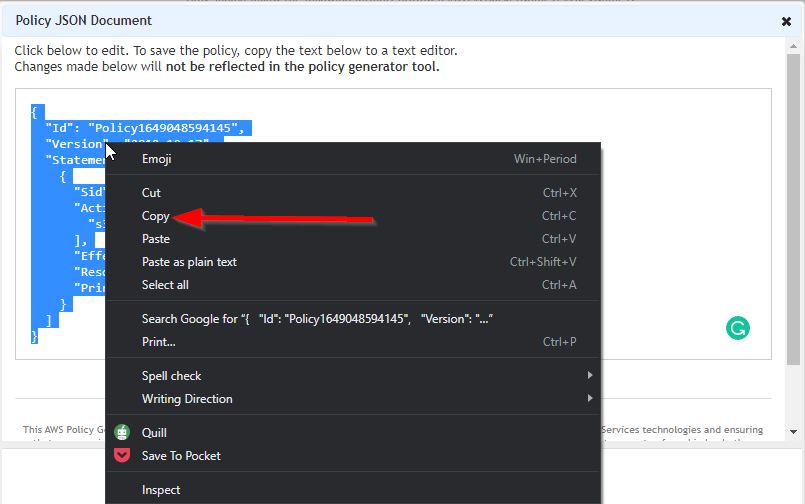
Click on save changes after you have pasted the script.

As shown in the screenshot above, we have successfully granted public access to our S3 Bucket using policy.
Lastly, let’s browse to the object URL once again and read the content of the file as shown below:

I hope you found this blog post helpful. If you have any questions, please let me know in the comment session.


