
Microsoft Phone Link is a must-have app for Windows 11 users who own Android smartphones. In this article, we shall discuss “Microsoft Phone Link: Connect Android to Windows 11”. Microsoft Phone Link allows you to view your phone’s notifications, messages, and photos directly from your PC. You only need to connect your Android device to Windows 11. Most impressively, certain Android phone models allow you to run many mobile apps on your computer at the same time. Other interesting articles to read about: How to install Windows Subsystem for Android (WSA) in Windows 11, and how to upgrade Windows 10 with an unsupported CPU and TPM 1.0 to Windows 11
Furthermore, to use any Android-to-Windows 11 features, you must be running Android 7 or later. Any PC running Windows 11 is compatible. When the devices are linked, the phone must be within the Wi-Fi range of the PC since display and control take place on the PC while the applications are running on the phone.
In this guide, we will be using Microsoft Phone Link to Windows to link our devices. The Link to Windows feature only works with select Samsung models and Surface Duo phones. Link to Windows offers far more functionality, like mirroring Android apps on the PC.
For Windows 10 users, here are detailed guides on how to link your Android or iPhone to your Windows 10 PC and how to unlink your Android or iPhone from Windows 10.
Now, let’s go over how to link your Android phone to your Windows 11 PC and start getting your phone notifications right from your PC.
How to Link an Android Phone to Windows 11 PC
To begin, check that your Android device has the necessary app installed and configured to connect to the Windows PC. On your Android phone or tablet, go to the Google Play Store and download “Link to Windows.”
This software is already installed on some of the most recent Samsung Galaxy devices and Surface Duo phones.

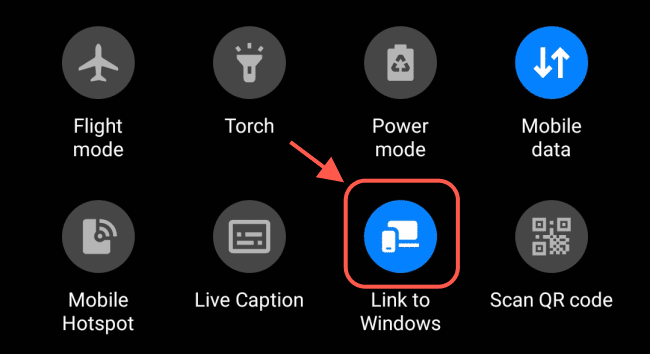
To see whether you already have Microsoft Phone Link to Windows, drag down the shortcut icon at the top of your device and look for the symbol highlighted below.
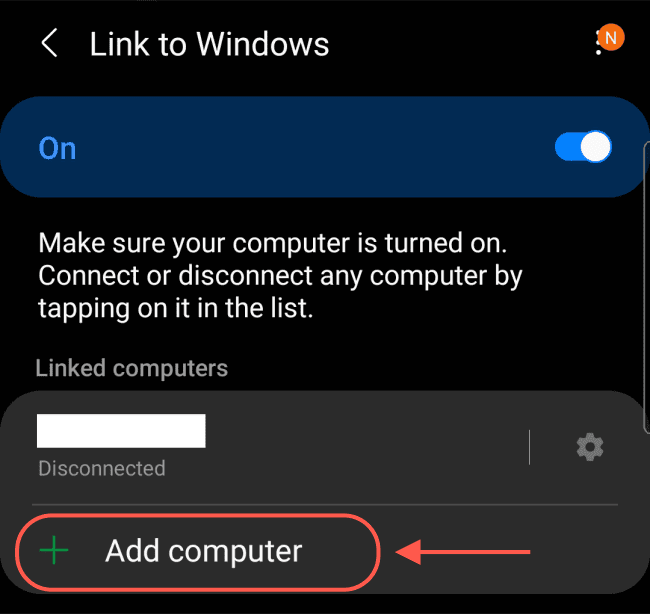
Once installed, launch the app to begin. On the Link to Windows screen, click “Add computer”, on the following page, click Continue.
Connecting Your Devices: Code Input and QR Code Scan
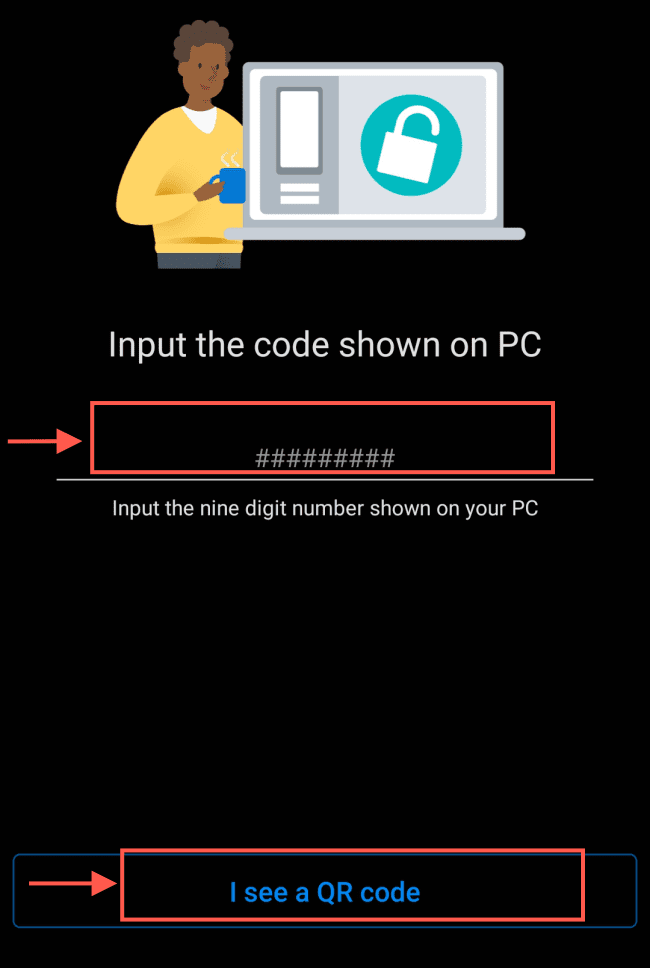
Upon initiating the process, the system will prompt you to either enter a code or scan a QR code. This action establishes the connection between your Android phone and the Windows 11 PC. Now open your computer to get the code/QR code.
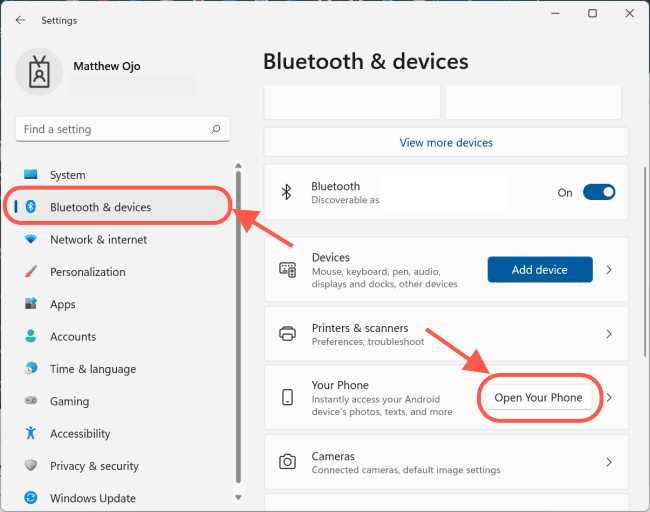
On your computer, open the Start Menu and click on Settings to launch the Windows Settings.

Next click on Bluetooth and devices, then under Your Microsoft Phone Link click on Open Your Phone.
This will open the Microsoft Phone Link interface, click on Get Started.

Tick the “I have the Link to Windows app already”, and then either “Pair using QR code” or “Pair manually.” Once you’ve done either pairing method, that’s it. You’re done!

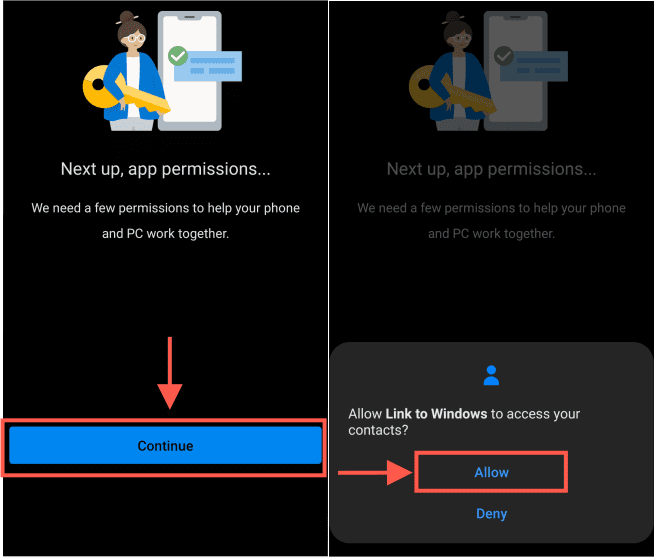
Once linked, the Android app will require specific permissions to function correctly.
To proceed, tap “Continue.” Contacts, making and managing phone calls, viewing media, and sending and receiving text messages are all required permissions. To proceed with all of them, tap “Allow.”
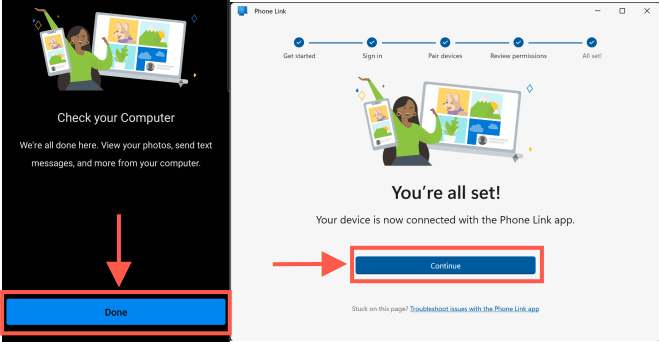
Now, the Android devices is successfully linked with the PC. Click done on the Android device and on your Windows 11 PC click “Continue.”
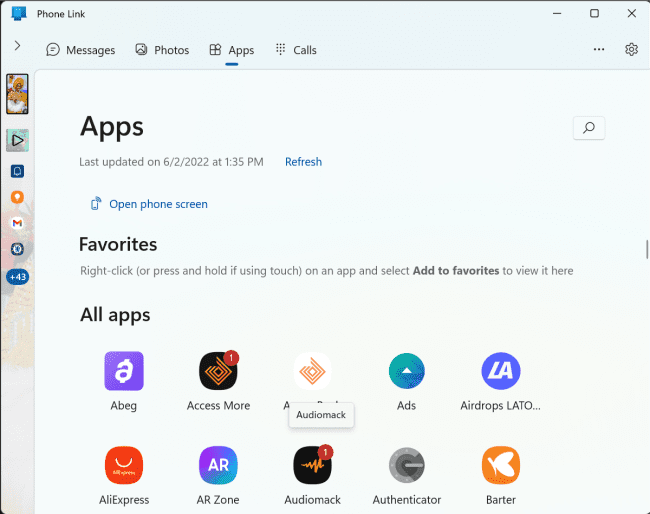
Any Android phone you link up with Your Phone on Windows allows you to receive and react to text messages, see and manage notifications, make and answer calls, and access images on the computer instantaneously.
How to Unlink an Android Phone from Windows 11 PC
Unlinking your devices is a straightforward process. You may unlink from either the Android phone or the Microsoft Phone Link app.
To unlink from your phone, simply swipe down the top shortcut bar and tap the Link to Windows Icon. For a complete removal, press and hold the Link to Windows Icon.

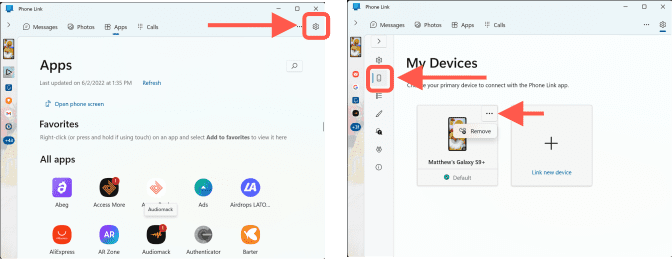
To completely remove the connected device, long-press the Link to Windows Icon. Next, press the gear icon in front of the connected device and then hit Remove on the next screen.

On Windows 11, launch the Microsoft Phone Link app and select Settings. Click the phone icon, then the three dots in the top-right corner of the connected device, and finally remove.
I hope you found this blog post on “Microsoft Phone Link: Connect Android to Windows 11” helpful. If you have any questions, please let me know in the comment session.


