Skip to content

TechDirectArchive

Hands-on IT, Cloud, Security & DevOps Insights

  • Home
  • About
  • Advertise With US
  • Reviews
  • Contact
  • Toggle search form
Home » Windows » Convert a PEM Key to a PPK Key on a Linux and Windows
  • Disable Microsoft SQL Auto Close Option
    Disable SQL Auto Close: Auto Close is enabled for both ePO and ePO Events Databases Oracle/MSSQL/MySQL
  • mssql ubuntu install feature image
    How to reset MSSQL Server SA Password on Ubuntu Oracle/MSSQL/MySQL
  • EFK Stack
    EFK Stack Installation on Docker Virtualization
  • mendeley
    Install Mendeley Reference Manager and Cite for Word on Mac JIRA|Confluence|Apps
  • 1 pUEZd8z  1p 7ICIO1NZFA
    The package python-virtualenv has no installation candidate error Linux
  • VM Disk
    Initialize and format a virtual disk: How to add and remove a new virtual disk from a VM on VMware Workstation Virtualization
  • Machine translation software min
    Self-hosted translator: How to install and uninstall SYSTRAN 6 translator on Windows Security | Vulnerability Scans and Assessment
  • 10.0.17763.1 error
    Fix Windows 10 Setup 1809 build 10.0.17763.1 is not supported Error Windows Server

Convert a PEM Key to a PPK Key on a Linux and Windows

Posted on 08/06/202203/04/2024 Imoh Etuk By Imoh Etuk No Comments on Convert a PEM Key to a PPK Key on a Linux and Windows
Convert-PEM-to-PPK-1

In this article, you will learn how to Convert a PEM Key to a PPK Key on a Linux and Windows Azure Platform. A public/private key pair is required to connect to a running Linux instance using an SSH client. You can also learn how to enable Telnet via the command line and GUI in Windows 10 and Windows Server and how to access EC2 Linux Instance via the Password. If you will like to learn how to view Putty logs, review this post on how to view Putty logs.

An SSH client is not included with Windows. PuTTY is a popular SSH client that is available for free download and use. PuTTY, on the other hand, does not support the PEM (Privacy Enhanced Mail) key format.

Because the key obtained from AWS EC2 Instance or Microsoft Azure Virtual Machine is in PEM format, it must be converted to PPK (PuTTY Private Key). PuTTYgen, fortunately, helps in converting PEM key files to PPK format.

Why do we need a Public and Private Key?

A public/private key pair is required to connect to a running Linux instance using an SSH client. An SSH client is not included with Windows. PuTTY is a popular SSH client that is available for free download and use.

PuTTY, on the other hand, does not support the PEM (Privacy Enhanced Mail) key format. Because the key obtained from AWS EC2 Instance or Microsoft Azure Virtual Machine is in PEM format, it must be converted to PPK (PuTTY Private Key). PuTTYgen, fortunately, helps in converting PEM key files to PPK format.

PuTTYgen is also available for free download and use. If you’re looking for ways to generate an SSH key in Windows 10, refer to a post on how to Generate SSH Key in Windows 10.

This is only necessary for Windows users. If you are using Mac or Linux, you can use the PEM file you downloaded directly. If you are using a Mac or Linux, continue to the next lab step.

You can also learn how to enable Telnet via the command line and GUI in Windows 10 and Windows Server and how to access EC2 Linux Instance via the Password.

Converting PEM to PPK Key

1: To carry out the exercise, if you do not already have PuTTYgen, download the PuTTYgen executable from the following link: PuTTYgen.

2. Locate the downloaded PuTTYgen in the download folder of your computer and double-click to start it. (no installation is required)

Click-PUTTYgen-to-start-it
Starting PUTTYgen

3. Click Load and navigate to the location of the private key file to be converted (for example privatekey.pem) which was downloaded from the AWS EC2 Instance Console or Azure Portal. Here my PEM Key file was downloaded to the download location of my local PC.

 Note: PuTTYgen displays only files with the .ppk extension by default. In order to see your PEM file, change the drop-down next to File name to All Files.
Choose-All-files
Choose All Files

4.  Select your .pem key file and click Open.

Select-the-file-and-click-open
Selecting the PEM Key

PuTTYgen displays the following message:

Warning-Message
Warning Message Displays

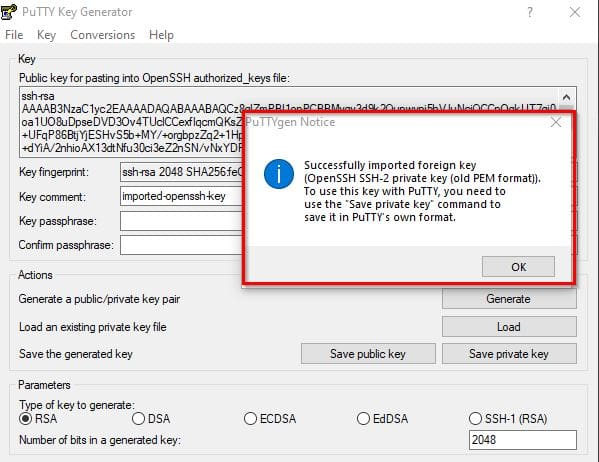
5. Click OK. PuTTYgen displays a dialog that contains information about the key you loaded, such as the public key and fingerprint.

Save-the-Private-Key-1
Save the Key

6. To save the key in PuTTY format, click Save private key.

Note: Do not choose a password as extra security is not required. When asked if you're sure you want to save without a passphrase, click Yes.

After clicking on save, the format will automatically give you the PUTTY Private Key Files.

Format-is-now-PPK
PUTTY Private Key Files
Disclaimer: Make sure to keep your private key somewhere safe.

You can now connect to the running Linux instance created previously on AWS or Azure using PuTTY.

Please see how to Associate SSH Public key with Azure Linux VM, How to Generate SSH keys in Windows 11, “vCenter Converter removed from available downloads on VMware – Use Veeam instead, and how to run Run MBR and GPT conversion with the best GPT converter.

Connecting to Linux VM Instance

An SSH client is required to manage a remote Linux server. SSH is a cryptographic network protocol used to secure data communication. It creates a secure channel across an insecure network. Remote command-line login and remote command execution are two common applications.

SSH clients that accept standard PEM keys are included with Linux distributions and macOS. An SSH client is not included with Windows. As a result, instructions for users running Linux/macOS and Windows on their local host are included in this Lab Step. Depending on your local operating system, only one of them is required.

To connect to the instance, the PuTTY SSH client will use the key pair format that the private key requires. The public key is already present on the running Linux instance. Windows has no SSH client, so you must install one.

This part of the will use PuTTY which was previously converted from PEM key PPK using PuTTYgen in the steps above. Here is How to Download and Use KiTTY SSH Client on Windows.

To connect using PUTTY

Open PuTTY and insert the EC2 instance public IP Address in the Host Name field:

Connect-to-EC2-Instance-Via-IP-Address
Enter your EC2 Instance Public IP Address
Note: The Public IP can be found by navigating to the AWS EC2 console and selecting an available EC2 instance. For Azure VM, you can find the Public IP in the overview page of the VM

Browse to Connection > SSH > Auth in the left pane and then select the downloaded private key in PPK format:

Browse-to-SSH
Browse to SSH

While still selecting Auth, click Browse on right side to locate the PPK key.

Locate-PPK-Key
Locating the PPK Key

Select the PPK key and click on Open. When prompted, click on Accept

Prompt-to-Connect
Connection Prompt

The login terminal interface displays. Enter the username for your EC2 or Azure VM. Here my EC2 username is ec2-user.

Enter-Your-Username
Entering the VM Username

Finally, the login screen where you can interact with your Linux server in the cloud shows up.

Login-Interface

I hope you found this blog post helpful on how to Convert a PEM Key to a PPK Key on a Linux and Windows Azure Platform. If you have any questions, please let me know in the comment session.

Rate this post

Thank you for reading this post. Kindly share it with others.

  • Share on X (Opens in new window) X
  • Share on Reddit (Opens in new window) Reddit
  • Share on LinkedIn (Opens in new window) LinkedIn
  • Share on Facebook (Opens in new window) Facebook
  • Share on Pinterest (Opens in new window) Pinterest
  • Share on Tumblr (Opens in new window) Tumblr
  • Share on Telegram (Opens in new window) Telegram
  • Share on WhatsApp (Opens in new window) WhatsApp
  • Share on Pocket (Opens in new window) Pocket
  • Share on Mastodon (Opens in new window) Mastodon
  • Share on Bluesky (Opens in new window) Bluesky
  • Share on Threads (Opens in new window) Threads
  • Share on Nextdoor (Opens in new window) Nextdoor
AWS/Azure/OpenShift, Linux, Windows Tags:Azure, EC2 instance, Microsoft Windows, SSH, Windows 10, Windows 11, Windows Server 2016

Post navigation

Previous Post: How to implement Interactive Authentication using MSAL dotNET
Next Post: Add Registry Keys via DISM in Windows

Related Posts

  • Screenshot 2024 02 28 at 11.17.41 PM
    GitHub Pages Deployment Guide Linux
  • Unable to ping an EC2 Instance
    Unable to Ping an EC2 Instance AWS/Azure/OpenShift
  • veeam backup for aws Processing postgres rds failed
    Veeam backup for aws Processing postgres rds failed: No valid combination of the network settings was found for the worker configuration AWS/Azure/OpenShift
  • Add or remove features   fix dotnet framework issues
    Fix the request to add or remove features on the specified server failed Windows
  • Featured Image 3
    How to enable Secure Boot on PC to install Windows 11 Windows
  • WhatsApp Image 2022 02 20 at 4
    How to use Postman for your POST Request Web Server

More Related Articles

Screenshot 2024 02 28 at 11.17.41 PM GitHub Pages Deployment Guide Linux
Unable to ping an EC2 Instance Unable to Ping an EC2 Instance AWS/Azure/OpenShift
veeam backup for aws Processing postgres rds failed Veeam backup for aws Processing postgres rds failed: No valid combination of the network settings was found for the worker configuration AWS/Azure/OpenShift
Add or remove features   fix dotnet framework issues Fix the request to add or remove features on the specified server failed Windows
Featured Image 3 How to enable Secure Boot on PC to install Windows 11 Windows
WhatsApp Image 2022 02 20 at 4 How to use Postman for your POST Request Web Server

Leave a Reply Cancel reply

You must be logged in to post a comment.

Microsoft MVP

VEEAMLEGEND

vexpert-badge-stars-5

Virtual Background

GoogleNews

Categories

veeaam100

sysadmin top30a

  • Disable Microsoft SQL Auto Close Option
    Disable SQL Auto Close: Auto Close is enabled for both ePO and ePO Events Databases Oracle/MSSQL/MySQL
  • mssql ubuntu install feature image
    How to reset MSSQL Server SA Password on Ubuntu Oracle/MSSQL/MySQL
  • EFK Stack
    EFK Stack Installation on Docker Virtualization
  • mendeley
    Install Mendeley Reference Manager and Cite for Word on Mac JIRA|Confluence|Apps
  • 1 pUEZd8z  1p 7ICIO1NZFA
    The package python-virtualenv has no installation candidate error Linux
  • VM Disk
    Initialize and format a virtual disk: How to add and remove a new virtual disk from a VM on VMware Workstation Virtualization
  • Machine translation software min
    Self-hosted translator: How to install and uninstall SYSTRAN 6 translator on Windows Security | Vulnerability Scans and Assessment
  • 10.0.17763.1 error
    Fix Windows 10 Setup 1809 build 10.0.17763.1 is not supported Error Windows Server

Subscribe to Blog via Email

Enter your email address to subscribe to this blog and receive notifications of new posts by email.

Join 1,825 other subscribers
  • RSS - Posts
  • RSS - Comments
  • About
  • Authors
  • Write for us
  • Advertise with us
  • General Terms and Conditions
  • Privacy policy
  • Feedly
  • Telegram
  • Youtube
  • Facebook
  • Instagram
  • LinkedIn
  • Tumblr
  • Pinterest
  • Twitter
  • mastodon

Tags

AWS Azure Bitlocker Microsoft Windows PowerShell WDS Windows 10 Windows 11 Windows Deployment Services Windows Server 2016

Copyright © 2025 TechDirectArchive


Loading Comments...
 

You must be logged in to post a comment.