
MSAL is the acronym for Microsoft Authentication Library; according to Microsoft, (MSAL) can provide secure access to Microsoft Graph, other Microsoft APIs, third-party web APIs, or your web API. Furthermore, MSAL supports many application architectures and platforms, including .NET, JavaScript, Java, Python, Android, and iOS. Microsoft provides a robust identity ecosystem, but applications must be registered to support authentication and authorization. This article explores how to implement interactive authentication using MSAL dotNET.
Other guides can be found in How to Install and configure JIRA on Linux and How to Install and configure Elasticsearch on Linux.
To that end, the App registrations pane in Azure AD allows you to establish application registrations and grant permissions to them. When developing an application, you establish a trust relationship between the defined application and the Microsoft identity platform. It’s worth noting that the trust is only one way in that the program trusts Microsoft but not vice versa.
The following Azure Apps features are within your control. Only registered applications are managed by the Microsoft identity platform for identity and access management (IAM). Whether your application is a client app, such as a web or mobile app, or a web API that supports a client app, registering creates a trust connection between your app and the identity provider, the Microsoft identity platform.
Managed identities provide an identity for applications to use when connecting to resources that support Azure Active Directory (Azure AD) authentication. Applications may use the managed identity to obtain Azure AD tokens.
Why Implement Interactive Authentication Using MSAL dotNET
MSAL provides a uniform API for various platforms, allowing you to obtain tokens in various methods. The following are some of the advantages of using MSAL:
- There’s no need to use OAuth libraries or code against the protocol directly in your project.
- Tokens are acquired on behalf of a user or an application (when applicable to the platform).
- Maintains a token cache and automatically refreshes tokens when they’re about to expire. You are not responsible for managing token expiration on your own.
- Assists you in configuring your program via configuration files.
- By exposing actionable errors, logging, and telemetry, it assists you in troubleshooting your program
At the end of this article, we will understand how the managed identity platform of Microsoft works & do the following:
- Register an application with the Microsoft Identity platform
- Use the PublicClientApplicationBuilder class in MSAL.NET
- Acquire a token interactively in a console application
Requirements for Implementing Interactive Authentication
Below are the requirements to implement Interactive Authentication.
- An Azure account with a subscription
- Visual studio code
- Basic knowledge of how to create a directory
Demo: let’s build an app that uses MSAL for authentication
Below are steps for implementing interactive authentication using MSAL.
Step 1: Create an app registration in the Azure Active directory Managed Identity
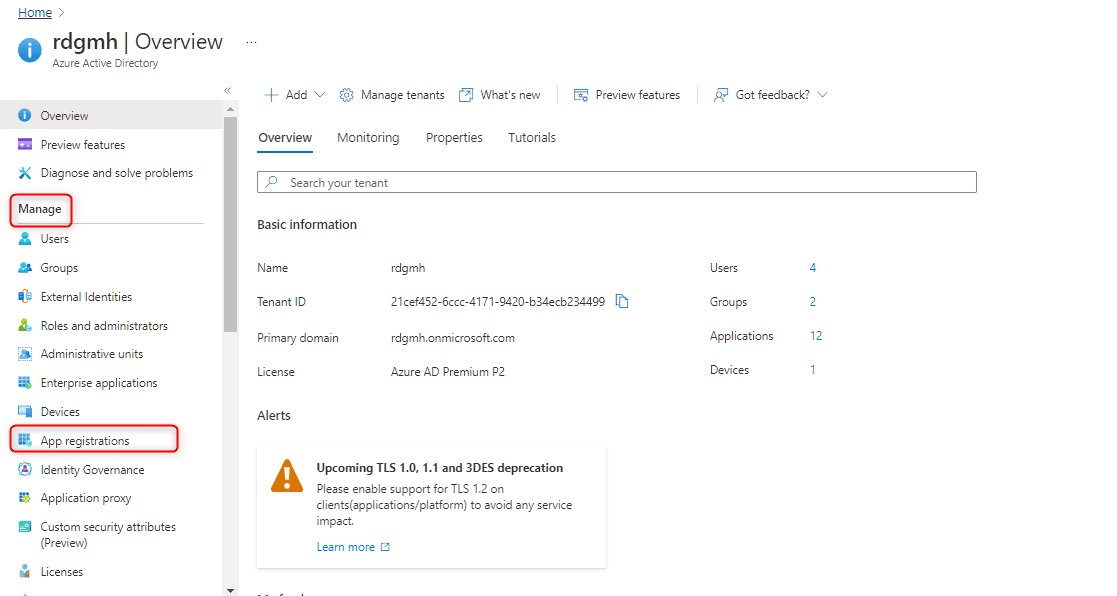
To register your app, sign in to the Azure portal and search for the active directory. Under Manage, select App registrations > New registration
Next, click new app registration and fill in all the required information as shown below

We decided to call the app we are registering.”techdirectarchive app. In the example exercise, we assumed that the account is a single account as it is not an organizational account. As such, we selected a single tenant as the organizational type. For redirect uri , we selected web and wrote http://localhost and then we hit on the blue register button

After registering the app, the platform automatically generates the Client ID and Object ID, as shown above. The tenant ID is unique to this. We shall use both application and tenant ID in the next step when creating a dotnet app in visual studio code.
Step 2: Create a DotNet Application
Therefore, to implement interactive authentication, you need to create a DotNet application. The steps are as shown below:
- Launch Visual Studio Code and open a terminal by selecting Terminal and then New Terminal.
- create a project directory or folder & change into that directory
mkdr techdirectarchive-app
cd techdirectarchive-app
Then, create the .NET console app.
dotnet new console
Afterward, open the techdirectarchive-app folder in vscode
code . -r
Step 3: Add the necessary packages to the console app
After creating the dotNET application, the next step in implementing interactive authentication is the addition of packages to the console app.
Add the Microsoft.Identity.Client package to the project in a terminal in VS Code
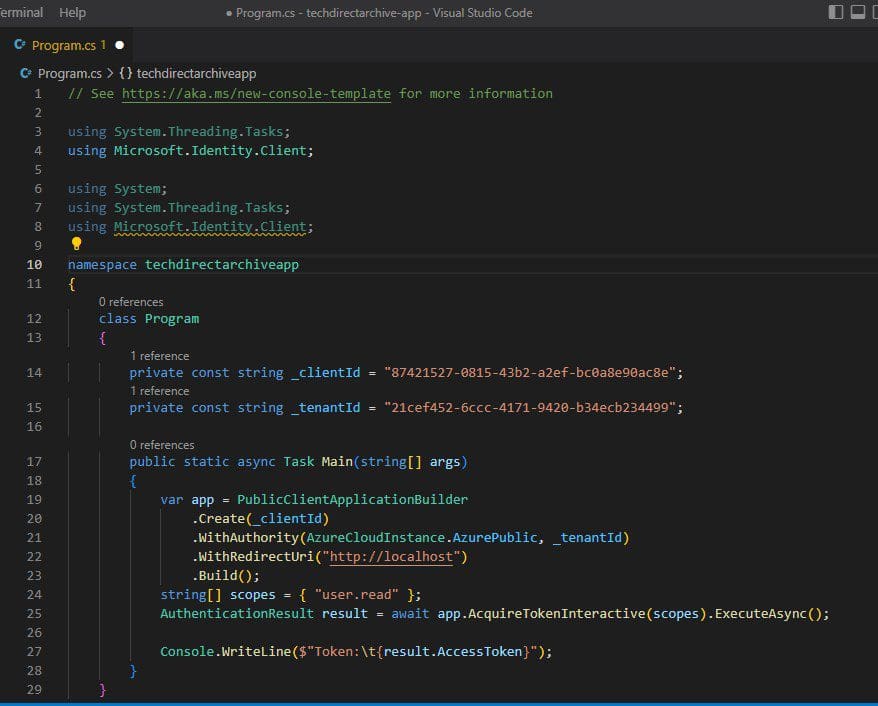
dotnet add package Microsoft.Identity.ClientTherefore, open the Program.cs file and add using statements to include Microsoft.Identity.Client and enable async operations.
using System.Threading.Tasks;
using Microsoft.Identity.Client;
Then, change the Main method to enable async.
public static async Task Main(string[] args)Following that, add code for the interactive authentication. Subsequently, the Application (client) and Directory (tenant) IDs will be stored in two variables. Those values can be copied from the Azure portal.
private const string _clientId = "APPLICATION_CLIENT_ID";
private const string _tenantId = "DIRECTORY_TENANT_ID";
Use the PublicClientApplicationBuilder class to build out the authorization context.
var app = PublicClientApplicationBuilder
    .Create(_clientId)
    .WithAuthority(AzureCloudInstance.AzurePublic, _tenantId)
    .WithRedirectUri("http://localhost")
    .Build();
.Create generates a PublicClientApplicationBuilder from a clientID..WithAuthority Adds a known Authority corresponding to an ADFS server. However, in the code, we specify the Public cloud and use the tenant for the app we registered.
Step 4: Acquire a token
Acquiring a token is another step to take when implementing interactive authentication.
When you registered techdirectarchive-app , it automatically generated API permission user.read for Microsoft Graph. Hence, we’ll use that permission to acquire a token.
- Set the permission scope for the token request. Add the following code to the
PublicClientApplicationBuilder.
string[] scopes = { "user.read" };Then, add code to request the token and write the result to the console.
AuthenticationResult result = await app.AcquireTokenInteractive(scopes).ExecuteAsync();

Console.WriteLine($"Token:\t{result.AccessToken}");
Review the code as shown below :
Step 5: Run the Application
We can check for errors with the command
dotnet build 
We can run the application with the command:
dotnet runThe app will open the default browser prompting you to select the account you want to authenticate with. If multiple accounts are listed, select the one associated with the tenant used in the app. Suppose this is the first time you’ve authenticated to the registered app. In that case, you will receive a Permission requested notification asking you to approve the app to read data associated with your account. Select Accept.

You should get a token in your console just like the one below
Token: eyJ0eXAiOiJKV1QiLCJub25jZSI6IlVhU.....Summary
In conclusion, Microsoft Authentication Library helps with the necessary authentication and permissions applications need to access services. The steps above explain how to implement interactive authentication using MSAL dotNET.


what is the difference between microsoft.identity.client and microsoft.identity.web?
Microsoft.identity.web is just a collection of ASP.NET Core libraries & it makes it easier to add authentication and authorization capabilities to web apps and web APIs that integrate with the Microsoft identity platform.
Meanwhile, microsoft.identity.client has the Microsoft Authentication Library for.NET binaries in it (MSAL.NET). Developers may easily access tokens from the Microsoft identity platform by signing users in with their work and school accounts, Microsoft personal accounts, and social identities using MSAL.NET Azure AD B2C
Thanks.
Thanks for sharing. I tried the similar approach, but I am getting a system exception as below:-
Could not load file or assembly ‘Microsoft.IdentityModel.Abstractions, Version=6.22.0.0, Culture=neutral, PublicKeyToken=31bf3856ad364e35’
or one of its dependencies. The system cannot find the file specified.”:”Microsoft.IdentityModel.Abstractions, Version=6.22.0.0, Culture=neutral
I have added the latest version of ‘Microsoft.IdentityModel.Abstractions’from nuget to my GAC and referencing it. But still have the same issue. Any ideas?
Hi Reenu V,
Thanks for trying out the steps in the article. If you have not been able to resolve the issue, check out a known solution for it below : Add
<_FunctionsSkipCleanOutput>true</_FunctionsSkipCleanOutput>to the .csproj file. This is a workaround, not a solution, because this property is internal and undocumented.Cheers