How to update the BIOS on your Dell system

In this article, you will learn how to update the BIOS on your Dell system. Your system BIOS, also known as System Setup, is an acronym that stands for Basic Input/Output System. BIOS is software that is contained on a small memory chip on the system board or motherboard of a computer. It connects the computer’s hardware to the operating system. Please see how to get TPM information: How to determine if TPM is present and how to enable TPM in the BIOS, and how to enable Secure Boot on PC to install Windows 11.
BIOS is a set of instructions that the computer uses to execute basic instructions such as determining whether to boot from a network or a hard disk drive. Since BIOS upgrades rarely bring new features or significant speed boosts, you’re unlikely to see a significant advantage when you install them.
To enhance your security vulnerability please see Fix for security vulnerabilities in the BIOS firmware for some Intel Processors.
According to Dell, it is advisable that you update your system BIOS as part of your scheduled update cycle. BIOS updates can sometimes fix issues, add features or both.
The BIOS update provides feature enhancements or updates that help keep the system software current and compatible with other computer modules (hardware, firmware, drivers, and software). A BIOS update also includes security updates and improved stability.
Important: Be very careful when updating your BIOS. If your computer freezes, crashes, or loses power during the installation (flashing), the BIOS or UEFI firmware may be corrupted. This will render your computer unbootable, and you could end up bricking your computer.
For more related information on BIOS other interesting guide please read: Fix for security vulnerabilities in the BIOS firmware for some Intel Processors, How to enable Virtualization in BIOS: Determine if the Intel VT-x or AMD-V Virtualization Technology is enabled in BIOS,
How to check your current BIOS Version in Windows
The BIOS version of your computer is displayed in the BIOS setup menu, but you do not need to reboot to check it. There are various methods for seeing your BIOS version from within Windows, and they all work on PCs with either a standard BIOS or a newer UEFI firmware.
How to check your BIOS Version at the Command Prompt
To check your BIOS version from the Command Prompt, click Start and enter “cmd” in the search box, then click the “Command Prompt” result. No need to run it as an administrator.

At the prompt, type (or copy and paste) the following command, and then click Enter:
wmic bios get smbiosbiosversion
This command will display the version number of the BIOS or UEFI firmware in your current PC.
Please see How to check the BIOS version on Windows, how to Use PowerShell to View and Change BIOS Settings, and How to install SCConfigMgr Driver Automation Tool on Windows
How to check your BIOS Version using the System Information Panel
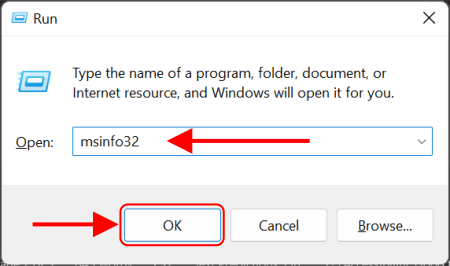
You can also find your BIOS’s version number in the System Information window. Press Windows key + R key, to open the Run box and type “msinfo32”, then hit Enter.
The BIOS version number is displayed on the System Summary pane. Look at the “BIOS Version/Date” field.

How to check your current BIOS version at Startup on Dell
To access the BIOS or System Setup on Dell computers:
- Press the F2 key several times at the Dell logo screen during startup and select BIOS Setup or System Setup from the menu.
- Or press the F12 key several times at the Dell logo screen during startup and select BIOS Setup or System Setup from the menu.
How to update your Dell BIOS
Updating your Dell BIOS is easy, all you need to do is download and run the BIOS update utility. Critical BIOS updates are also pushed through Windows Update.
Warning: Before you begin, if you have BitLocker protection enabled on your system temporarily suspend it in the Control Panel. BitLocker protection will resume automatically when the computer is restarted. If BitLocker is not suspended, the next time you reboot the computer it will not recognize the BitLocker key. You will be prompted to enter the recovery key to progress, and the computer will ask for the recovery key on each reboot. If the recovery key is unknown this can result in data loss or unnecessary operating system reinstallation.Below are the steps to download and install the latest BIOS update for your Dell computer:
Visit Dell.com/support/drivers. Enter the Service Tag, Express Service Code, or the Serial number of the Dell computer and click Search. Or click Browse all products to manually select your Dell computer from the catalog.

You will be taken to the Drivers & Download page. Here you can either choose to allow Dell to automatically scan and auto detect drivers that needs to be updated on your system. Or you can decide to manually find a specific driver for your Dell system. We will do the latter in this guide.
Click on the Find drivers. In the drop-down menu select the Operating System that is installed on the computer, and under Category, select BIOS.

Scroll down the page and select the latest System BIOS. Click Download and save the file to your computer.

Go to the folder location where your file is downloaded, right-click the downloaded BIOS setup file and run as administrator.

Follow the on-screen instructions to complete the installation process. Make sure to tick the Suspend BitLocker Drive Encryption if not already suspended. Click on Update to complete the process.

The computer will restart and complete the BIOS update process.
Conclusion
Congratulations! You now have the latest BIOS updates for your Dell PC. If you have any questions concerning this process on how to update the BIOS on your Dell system. Please leave them in the comments section below.


