Skip to content

TechDirectArchive

Hands-on IT, Cloud, Security, Veeam & DevOps

  • Home
  • About
  • Advertise With US
  • Reviews
  • Tech News
  • Contact
  • Toggle search form

How to use a Fido Certified U2F Key for Authentication

Posted on 23/07/202203/01/2024 Raphael Gab-Momoh By Raphael Gab-Momoh No Comments on How to use a Fido Certified U2F Key for Authentication
  1. Home
  2. Password Manager
  3. How to use a Fido Certified U2F Key for Authentication
FIDO-KEY-FEATURE

U2F is the acronym for Universal 2nd factor, which is an open protocol based on comparable security technology used in smart cards that enhances and streamlines two-factor authentication utilizing specialized Universal Serial Bus or near-field communication devices. In this article, you will learn How to use a Fido Certified U2F Key for Authentication, Please see how to install Let’s Encrypt Wildcard SSL Certificate in cPanel using Certify The Web, and Set Two-Factor Authentication for SSH in Linux.

Meanwhile, FIDO is the acronym for Fast Identity Online, it is the technological protocol for confirming online user identification. The FIDO certified U2F key is also applicable in situations like fingerprint login and two-factor authentication login. Most importantly, this enables you to access your online accounts using biological characteristics or a FIDO security key.

PCs like Windows devices, iPhones and even email accounts like Gmail all accept this verification option since it enhances security, preserves privacy, and makes the verification process simpler.

Furthermore, it is usually in a Hardware security key device that resemble USB flash drives and USB keys in appearance. FIDO keys operate similarly to certain USB keys also. To confirm your action, you must touch the buttons on them.

How FIDO work?

FIDO aims to fix the issues with the current username and password system. Additionally, the security technology uses public key cryptography to ensure that there are no shared secrets between users and online services. With a straightforward authentication sequence, FIDO Authentication will defend your organization’s data from phishing, account takeover, and man-in-the-middle attacks.

In this article, we shall be focusing on how to use a FIDO Certified U2F key series manufactured by Feiten Technologies.

Other useful guides: How to Remove a Device from your Microsoft Account and How to create Windows 11 Bootable USB drive with the Media Creation Tool and How to Add a Device to your Microsoft account also How to use Systemd Timers on Linux

How U2F Operates

Consider Universal 2nd Factor as a new security entry point that users need to go through to access protected resources.

These users still require passwords to start the process. Meanwhile, to finish the authorization procedures, they also need to have a physical device.

A U2F process appears as follows, in basic terms:

  • Password: The user accesses a website and inputs login information that the domain accepts.
  • Challenge: The system sends a challenge to a key that the user has put into a USB port after recognizing the correct username and password. Communication is effective with transport-level encryption.
  • Response: In response, methods such as the key lighting up addresses the challenge. For the connection to be complete, the user clicks a button.

Requirements for Using FIDO Certified U2F Key

  • Fido Certified U2F Key
  • Chrome
  • Gmail account
  • Internet connection

How to Setup your U2F key for use

To use a FIDO-certified U2F key, we will need to set it up by following a series of steps as shown below:

Step1: Place the U2F key nearby

As it is about to be set up, you need to have it near you. This is an important step in using a FIDO-certified U2F key.

lastfido
fido key

Step2: Open your Chrome Browser

The Chrome web browser may be downloaded at https://chrome.com if it is not already on your computer.

Step3: Access your Account

Go to Google.com. And click “My account” at the very top-right corner.

How to use a FIDO certified key -MANAGE-Account-1
manage accounts

Sign into your Google Account

Step4: Go to https://myaccount.google.com/security

When you are there, confirm if 2-step verification is turned off or on, if it is turned off, turn it on.

 2step
2-step verification page in google

Next, follow the steps to get started
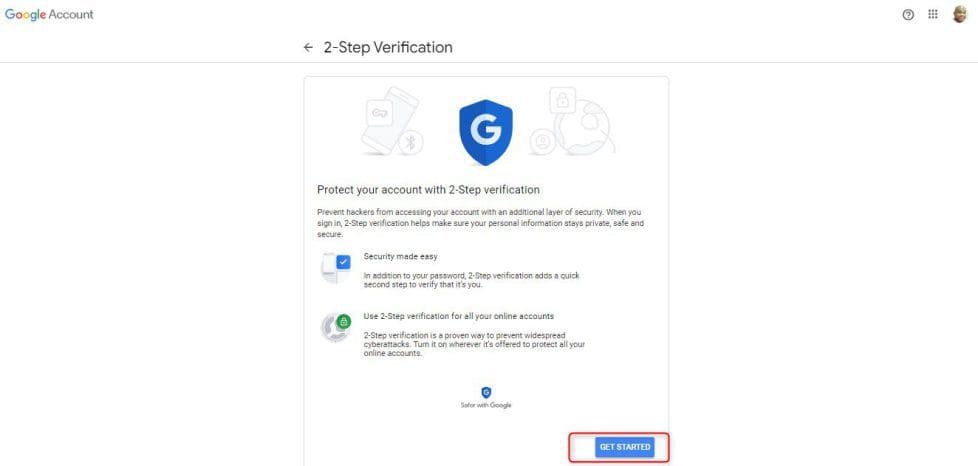
How to use a FIDO certified key -get-started
turn on turn factor and click next
How to use a FIDO  certified key - follow
follow the prompt & insert key
-the-key
register the key

You would need to make sure the certified U2F key is plugged in & touched at the point where there is a light

How to use a FIDO certified key -Touchthekey
touch the key

Finally, we need to name the key

How to use a FIDO certified key - Name-your-Key
name your key

Set-up is complete

How to use a FIDO certified key - Set-up-complete
completed

Summary

In conclusion, U2F is a security entry point that users need to go through to access protected resources, and it can be set up by following a series of steps shown above.

Now, you know how to use a FIDO-certified key. Protect yourself against cyberattacks using this security key.

I hope you found this guide useful on How to use a Fido Certified U2F Key for Authentication. Please feel free to leave a comment below.


Rate this post

Thank you for reading this post. Kindly share it with others.

  • Share on X (Opens in new window) X
  • Share on Reddit (Opens in new window) Reddit
  • Share on LinkedIn (Opens in new window) LinkedIn
  • Share on Facebook (Opens in new window) Facebook
  • Share on Pinterest (Opens in new window) Pinterest
  • Share on Tumblr (Opens in new window) Tumblr
  • Share on Telegram (Opens in new window) Telegram
  • Share on WhatsApp (Opens in new window) WhatsApp
  • Share on Mastodon (Opens in new window) Mastodon
  • Share on Bluesky (Opens in new window) Bluesky
  • Share on Threads (Opens in new window) Threads
  • Share on Nextdoor (Opens in new window) Nextdoor
Password Manager

Post navigation

Previous Post: How to use Systemd Timers on Linux
Next Post: How to update the BIOS on your Dell system

Related Posts

  • How to Disable the Password Manager of Google Chrome
    How to Disable the Password Manager of Google Chrome Password Manager
  • 785509289 780x439
    Errors associated with Pleasant Password Password Manager
  • 785509289 780x439
    Integrate Pleasant Password Server with Active Directory Password Manager
  • unnamed
    Upgrade ManageEngine Password Manager Pro Password Manager
  • password manager pro enterprise
    Configure failover for ManageEngine Password Manager Pro Password Manager
  • How to Disable the Firefox Password Manager in Windows 11
    How to Disable the Firefox Password Manager in Windows 11 Password Manager

More Related Articles

How to Disable the Password Manager of Google Chrome How to Disable the Password Manager of Google Chrome Password Manager
785509289 780x439 Errors associated with Pleasant Password Password Manager
785509289 780x439 Integrate Pleasant Password Server with Active Directory Password Manager
unnamed Upgrade ManageEngine Password Manager Pro Password Manager
password manager pro enterprise Configure failover for ManageEngine Password Manager Pro Password Manager
How to Disable the Firefox Password Manager in Windows 11 How to Disable the Firefox Password Manager in Windows 11 Password Manager

Leave a Reply Cancel reply

You must be logged in to post a comment.

Microsoft MVP

VEEAMLEGEND

vexpert-badge-stars-5

Virtual Background

GoogleNews

Categories

veeaam100

Veeam Vanguard

  • WDSMDT
    What are the differences between MDT and WDS Windows Server
  • images
    Query MBAM to display the BitLocker Recovery report Network | Monitoring
  • Backup is an attacker real target
    Hacker Thinking in Ransomware Attacks: Backup Is the real Target Backup
  • VirtualinstallationonMac
    How to install Oracle VirtualBox on a Mac device Mac
  • 33
    The wim file needs to be remounted: Fix error 0xc1510114 Windows Server
  • PSD
    PowerShell Deployment Extension for MDT: How to deploy Windows using PSD, Microsoft Deployment Toolkit, and Windows Deployment Services Windows Server
  • screenshot 2020 02 08 at 20.02.50
    Windows 10 Administrative Shortcut command key Windows Server
  • Fix 0x800f0831 Windows Update
    Fix 0x800f0831 Error when installing Windows update Windows

Subscribe to Blog via Email

Enter your email address to subscribe to this blog and receive notifications of new posts by email.

Join 1,779 other subscribers
  • RSS - Posts
  • RSS - Comments
  • About
  • Authors
  • Write for us
  • Advertise with us
  • General Terms and Conditions
  • Privacy policy
  • Feedly
  • Telegram
  • Youtube
  • Facebook
  • Instagram
  • LinkedIn
  • Tumblr
  • Pinterest
  • Twitter
  • mastodon

Tags

Active Directory Azure Bitlocker Microsoft Windows PowerShell WDS Windows 10 Windows 11 Windows Deployment Services Windows Server 2016

Copyright © 2026 TechDirectArchive

Loading Comments...

You must be logged in to post a comment.