
Skip to content

TechDirectArchive

Hands-on IT, Cloud, Security, Veeam & DevOps

  • Home
  • About
  • Advertise With US
  • Reviews
  • Contact
  • Toggle search form

How to import SSL Certificate to Windows Server using DigiCert Utility

Posted on 19/11/202125/08/2023 Temitope Odemo By Temitope Odemo No Comments on How to import SSL Certificate to Windows Server using DigiCert Utility
  1. Home
  2. Windows
  3. How to import SSL Certificate to Windows Server using DigiCert Utility
SSL Certificate

The free DigiCert Certificate Utility for Windows is a very good and indispensable tool for administrators and a must-have for anyone that uses SSL Certificates for Websites and servers or Code Signing Certificates for trusted software. This is a globally accepted tool that you can use for certificate management and various certificate troubleshooting. It is very easy to configure and has a straightforward approach to usage.

You can read more related guides: Enable LDAP over SSL with a Third-party Certification Authority such as DigiCert, Generate a self-signed SSL certificate: How to enable LDAP over SSL with a self-signed certificate, How to use the DigiCert Certificate Utility for Windows to create a CSR and Generating your Trial SSL Certificate for private IP using DigiCert PKI Platform.

Follow these Steps to Import Your SSL Certificate with the DigiCert Utility

  • However, You can buy or request for trial SSL Certificate from DigiCert and follow this guide Generating your Trial SSL Certificate for Private IP using DigiCert PKI Platform on requesting for a trial SSL Certificate.
  • On the Windows Server where you created the CSR, save the generated SSL certificate e.g Your_SSL_CERT.cer to the same folder you saved the DigiCert Certificate Utility executable (DigiCertUtil.exe).
  • Run the DigiCert Certificate Utility.
  • In the DigiCert Certificate Utility for Windows, click SSL and then, click Import.
Windows Server
Importing your SSL Certificate

Moreover, Enter a new friendly name or type a unique name in the default box to identify the certificate.
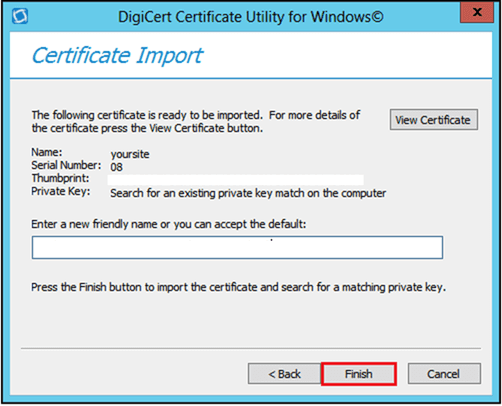
DigiCert Utility
Entering a new friendly name
  • click Finish to complete the certification import.
  • Nonetheless, If the certificate is valid, the system will display a successful message confirming the import and showing the SSL Certificate on the DigiCert Certificate Utility for Windows.
image-72
Certificate Imported
  • After successfully installing the SSL certificate, assign the certificate to the appropriate site, such as IIS.

I hope you found this blog post very interesting and helpful for importing your SSL Certificate to your Windows Server using DigiCert Utility. Furthermore, If you have any questions, do not hesitate to ask in the comment section.

Rate this post

Thank you for reading this post. Kindly share it with others.

  • Share on X (Opens in new window) X
  • Share on Reddit (Opens in new window) Reddit
  • Share on LinkedIn (Opens in new window) LinkedIn
  • Share on Facebook (Opens in new window) Facebook
  • Share on Pinterest (Opens in new window) Pinterest
  • Share on Tumblr (Opens in new window) Tumblr
  • Share on Telegram (Opens in new window) Telegram
  • Share on WhatsApp (Opens in new window) WhatsApp
  • Share on Mastodon (Opens in new window) Mastodon
  • Share on Bluesky (Opens in new window) Bluesky
  • Share on Threads (Opens in new window) Threads
  • Share on Nextdoor (Opens in new window) Nextdoor
Windows, Windows Server Tags:SSL, ssl certificate

Post navigation

Previous Post: What are the differences between dnf and apt package managers?
Next Post: How to enable LDAP over SSL with a third-party Certificate such as DigiCert

Related Posts

  • MBAM
    The web application “Administration Portal” cannot be enabled because one or more software dependencies are not met Windows
  • images
    How to fix you are not allowed to view this folder on SSRS: MBAM reports cannot be accessed because it could not load folder contents Windows Server
  • drivelock 1
    How to activate DriveLock License on Windows Server Windows Server
  • 1 WeXxkEX0JG3oB781HD8Hrg 1
    Post OS installation: Configure the properties of Windows Server Windows Server
  • The evolution of Windows authentication   NTLM to Keberos
    Bidding Farewell to NTLM in favour of Kerberos Windows
  • WDS
    An error occurred while trying to start the Windows deployment services error 0x906 Windows Server

More Related Articles

MBAM The web application “Administration Portal” cannot be enabled because one or more software dependencies are not met Windows
images How to fix you are not allowed to view this folder on SSRS: MBAM reports cannot be accessed because it could not load folder contents Windows Server
drivelock 1 How to activate DriveLock License on Windows Server Windows Server
1 WeXxkEX0JG3oB781HD8Hrg 1 Post OS installation: Configure the properties of Windows Server Windows Server
The evolution of Windows authentication   NTLM to Keberos Bidding Farewell to NTLM in favour of Kerberos Windows
WDS An error occurred while trying to start the Windows deployment services error 0x906 Windows Server

Leave a Reply Cancel reply

You must be logged in to post a comment.

Microsoft MVP

VEEAMLEGEND

vexpert-badge-stars-5

Virtual Background

GoogleNews

Categories

veeaam100

Veeam Vanguard

  • no pg hba
    Resolve “no pg_hba.conf entry for host on PostgreSQL Oracle/MSSQL/MySQL
  • Failed to connect to Deployer Service   VIHR
    How to fix Failed to connect to Deployer Service Error Backup
  • Snapshot replication fix on synology
    Fix Task failed to perform Scheduled Snapshot Replication [Part 1] Storage
  • How to Migrate Windows Servers from Hyper V to Proxmox Correctly
    Migrate Windows Servers from Hyper V to Proxmox Correctly Backup
  • Screenshot 2020 06 22 at 10.17.18
    How to disable Outlook and Yahoo Auto-Complete Network | Monitoring
  • VMware
    How to install Windows Server 2022 on VMware Workstation Virtualization
  • ansible logo600 591x296 1 1
    Ansible error: Server unreachable, ssl: auth method ssl requires a password Configuration Management Tool
  • Prevent Windows from Saving RDP Connection
    Prevent Windows from Saving RDP Connection History Windows

Subscribe to Blog via Email

Enter your email address to subscribe to this blog and receive notifications of new posts by email.

Join 1,803 other subscribers
  • RSS - Posts
  • RSS - Comments
  • About
  • Authors
  • Write for us
  • Advertise with us
  • General Terms and Conditions
  • Privacy policy
  • Feedly
  • Telegram
  • Youtube
  • Facebook
  • Instagram
  • LinkedIn
  • Tumblr
  • Pinterest
  • Twitter
  • mastodon

Tags

AWS Azure Bitlocker Microsoft Windows PowerShell WDS Windows 10 Windows 11 Windows Deployment Services Windows Server 2016

Copyright © 2025 TechDirectArchive

Loading Comments...

You must be logged in to post a comment.