High availability refers to a group of technologies that reduces IT outages by ensuring business continuity of IT services through redundant, fault-tolerant, or failover-protected components located inside the same data centre. This tutorial explores Azure’s high availability options for business. Please see how to Install PlayonLinux on a Linux System and How to install Redis on a Linux System also How to Install Apache Subversion on a Linux System
In our own case, we will try and achieve this using a Virtual Machine Scale set. Hence, you can deploy and manage a group of load-balanced VMs using Azure virtual machine scale settings. Thus, VM instances can automatically grow or shrink in response to demand or a predetermined schedule and as such ensure that your workload is highly available.
Requirements for Azure Virtual Machine Scale Set
- Azure Portal
- Command Line Interface
- Working Internet
Find other useful articles here: How to solve Could not get lock /var/lib/dpkg/lock Error in Ubuntu Linux and How to set up a third-party DNS server on a Linux Server and
Step1: Create a Resource Group
A resource group is a logical container where all your workload that you want to group together are housed in. So, for evert project, it will make sense to create one and we will create one for this as well.
We can either choose to do this using Azure portal or using the Cli. Thus, we will use both methods. We will label the one we create with cli as techdirectarchivergroup1 and the one we create from the console as techdirectarchivergroup2. So, here is the one created with Cli
az group create --name techdirectarchivergroup1 --location eastus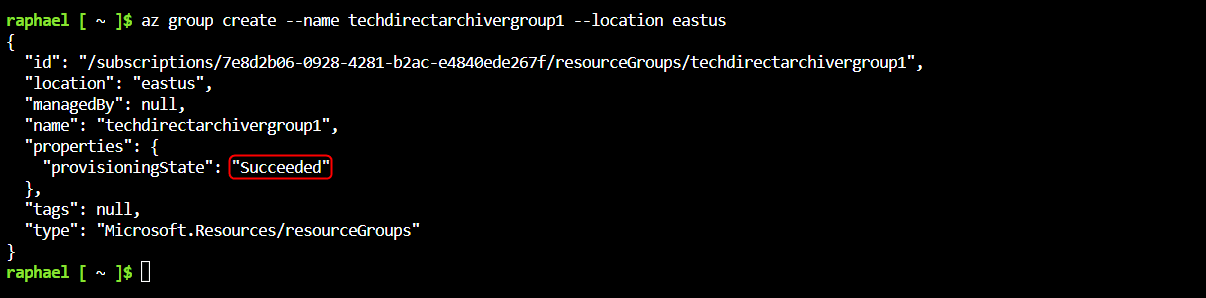
Thus. here is the one created from the console. Just search for resource group and fill in the information as in the screenshot below:

Step2: Create a Virtual Machine (VM) Scale Set
You can create a Virtual Machine Scale Set using either the portal or CLI
CLI Option
az vmss create \
  --resource-group techdirectarchivergroup1 \
  --name sampleScaleSet \
  --image UbuntuLTS \
  --upgrade-policy-mode automatic \
  --admin-username azureuser \
  --generate-ssh-keys
Portal Option
Notice that we can have the option of placing the Virtual Machine scale sets in availability zones to further protect our workload against datacenter failures, thus making them even more highly available.

Step3: Loadbalancing
The load balancer was created automatically when we created the scale set using the CLI method. But for the Azure portal method, you will have to enable the option and when you do, everything will be automatically assigned

Create Traffic rules to enable traffic to the application
az network lb rule create \
  --resource-group techdirectarchivergroup1 \
  --name myLoadBalancerRuleWeb \
  --lb-name sampleScaleSetLB \
  --backend-pool-name sampleScaleSetLBBEPool \
  --backend-port 80 \
  --frontend-ip-name loadBalancerFrontEnd \
  --frontend-port 80 \
  --protocol tcp
Step 4: Deploy a sample app for the Azure VM Scale set
We shall install a basic web application. Furthermore, we’ll use The Custom Script Extension below to install a basic NGINX web server as shown below:
az vmss extension set \
  --publisher Microsoft.Azure.Extensions \
  --version 2.0 \
  --name CustomScript \
  --resource-group  techdirectarchivergroup1 \
  --vmss-name sampleScaleSet \
  --settings '{"fileUris":["https://raw.githubusercontent.com/Azure-Samples/compute-automation-configurations/master/automate_nginx.sh"],"commandToExecute":"./automate_nginx.sh"}'
Step5: Test Scale set
Therefore, we shall access the sample web application in a web browser. However, the way to go about this is to use the public IP address of the load balancer and we can get it with the command below:
az network public-ip show \
  --resource-group techdirectarchivergroup1 \
  --name sampleScaleSetLBPublicIP \
  --query '[ipAddress]' \
  --output tsv
In a web browser, type in the load balancer’s public IP address. The following example demonstrates how the load balancer distributes traffic to one of your virtual machine instances:

Although staying in the cloud is good but not following best practices can make you get into trouble and as such, whenever you finish whatever you are doing, it is important to clean up. So, let’s delete the resource group with it’s content using the command:
az group delete --name techdirectarchivergroup1 --yes --no-wait
Summary
We can use a Virtual Machine Scale set to ensure high availability for the Azure workload. To this end, the steps to configure this have been shown in this article.