In this article, we will discuss how to troubleshoot and fix Windows 11 blue screen errors. The Blue Screen of Death (BSOD), also known as “blue screen,” “stop error,” or “system crash,” may occur when Windows encounters a significant issue that it is unable to manage and fix automatically. Here are other interesting guides on Windows: BSOD: How to replace blue screen error with a blank screen for system errors, how to restore quarantined files in Microsoft Defender Antivirus, and how to find and remove Malware with Microsoft Defender Offline.
The system will display a message like, “Your PC ran into a problem and needs to restart.” “We’re just collecting some error information, and then we’ll restart for you.” or general stop error codes (such as SYSTEM_SERVICE_EXCEPTION, CRITICAL_PROCESS_DIED, PAGE_FAULT_IN_NONPAGE_AREA, etc.); or hexadecimal codes (such as 0x000000D1, 0x0000000A, or 0x0000007B).
The Windows 11 blue screen error could be caused by crashing low-level software (or a driver) or bad hardware. When Windows crashes and stops working, the blue screen may show the exact stop error and a description of what happened. Some programs, documents, and apps may still be open and not saved.
How to Troubleshoot and fix Blue Screen Error BSOD in Windows 11
Before beginning the troubleshooting process, make sure to follow these steps:
- Remove any external storage devices, docks, and other unnecessary hardware, then reboot your PC.
- Inspect your hardware, especially your RAM if you get a memory management Windows 11 blue screen.
Please see how to create blue screen using the Not my Fault tool from Sysinternals, How to Fix Windows Security Blank Screen Issue, How to disable Lock Screen on Windows 10, and How to disable automatic screen lock in Ubuntu Linux.
1. Uninstall third-party applications in Safe Mode
Press the Windows key + I to open Settings and click on System, then select Recovery.

Select the Restart now button next to the Advanced startup section and click Restart from the follow-up prompt.

Your computer will restart then show the Advanced options screen. Select Troubleshoot from the options displayed, by using the arrow keys from your keyboard.

Select Advanced options.

Choose Startup Settings.
Here are some related guides as well: How to remove Microsoft Defender update on Windows 10 and Windows Server image, how to view Microsoft Defender Antivirus update details on Windows 10 image (install.wim), and how new Windows 11 encryption features and security enhancements will help protect hybrid work.

Click the Restart button.

Press the F4 key to get into Safe Mode. After your PC starts up, press Windows + I click Apps followed by Installed apps.

Here, type the name of your antivirus or application, then click the three-dot icon next to the result to choose Uninstall.

Third-party antivirus programs are known to cause problems, so we recommend removing them after entering Safe Mode as the first step to fixing the blue screen of death in Windows 11.
Also, you should get rid of any third-party software you installed before the BSOD.
After completing the above steps, the issue should be fixed. If the issue persists, try the next step.
2. Disable/uninstall/roll back your drivers
Disable the driver
Press the Windows key + R key to open Run utility and type devmgmt.msc then press the OK button.

Now locate the driver that you want to disable, right-click it, and choose Disable device.

Roll back the driver
Press the Windows key + R key to open Run utility and type devmgmt.msc then press the OK button.
Locate the driver that you want to roll back and double-click it.

Click the Driver tab and click on Roll back driver.
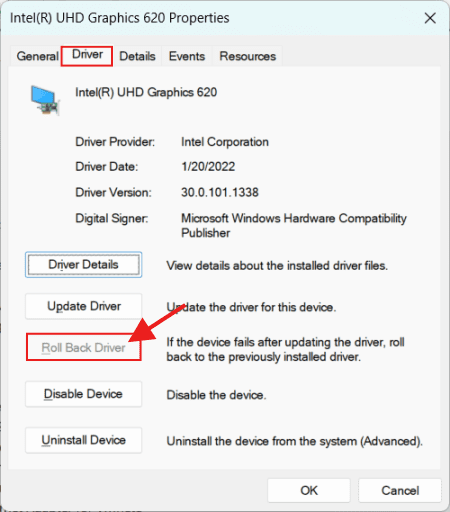
Now follow the instructions on the screen to complete the process.
Remember that you only need to update, remove, or roll back the driver causing the problem, so pay attention to the driver name in the BSOD error.
Uninstall the driver
Press the Windows key + R key to open Run utility and type devmgmt.msc then press the OK button.
Locate the driver you want to uninstall, right-click it, and choose Uninstall device. Click on Uninstall to confirm.

Now restart your PC and check if the problem is resolved.
3. Uninstall recent updates
Press Windows key + I to open the Settings app then navigate to the Windows Update section and select Update history.

Click on Uninstall updates.

Double-click on the update you want to remove and follow the on-screen instructions to complete the process.

Keep in mind that this solution only works if the issues began after installing the new update.
4. Run SFC and DISM scans
BSODs, such as the Windows 11 blue screen of death, need the repair of system files. To do so, press the Windows key, then enter cmd, and then open the first result as an administrator by selecting the Run as administrator option from the menu.

Now type the following command and press Enter:
sfc /scannow

Wait for the process to finish. then type the next command and press Enter:
DISM.exe/Online/Cleanup-Image/ Restorehealth

5. Perform a clean boot
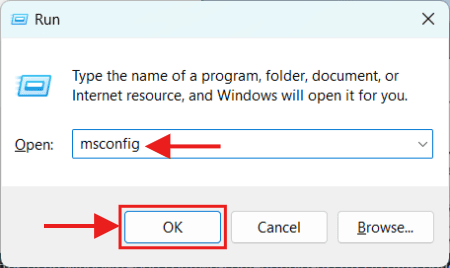
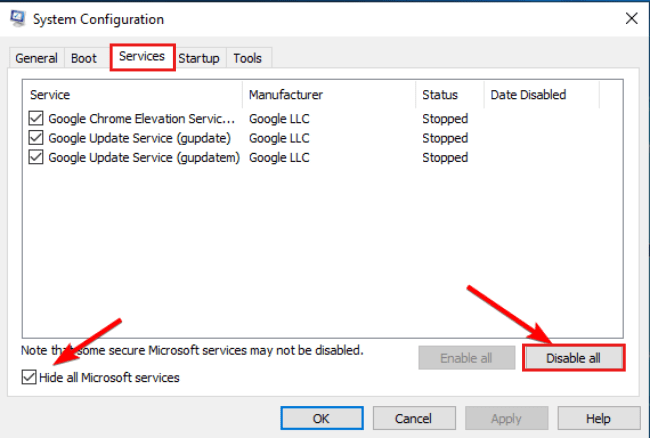
Press Windows key + R and enter msconfig. Press Enter.
Navigate to the Services tab and check Hide all Microsoft services. Now click on Disable all.
Go to the Startup tab then click Open Task Manager.
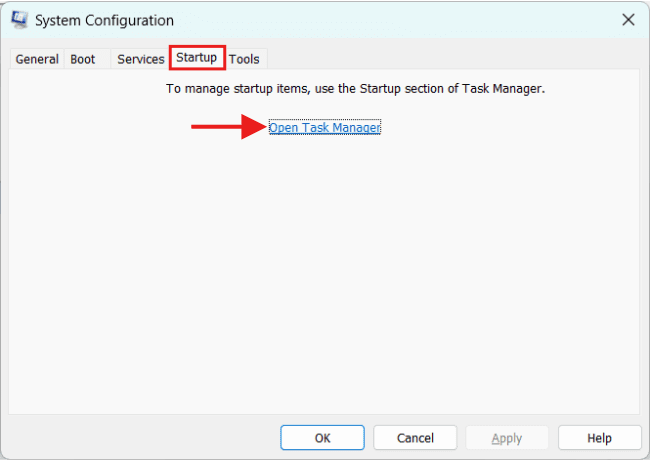
Navigate to the Startup tab, right-click the items in there one by one and choose Disable.

Close Task Manager, click OK in the System Configuration window and reboot your PC.

Check to see whether the issue persists after restarting your computer. If the problem keeps happening, restart services and apps one at a time until you find the cause.
6. Perform a System Restore
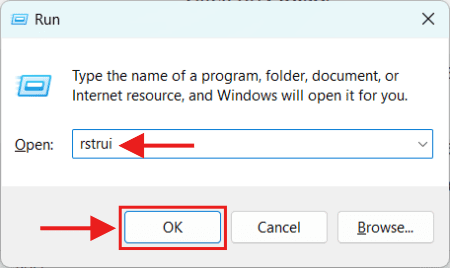
Press Windows key + R and enter rstrui. Press the OK button.
Select the desired restore point and click on Next.

Click on Finish.
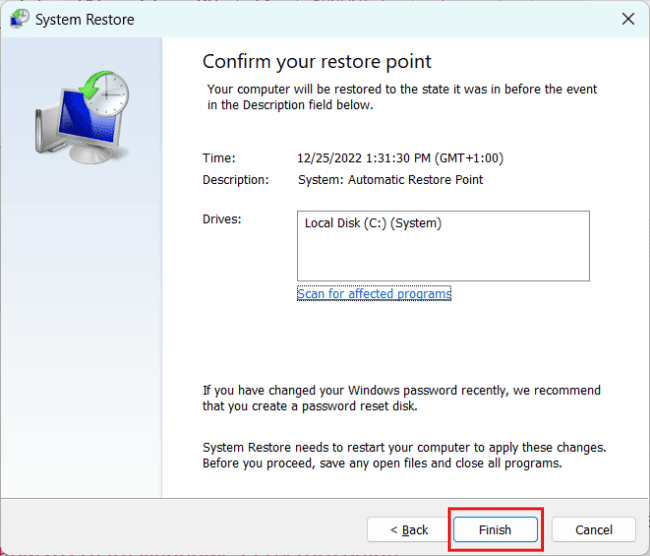
Wait while your PC restores your system.
Windows usually creates restore points automatically, but it’s also a good idea to do that manually from time to time. To learn more, check out our guide on how to create Windows 11 restore points.
7. Go back to the previous build
Press the Windows key + I to open Settings and click on System, then select Recovery.
Click the Go back button and follow the instructions on the screen.
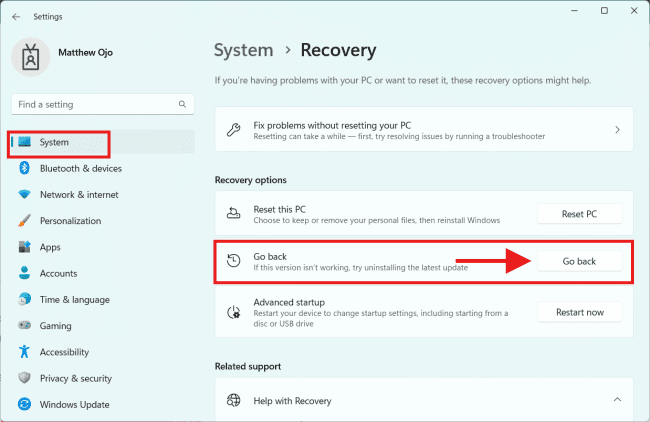
Keep in mind that this option is only accessible for a few days, so if difficulties arise after installing a fresh version, be sure to attempt it.
8. Reset Windows 11
If you reset Windows, the data on your system disk will be lost, so make a backup before you try this.
Press the Windows key + I to open Settings and click on System, then select Recovery.
Click on the Reset PC button.
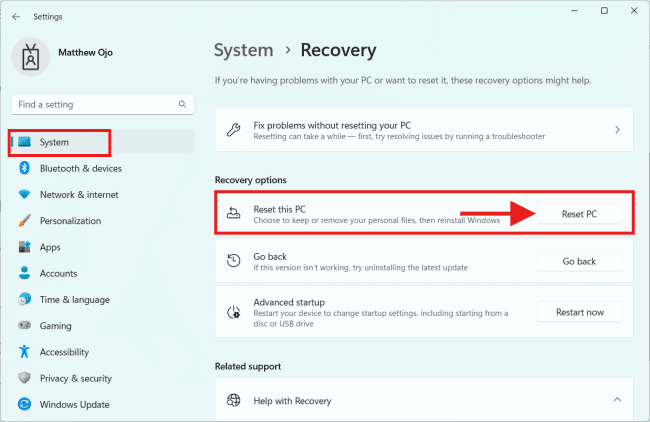
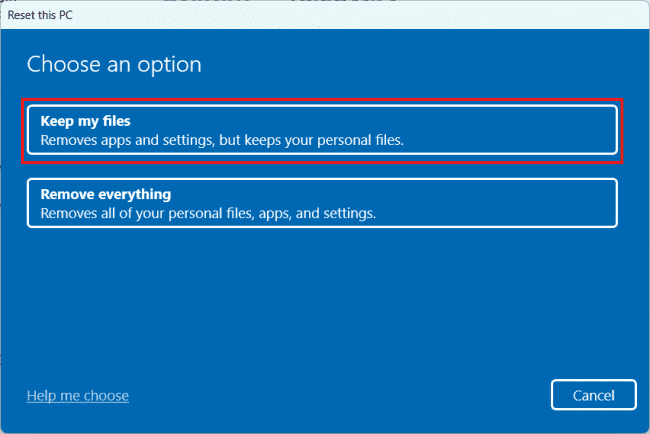
Pick Keep files or Remove everything. The Remove everything option will remove all files from your system drive, so it might be a better choice.
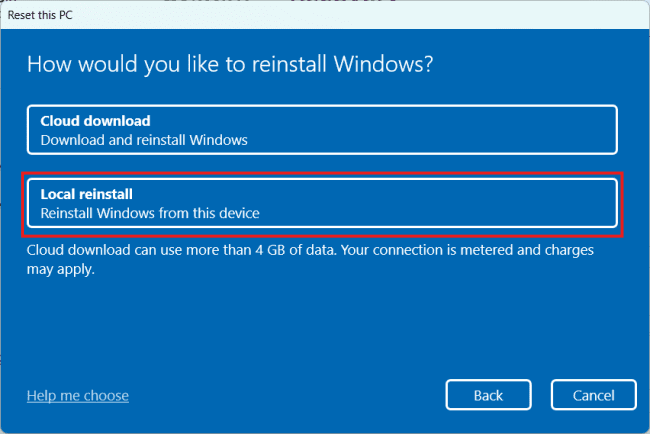
Select Local reinstall.
Click on Reset to confirm.
Follow the instructions on the screen to complete the process.
Are BSOD errors dangerous?
This depends on what kind of BSOD error happened. They will make your PC restart, which will cause you to lose any data you haven’t saved yet. This can be a problem because crashes can happen at any time and more than once a day.
If the error is caused by a hardware problem, it’s best to figure out what’s wrong and replace the failed component before the problem gets worse.
Conclusion on BSoD
The above steps are some general solutions that should help you fix a BSoD in Windows 11. In this guide, you have learned how to troubleshoot and fix Windows 11 blue screen errors. However, the exact steps might be different depending on the issue that you’re having.