In the Amazon Web Services (AWS) cloud, Amazon Elastic Compute Cloud (Amazon EC2) provides scalable computing capacity. Using Amazon EC2 reduces the need to invest in hardware upfront, allowing you to develop and deploy applications more quickly. You can launch as many or as a handful of virtual servers as you need, configure security and networking, and manage storage using EC2. Learn more by reviewing these posts: How to Allocate, Associate, Disassociate, and Release Elastic IP Address from an EC2 Instance, and how to Add a New Virtual Disk to an EC2 Instance and Format the Drive.
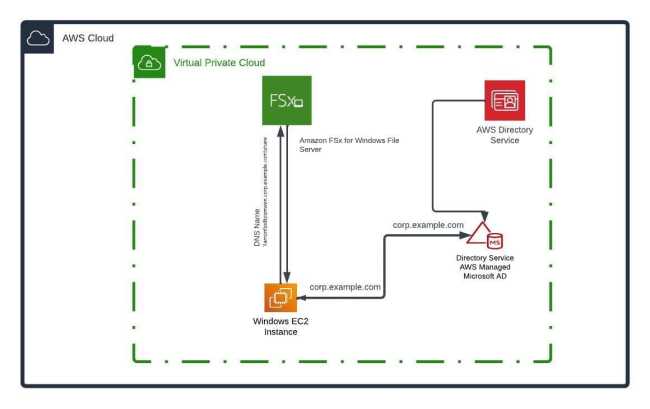
EC2 allows you to scale up or down in response to changes in demand or surges in popularity, reducing the need to anticipate future traffic. In this article, you will learn how to create Amazon FSx for Windows File Server, AWS Managed Active Directory, Manually join an existing EC2 Windows instance to AD, and Mount FSx File System.
Amazon EC2 instance
Amazon EC2 is available to Linux, Windows, and macOS instances, and has the following capabilities: Instances are virtual computing environments, Amazon Machine Images (AMIs) are preconfigured templates for your instances that package the bits you need for your server (including the operating system and additional software); Instance types are different configurations of CPU, memory, storage, and networking capacity for your instances.
Using key pairs, you can secure login information for your instances (AWS stores the public key, and you store the private key in a secure place), and instance store volumes are storage volumes for temporary data deleted when you stop, hibernate, or terminate your instance.
In this post, I’ll show you how to create FSx for Windows File Server, set up AWS Managed Microsoft Active Directory, manually join an existing EC2 Windows instance to Active Directory, and mount FSx File System.
Getting Started with Amazon FSx for Windows File Server
Amazon FSx is based on Windows Server and includes a plethora of administrative features such as end-user file restore, user quotas, and Access Control Lists (ACLs).
Windows-based applications can access fully-compatible shared file storage thanks to Windows Server’s native support for the SMB protocol. It provides fully managed shared storage built on Windows Server, as well as a wide variety of data access, management, and administrative capabilities.
To create FSx for the Windows file server, we will take the following steps:Step 1 – Creating Your Amazon FSx File System
You must first create your Windows-based Amazon Elastic Compute Cloud (AWS EC2) instance and the AWS Directory Service directory before you can create your Amazon FSx file system. If you haven’t already done so, review this post to learn how to create an EC2 instance via the AWS Management Console. The steps to create an AWS Managed Directory for Microsoft Active Directory are described.
To create the file system, go directly to the Amazon FSx console.

While on the FSx dashboard, click on create a file system to get started as shown in the above screenshot. Next, choose FSx for Windows File Server from the Select file system type page, then click Next.

The page Create file system appears. Give your file system a name in the File system details section. If you give your file systems names, it will be simpler to locate and manage them.
Note: You are limited to using 256 Unicode letters, digits, white space, and the special symbols + - =. : /Configure every other tab as shown in the screenshot below or otherwise if you want something different.

Select the right AWS VPC for you Amazon FSx File System
Choose the Amazon VPC that you want to link with your file system in the Network & security section. Choose the same Amazon VPC for your EC2 instance and AWS Directory Service directory.

You have the following options for Windows authentication: If you want to connect your file system to an AWS-managed Microsoft Active Directory domain.
Sselect AWS Managed Microsoft Active Directory and then select your AWS Directory Service directory from the list. If you don’t already have a directory, click on Create a new directory to create one and apply.

For Encryption, leave the default Encryption key setting of aws/fsx (default) as it is.

In the proceeding steps, leave everything as default and move to review the file system configuration shown on the Create file system page.

Make a note of which file system settings you can change after the file system is created for future reference.. and click on Create file system to create it.

After Amazon FSx has created the file system, navigate to the File Systems dashboard and select the file system ID. Select Attach and take note of your file system’s fully qualified domain name. It will be required in a later step.

Your FQDN should be similar to \\amznfsx8tzsmwen.corp.example.com\shareHere are some related guides: How to add an EBS volume to AWS EC2 via the AWS Console and CLI, and Why can’t I ping the Public IP Address of an EC2 instance?
How to Create AWS Managed Directory Service for Microsoft Active Directory
AWS Directory Service lets you run Microsoft Active Directory (AD) as a managed service. AWS Directory Service for Microsoft Active Directory, also referred to as AWS Managed Microsoft AD, is powered by Windows Server 2019. When you select and launch this directory type, it is created as a highly available pair of domain controllers connected to your virtual private cloud (VPC).
The domain controllers run in different Availability Zones in a Region of your choice. Host monitoring and recovery, data replication, snapshots, and software updates are automatically configured and managed for you.
To create AWS Managed Directory Service for Microsoft Active Directory, follow the steps below: From the AWS Management console search for and click on Directory Service and then click on set up a directory.

Step 2: Select the directory type as AWS Managed Microsoft AD and click on Next

Step 3: Select Standard Edition

Step 4: Enter the DNS Name, Directory NetBIOS name (optional) and Directory password and click on Next

Step 5: Choose VPC and subnets and click on Next

Step 6: Review and create the directory and click on Next


The directory is being created and can take between 20 – 45 minutes to finish creating.

When the directory becomes active as shown below, proceed to manually join it to an existing EC2 Windows instance to Active Directory

Manually join an EC2 Windows instance to AWS Managed Active Directory
Before you can mount a file share on a Windows instance, you must launch an EC2 instance and join it to an AWS Directory Service for Microsoft Active Directory. Let’s take these few steps to learn how to manually join a Windows EC2 instance to the AWS Directory Service for Microsoft Active Directory.
Connect a Windows instance to an AWS Managed Microsoft AD Service
To connect please follow these steps:Step 1: Connect to the instance using any Remote Desktop Protocol client. Feel free to use the built-in RDP client on your local PC.
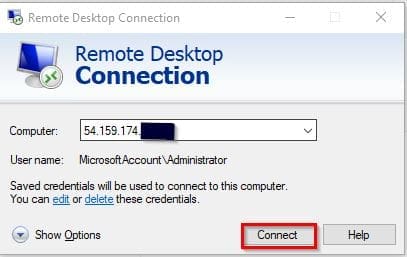
Supply the username and password for your Windows instance to allow the connection.
Step 2: After successfully connecting to the Windows instance, open the instance’s TCP/IPv4 properties dialog box. You can also open the network connection by running the below command in the run command dialog box
%SystemRoot%\system32\control.exe ncpa.cpl
Enter the Right IP Parameters for the EC2 instance
Step 3: Select Properties from the context menu (right-click) for any enabled network connection. Double-click Internet Protocol Version 4 (IPv4) in the connection properties dialog box.


Step 4: Select Use the following DNS server addresses, and change the Preferred DNS server and Alternate DNS server addresses to the IP addresses of the AWS Directory Service-provided DNS servers, and then click OK.

Note: The DNS Server can be found on the AWS Directory Service dashboard under the Newtrok and Security tab
Join EC2 instance to AWS Managed Active Directory
Step 5: Next, open the System Properties dialog box, click the Computer Name tab, and then click Change. The below command can also open the computer settings for you:
%SystemRoot%\system32\control.exe sysdm.cplSelect Domain in the Member of field

Step 6: Enter the fully qualified name of your AWS Directory Service directory, and click OK. When prompted for the domain administrator’s name and password, enter the username and password of an account with domain join privileges.


Note:
You can enter either the fully qualified name of your domain or the NetBios name, followed by a backslash (\), and then the user name.

If using AWS Managed Microsoft AD, the user name would be Admin. For example, corp.example.com\admin or corp\admin.

If using Simple AD, the user name would be Administrator. For example, corp.example.com\administrator or corp\administrator.
Note: You can reset the directory username and password directly in the AWS Microsoft Active Directory dashboard.

After you receive the welcome message, restart the instance to see the changes take effect.
Mount the FSx File System to a Windows EC2 Instance
Since the overall object of this guide is “create Amazon FSx for Windows File Server, AWS Managed Active Directory, Manually join an existing EC2 Windows instance to AD, and Mount FSx File System.
You can now mount your Amazon FSx file system to your AWS Directory Service-joined Microsoft Windows-based Amazon EC2 instance. The name of your file share differs from the name of your file system.
Having joined the system to the AWS-managed directory service, let’s proceed to mount the file system through the following steps:
With the connection to the Windows instance in tact, Connect to your instance, and open File Explorer on the Windows instance. Right-click on the menu for Network in the navigation pane and select Map Network Drive.

When the dialog box for mapping a drive pops up, choose the drive letter of your choice. For the Folder field, enter the file system DNS name and the share name. Share is the default Amazon FSx share. The DNS name can be found in the Amazon FSx console.
You can map your file system using either the default DNS name assigned by Amazon FSx or a custom DNS alias. \share is the name of the standard Amazon FSx share.
The DNS name is accessible at the FSx console. The DNS name in this demo is shown below:
amznfsx8tzsmwen.corp.example.com\shareChoose whether the file share should Reconnect at sign-in, and then choose Finish.

That is it, congrats! You have learned how to create Amazon FSx for Windows File Server, AWS Managed AD, join an EC2 Windows instance to AD, and Mount FSx File SystemYou have successfully mapped your FSx file system to an EC2 Windows instance.


