
If you have been using create-react-app to set up your React project, it’s now time to start using Vite for better performance and faster development speed. Vite is a frontend build tool that was developed and designed to improve your development experience because it will offer you faster development and better performance. In this guide, I will show you how to create a React App with Vite. Please see how to automatically resolve errors associated with failed dependencies, How to set up a self-hosted speed test server on Ubuntu Linux, and how to fix “The web application “Administration Portal” cannot be enabled because one or more software dependencies are not met“.
Vite improves the development server start time by first dividing the modules in an application into two parts which are dependencies and source code. Dependencies are modules within your application that do not change, unlike the source code which is often edited all through the development. Below is a YouTube video discussing this topic.
Vite makes use of esbuild which ensures optimal output and behavioural consistency between your dev server and the production build. This is why Vite comes with a pre-configured build command that can create many performance optimizations for your development. If you want to deploy your React application to AWS S3 read about How to deploy a React Application to AWS S3 and if it’s Netlify you can read about How to Deploy a React Application on Netlify.
How to Create a Vite Project
Before you can create a Vite Project you need to install Node.js. Installing Node.js on Windows is very simple just go to the Nodejs website to download your specific version and follow the guidelines to install it. But you may also want to know how to install Node.js on Ubuntu.
1. Run the following commands to create your first Vite Project
This command will help launch the Vite Project with a specific version in mind but if you leave it as latest, you will get the current version installed.
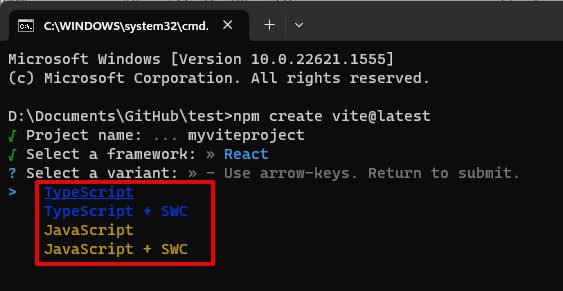
npm create vite@latest or npm create vite@4.1.0After this command is run, you will need to supply the project name and hit the enter key.

Vite will now prompt you to select a framework. Select React.

Vite will now ask you to select a variant or a language. You can choose TypeScript or JavaScript. But in this guide, I will be using TypeScript as our language.
After this, your Vite Project will be created successfully. Here is an article on how to install new fonts in Microsoft Office.

2. Installing Node Package Dependencies
Change the directory to the project folder and install the node package inside. Run this command:
npm install 
Please note that while installing this npm package it’s possible you get stuck. You can check this guide on How to fix npm install hangs on ‘sill idealTree buildDeps’

After installing npm, you can run the project by using this command:
npm run devOnce successful you will see the Local Address with the port number where you can access your application.

Your Project is successfully launched when you see this homepage. Please also see how to clean packages laying around in Linux.

I hope you found this blog post on how to Create a React App with Vite. Interesting and helpful. In case you have any questions do not hesitate to ask in the comment section.


