Skip to content

TechDirectArchive

Hands-on IT, Cloud, Security & DevOps Insights

  • Home
  • About
  • Advertise With US
  • Reviews
  • Contact
  • Toggle search form
Home » Microsoft Exchange/Office/365 » How to change Windows 11 and 10 default mail app to Outlook

How to change Windows 11 and 10 default mail app to Outlook

Posted on 30/08/202329/09/2023 Matthew By Matthew No Comments on How to change Windows 11 and 10 default mail app to Outlook
Featured image - change default mail app
Change Windows Default Mail App to Outlook

Being able to manage your email inbox effectively is crucial in today’s professional and personal lives. Windows 11, like its predecessor Windows 10, allows users to easily include their favourite email client within the operating system. Microsoft Outlook is the most powerful and feature-rich of these solutions for organizing your inbox, calendar, and to-do list. Kindly see How to Recall an Email in Microsoft Outlook, and Microsoft Outlook: Adding & Removing Folders in Favorites. This article shall discuss how to change the Windows 11 and 10 default mail app to Outlook.

We will show you how to make Microsoft Outlook the default email client on Windows 11 and 10 and walk you through the rest of the procedure if you are unfamiliar with the process. You can improve your digital communication, workflow, and email organization all from your desktop by making this one simple change. Here are other related guides on outlook: How to Share Microsoft Outlook Calendar on Desktop and on Web, 5 Steps to Fix Outlook continually prompts for passwords on Windows 10 and 11, and How to install new fonts in Microsoft Office.

How to change the Windows 11 default mail app to Outlook

Press the “Windows key + I” to open the system settings. Then, select “Apps,” and on the right pane, choose “Default apps.”

Select Default apps in the App settings

Within the default apps section, scroll down and click on the current default mail app on your system.

Click on Mail
Select the current default mail app

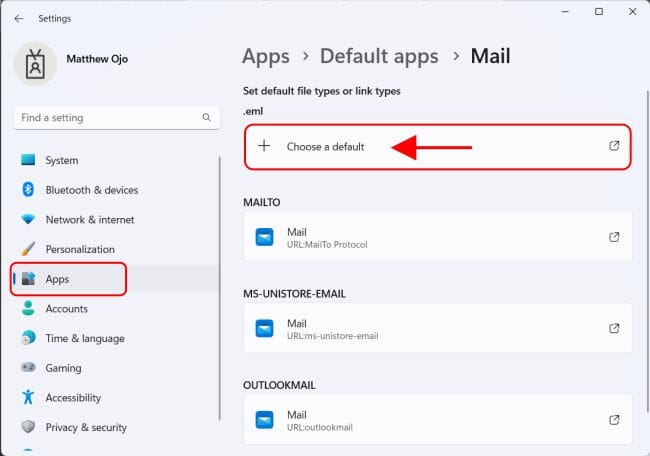
In the current default mail app, click on “Choose a default.” Upon completing that action, proceed to click on the MAILTO option and also modify the default to Outlook.

Click on choose a default

Under the suggested apps, select Outlook as the default app.

Select outlook as the default app

After completing this process, every email you send will automatically open Outlook as the mail app.

How to change Windows 10 default mail app to Outlook

Press the Windows key to open the Start menu, then type “Control Panel” in the search box and open it.

Open control panel from start menu

Click on “Programs” in the control panel”

Click on Programs
Click on Programs

Within the Programs section, select “Default Programs.”

Select default programs

Under the Default Programs, click on “Associate a file type or protocol with a program.”

Click on Associate a file type or protocol with a program

This will open up the “Default apps” settings. On the right-hand side of this interface, under the “Email” category, click on the default Mail app.

Click on Mail app
Click on Mail app

Under the “Choose an app,” select Outlook as the default app.

Click Outlook to set default app

To finalize the process, verify that Outlook is now confirmed as the designated default email application.

Outlook set as default app

I hope you found this blog post helpful on how to “change Windows 11 and 10 default mail app to Outlook”. Please let me know in the comment section if you have any questions.

Rate this post

Thank you for reading this post. Kindly share it with others.

  • Share on X (Opens in new window) X
  • Share on Reddit (Opens in new window) Reddit
  • Share on LinkedIn (Opens in new window) LinkedIn
  • Share on Facebook (Opens in new window) Facebook
  • Share on Pinterest (Opens in new window) Pinterest
  • Share on Tumblr (Opens in new window) Tumblr
  • Share on Telegram (Opens in new window) Telegram
  • Share on WhatsApp (Opens in new window) WhatsApp
  • Share on Mastodon (Opens in new window) Mastodon
  • Share on Bluesky (Opens in new window) Bluesky
  • Share on Threads (Opens in new window) Threads
  • Share on Nextdoor (Opens in new window) Nextdoor
Windows Tags:email, Microsoft outlook, Microsoft Windows, Outlook, Windows 10, Windows 11, Windows Server 2016

Post navigation

Previous Post: Great details on VMware Tech Showcase
Next Post: Convert Google Forms Into Microsoft Forms

Related Posts

  • powershell auto run
    How to pause a PowerShell script Windows
  • username
    Is my AD user or service account password correct? Run App as a different User and switch Users in Windows Windows
  • Ping 4
    Perform continuous ping on OSes and network Appliances Mac
  • Add or remove features   fix dotnet framework issues
    Fix the request to add or remove features on the specified server failed Windows
  • fix windows activation 0x87E10BC6 error
    Fix Error 0x87E10BC6 on a PC running Windows non-core Edition Windows
  • How to create a Recovery Partition in Microsoft Windows
    How to create a Recovery Partition in Microsoft Windows 10/11 Windows

More Related Articles

powershell auto run How to pause a PowerShell script Windows
username Is my AD user or service account password correct? Run App as a different User and switch Users in Windows Windows
Ping 4 Perform continuous ping on OSes and network Appliances Mac
Add or remove features   fix dotnet framework issues Fix the request to add or remove features on the specified server failed Windows
fix windows activation 0x87E10BC6 error Fix Error 0x87E10BC6 on a PC running Windows non-core Edition Windows
How to create a Recovery Partition in Microsoft Windows How to create a Recovery Partition in Microsoft Windows 10/11 Windows

Leave a Reply Cancel reply

You must be logged in to post a comment.

Microsoft MVP

VEEAMLEGEND

vexpert-badge-stars-5

Virtual Background

GoogleNews

Categories

veeaam100

sysadmin top30a

  • Integrate Icloud With Windows
    Synchronize Apple Calendar on Windows with Outlook [Part 2] Mac
  • How to download install and use Kitty SSH Client on Windows
    How to Download and Use KiTTY SSH Client on Windows Configuration Management Tool
  • ESXi
    How to install ESXi on VirtualBox Virtualization
  • S3 Bucket Replication
    Set up Cross-Region Replication for S3 Buckets AWS/Azure/OpenShift
  • xxxxxx
    How to move the Taskbar to a second screen in Windows Windows
  • lampstack feature lamp stack ubuntu
    How to Install LAMP Stack on Ubuntu 18.04 Linux
  • Webp.net resizeimage 4
    Create a Service Fabric Cluster using the Azure Stack Hub portal and the CLI AWS/Azure/OpenShift
  • veeam and wasabi
    Modern Backup Strategy with Veeam and Wasabi: Truly Immutable Network | Monitoring

Subscribe to Blog via Email

Enter your email address to subscribe to this blog and receive notifications of new posts by email.

Join 1,824 other subscribers
  • RSS - Posts
  • RSS - Comments
  • About
  • Authors
  • Write for us
  • Advertise with us
  • General Terms and Conditions
  • Privacy policy
  • Feedly
  • Telegram
  • Youtube
  • Facebook
  • Instagram
  • LinkedIn
  • Tumblr
  • Pinterest
  • Twitter
  • mastodon

Tags

Active Directory AWS Azure Bitlocker Microsoft Windows PowerShell WDS Windows 10 Windows 11 Windows Server 2016

Copyright © 2025 TechDirectArchive


Loading Comments...
 

You must be logged in to post a comment.