Deep Dive into Protecting AWS EC2, RDS Instances and VPC

Veeam Backup for Amazon Web Services (Veeam Backup for AWS or VBAWS) protects and facilitates disaster recovery for Amazon Elastic Compute Cloud (EC2), Amazon Relational Database Service (RDS), Amazon DynamoDB, and Amazon Elastic File System (EFS) environments. In this article, we shall deep dive into Protecting AWS EC2 and RDS Instances and VPC (Amazon Virtual Private Cloud) configurations as well. Please see how to upgrade Veeam ONE to v12.1, and how to verify whether the xp_cmdshell feature is enabled or disabled in MSSQL Server.
Note: Veeam Backup for AWS does not curently support backup and restore of RDS Multi-AZ DB clusters. Starting from v12, Veeam eliminates the requirement for local storage and Scale-Out Backup Repository (SOBR) to directly perform backups to S3. It seamlessly supports all S3 classes and immutability, and integrates with S3 Object Lock (WORM).
Utilizing a write once, read many (WORM) model state ensures the integrity of backup data, defending against cyber threats aiming to attack and encrypt critical data in backups. Here I have created a Shared Folder with the WORM Feature “Setup DS923+ Synology NAS as a Backup Repository for VBR“.
We will focus on creating cloud-native snapshots of EC2 instances, RDS, and protecting AWS VPC. If you’re looking to protect your AWS workload, I recommend implementing the following architecture for a production environment. Place your Veeam Backup for AWS in a separate VPC. Here is an article on “how to Set up an Amazon Web Services (AWS) Account“.

You could use the default VPC for your backup environment and create a new VPC as discussed here for your production workload “VPC, Subnet, NACL, Security Group: Create your own Network on AWS from Scratch [Part 2]“. Also, see how to “Migrate Veeam Configuration Database to PostgreSQL Server“.
Why Choose VBAWS Over AMI and AWS Backup?
Using Veeam for EC2 instance backups over native AWS solutions like AMI (Amazon Machine Image) or AWS Backup offer several advantages. Here are some reasons why an organizations might choose Veeam Veeam Backup for AWS.
- Veeam supports cross-platform backup and recovery, allowing you to back up instances from different cloud providers or on-premises environments. This flexibility is valuable if you have a multi-cloud or hybrid infrastructure.
- Veeam provides application-aware backups, ensuring consistency and integrity when for applications and databases which is crucial for mission-critical applications.
- VBAWS offers granular recovery options, and allows for advanced retention policies. This gives you more control over how long backup data is retained. This can be beneficial for compliance requirements and long-term data storage needs.
- Veeam Backup and Replication/Veeam Backup for AWS provides centralised management for backups, making it easier to manage and monitor backups across multiple instances and environments from a single console.
- Veeam employs advanced techniques for data transfer, such as incremental backups and compression, which can reduce the amount of data transferred and optimize storage usage.
That said, utilizing native AWS solutions like Amazon Machine Image (AMI) or AWS Backup offers a straightforward approach but may not fully address your organisation’s compliance and regulatory requirements. The decision between Veeam and native AWS tools ultimately hinges on factors such as infrastructure complexity and recovery objectives (RPO/RTO).
Essential Measures for EC2 and RDS Backup Protection
Simply relying on backup software to protect your workload is insufficient; implementing monitoring and alert systems is also imperative. Here is how to deploy VeeamOne Monitor. Conducting regular restoration drills is recommended to ensure that backups can be successfully recovered in the event of a disaster.
If you do not have VBR, please see Install Veeam Backup And Replication With Dedicated SQL Server, how to Install and configure Veeam Backup and Replication Community Edition, and how to uninstall Veeam Backup and Replication from your server
Backup Repositories [Amazon S3]
Amazon S3 serves as the trusted primary storage for customers worldwide, offering 99.999999999% (11 9s) data durability. Customers can securely store and protect their business-critical data. In this section, we shall discuss the Amazon S3 Object Storage as a backup target/repository.
A backup repository is a folder in an Amazon S3 bucket where Veeam Backup for AWS stores EC2 and RDS image-level backups. Additionally, it stores backup copies of VPC, indexes of EFS file systems and Veeam Backup for AWS configuration backups.
Amazon S3 “Object Lock” feature blocks permanent object deletion during a customer-defined retention period, allowing enforcement of retention policies for enhanced data protection and regulatory compliance. With S3 Object Lock, S3 versioning is automatically enabled. Thereby ensuring that locked object versions cannot be permanently deleted or overwritten, following a write-once-read-many (WORM) model.
S3 Object Lock sets the industry standard for object storage immutability, providing robust ransomware protection. Here is a guide on how to manually create an Amazon S3 Bucket for your backup or storage need “Backup Repository: How to Create Amazon S3 buckets“.
To communicate with a backup repository, Veeam Backup for AWS uses Veeam Data Mover, the service that runs on a worker instance and is responsible for data processing and transfer. When a backup policy addresses the backup repository, the Veeam Data Mover establishes a connection with the repository to enable data transfer
Note: A backup repository must not be managed by multiple backup appliances simultaneously. This is because, retention sessions running on different backup appliances may corrupt backups stored in the repository, thereby resulting in data loss.
Here is How to upgrade Veeam Backup and Replication v11 to 12.1, Demystifying Zero Trust with Veeam: Design your Architecture, and how to Set up Veeam Backup for Microsoft Azure.
Encryption on Backup Repositories
For enhanced data security, Veeam Backup for AWS (VBAWS) allows you to enable encryption at the repository level. VBAWS encrypts backup files stored in backup repositories the same way as Veeam Backup & Replication encrypts backup files stored in backup repositories on other repositories such as “how to Setup iSCSI Target and Storage LUN on Synology DS923+ for VBR“, and “how to Create local Backup Repository and Add HyperV to VBR Inventory“.
Note: Veeam Backup for AWS also supports scenarios where data is backed up to S3 buckets with enabled Amazon S3 default encryption. You can add the S3 bucket to the backup infrastructure and use it as a target location for image-level backup as we will see very shortly.
Set up a Veeam Backup & Replication server
If you haven’t installed Veeam Backup and Replication yet, here are some guides to help you get started “Install and configure Veeam Backup and Replication Community Edition“, how to install Veeam Backup And Replication With Dedicated SQL Server, and how to “Install Veeam Backup and Replication with the default PostgreSQL“.
Provision Veeam Backup for AWS through VBR
With with VBAWSv7.0, VBAWS is integrated with Veeam Backup & Replication solution. Certain features are exclusively accessible for the backup appliances managed within Veeam Backup & Replication. To access the full functionality, deploy your appliances via VBR.
Note: There are a couple of ways to deploy VBAWS such as via the AWS Plugin, cloud formation etc. In this guide, I will deploy the appliance from the Veeam Backup and Replication (VBR) console.
To do this, launch the Veeam Backup & Replication Console from your desktop. Click on Backup Infrastructure from the button switching views, and right click on the Manage Server in the navigation pane.
You could also click on Add Server from the Tabs or right-click on the working area. The choice is yours!
Select Veeam Cloud-Native Backup Appliance.

Deployment Mode
This initiates the deployment mode. If you previously set up the appliance through the AWS Marketplace, you could connect to an existing appliance. However, in this case, I will deploy a new appliance. Click Next to proceed.

Add your AWS Account, region, and datacenter.

I will populate the credential field with the IAM user account I have created on AWS.

Here are some guides to Install Windows Deployment Services on Windows Server 2022, and how to install WSUS on Windows Server 2022.
Deploy Appliance
Click on the link as shown below to deploy the VBAWS Appliance.

Upon redirection to the AWS Marketplace, if authentication hasn’t been completed previously, you will be prompted to log in to AWS. Enter your IAM user or Root User account for authentication.
Note: Using the root account for your everyday AWS administration is not recommended.

Click on “Continue to Subscribe”

You will get a couple of emails you can disregard.

In Veeam Backup & Replication, configure your AWS account by providing the necessary credentials which we started above. Click Next to continue.

Enter the EC2 instance name. The description is option. Click Next to proceed.

Clicking on the “Advanced” button allows you to select a different instance type. Exercise caution as it may result in additional changes.

Select your connection method and click next.

I will be selcting a dedicated VPC I have created in the link shared above.

Ensure you have populated all fields, then click on Next to proceed.

You’ll need to confirm that the selected network security group contains a rule for the specified backup server. Click “Ok” and proceed to the next step

On the guest OS wizard, click on “Add” and enter your credential

Click on the “Add” utton to add the key pair

Click on “Apply” to apply the settings

As you can see below, we have successfully created our Veeam backup for AWS over the VBR Console. As you can see, it is currently initialiazing.

Here are the steps involved in deploying VBAWS. Click “Next” to proceed.

Just in case you run into several VBAWS errors. Please see “Veeam backup for aws Processing postgres rds failed: No valid combination of the network settings was found for the worker configuration“.
Create a New Backup Repository
Note: You can follow this step to launch the Backup repository wizard or have VBR do it for you. To manually initiate the backup repo creation, click Finish below and navigate to “Backup Infrastructure on the bottom left menu. Right click Backup Repositories and choose Add Backup Repository“.
I enjoy the convenience of a smooth workflow. Thus, I will let Veeam Backup & Replication (VBR) initiate the backup repository creation wizard by checking the button “Open the S3 backup repository creation wizard’ and then proceed to click Finish”.

Note: As mentioned earlier, you can utilize any bucket you’ve previously created. Since I aim to demonstrate all the steps in this guide, I will create a new repository using the “Add External Repository” wizard below.
Enter the name of your repository and click Next.

Add your AWS account, region and the Gateway Server and click Next.

Note: As mentioned earlier, you can utilize any bucket you’ve previously created. Since I aim to demonstrate all the steps in this guide, I will create a new repository using the “Add External Repository” wizard below.

Select your desired datacenter and browser to a bucket you wish to utilze.

For me, I will click on create “New Bucket”

Enter the bucket name and click Ok

Select the Bucket and Click OK again.

You can see that our new bucket is selected. Check the box to make the backup “immutable” for the entire retention period. This action prevents attackers from deleting your data, ensuring that you won’t lose any information or need to pay any ransom.

Enable backup file encryption and click on “Apply”.

Navigate to S3, you will be able to find your new S3 bucket.

Click Next on the Apply message wizard

Click Finish to complete the “Repository” creation.

In the upcoming sections, we’ll need to protect our EC2 instances, RDS databases, and VPC

Veeam Backup for AWS: Simplifying AWS RDS Backups
We’ve previously explored the rationale behind opting to pay for Veeam Backup for AWS instead of utilizing AWS’s native solution. In addition to the above, Veeam implements security best practices including encryption of data transfer at rest, ensuring that your backup data remains secure. This can be especially important for sensitive databases and regulatory compliance.
Also, flexible automation and scheduling of backup jobs ensures data protection without manual intervention. This can be crucial for meeting backup SLAs (Service Level Agreements).
RDS Database Backups
Note: The backup appliance includes a preconfigured VPC Configuration Backup policy, which is disabled by default. We will address this in the last section of this article. To start protecting your Amazon VPC configuration, you must edit the VPC Configuration Backup policy settings and enable the policy.
You can create an RDS policy needed for your RDS backup by navigating to the VBAWS appliance URL. However, I will demonstrate how to initiate this through VBR.
This time, right-click on the working area and select backup, then AWS and then RDS. Ensure you are on the right switching view “Home”.

You will be redirected to the VBAWS appliance. Due to the absence of a valid TLS certificate, you will receive a prompt displaying the well-known “Your connection isn’t private” message. You need to click “Advanced” to proceed.

Click on the URL to access the applaince.

Create an RDS Backup Policy
A backup policy is a collection of settings that define the way backup operations are performed: what data to back up, where to store backups, when to start the backup process,
To launch the Add RDS Policy, please navigate to Policies > RDS and click on “Add”. Enter the policy name and description and click Next

Specify an IAM account. Ensure that the specified IAM role belongs to the AWS account containing the RDS resources you want to protect and has the required permissions assigned
Note: When deploying Veeam Backup for AWS, the system automatically creates and adds the Default Backup Restore IAM role to the backup appliance. This IAM role is assigned all permissions required to perform operations in the same AWS account where the backup appliance resides.

Do not forget to check the permission if you entered a different IAM role. This ensure you have the right privileges to perform RDS backup.

Also, select the right region.

Also, choose resource to protect

You can add he databse ID or browser to the specific resources from the global list.

I will be selecting the following instance to protect it.

Click on apply as shown below.

All fields have been populated. Click on Next to proceed.

Toggle to enable “RDS backup”. At this moment, I’m not interested in taking additional snapshots.

Select the positron to have your backup stored, and click on Apply.

Click Next to proceed. I am not interested in the Archive Settings.

Click on “Configure Account”

Enter the RDS database account and password and click on Apply. Here is a guide on how to create an Amazon Relational Database Service Instance. You will also get the instance password from here.
If you specify a different credential "you will encounter the following error. "Processing postgresql failed: The processing has exited with exit code 2.psql: error: connection to the server at "postgresql.......URL"IP Address, port 5432 failed. Fatal: password authentication failed for user: .......
Click next to proceed

Select your scheduling option

De to AWS cost, I have decided to create a yearly schedule and to keep backup for 1 year. Click Apply.

Next Next!

Not interested in tags at the moment. Click Next to proceed.

On the general settings, select the number of automatic retry and click Next

Click Next also on the cost estimation

I would recommend testing the configuration to ensure the backup succeeds. Veeam Backup for AWS will save the configured backup policy.

The test policy succeeded. Click on Close.

Start RDS Policy
As seen below, we created our policy but never executed it. Click on “Start”

On the warning prompt, click on OK

As you can see below, the backup job is running.

You would be able to see the job running also non AWS.

Note: When faced with this error, I will show you the steps to fix this issue "veeam backup for aws Processing postgres rds failed: No valid combination of the network settings was found for the worker configuration. You have to create a production worker node, and ensure the VPC has the right network settings.
As shown blow, the snapshot has completed successfully. The backup is still running.

Lick on Success to view the RDS policy snapshot or navigate to the session log to view te session status. Click Close when you are done.

unfortunately, I missed the first screenshoot and rerun the job and this time it succeeded with some warning.

RDS Restoration with Veeam Backup for AWS
You can recover corrupted databases of a DB instance running the PostgreSQL database engine from an image-level backup in the Veeam Backup for AWS Web UI only.
Note: You can launch the RDS Database Restore wizard directly from the Veeam Backup & Replication console to start the restore operation.
Navigate to “Protected Data ” and select

You cxan perform any of the “restoration” as you wish.

In the Veeam Backup & Replication console, open the Home view. Navigate to Backups > External Repositor and expand the backup policy that protects the database you want to recover select the necessary database and click Amazon RDS on the ribbon.Alternatively, you can right-click the selected database and click Restore to Amazon RDS. Veeam Backup & Replication will open the RDS Database Restore wizard in a web browser as shown above.

EC2 Instance Backup with Veeam Backup for AWS
Create backup jobs for your EC2 instances using VBAWS. Configure backup settings such as frequency, retention policies, and storage targets. Here is how to “create an EC2 Instance“.
Note: One backup policy can be used to process one or more instances within one AWS account. The scope of data that you can protect in an AWS account is limited by permissions of an IAM role that is specified in the backup policy settings.
This time, lets initiate the EC2 Backup from the console. Click On “Home”, and then expand “jobs” and right-click on “Backup”. Selct AWS, and this time EC2. You will be redirect to the web browser.

Note: You can also do this from the “Appliance”, click on the EC2 backup Policy. Then, navigate to Policies > EC2 and click Add.
Enter the Policy name and description and click Next

When you deploy Veeam Backup for AWS, the Default Backup Restore IAM role is automatically created and added to the backup appliance. Default IAM roles might grant more permissions than necessary for the backup process.
You can specify a custom IAM roles with granular permissions to perform operations as you wish.

But do not forget to “check the permission”. Click Close.

Select a region and click on Apply.

Choose an EC2 to protect. You can also exclude an instance from VBAWS backup. Click Next to proceed.

Browse to the instance you wish to save.

Now, select the instance and click on “Protect”.

Click on “Apply”.

The sources field has been populated. Click Next to proceed.

Not interested in “guest processing settings” for now. Click Next to proceed.

Enable the “Backup”

See Object First OOTBI Appliance Quick Setup, how to Build a Scalable VPC for Your AWS Environment [Part 1], and How to Remove Remote Desktop Services Role on Windows Server.
Define the Backup Target
Select the Repository and click “Apply”.

To perform EC2 backup, Veeam Backup for AWS by default deploys worker instances in the backup account (that is, the AWS account to which the service IAM role used to launch worker instances belongs), in the same AWS Region where source EC2 instances reside.
However, you can instruct Veeam Backup for AWS to deploy worker instances in a production account. I will show you in a different guide how to deploy a Worker.

Do not forget to check the permission to be safe! Click on Close when complete.

Define he backup schedule and click next. You can take a look at the cost, it is 0.00 at the moment”.

I have selected the cost effect scheduling option and this is just $0.31

On the general settings, enable the number of retry policy and also enable the health check.

Review the cost and click Next

Do not forget to test the connection and close when complete.


Click on “Finish”.


On the prompt, click OK

Start EC2 Backup Policy
As you can see, we have successfully created our EC2 Backup Policy. Click on start to initiate the EC2 Backup.

On the prompt, click ok Ok stating the immutability.


Snapshot job created successfully. Backup still running.

You can see from AWS, that numerous worker nodes have been created and some terminated to ensure the backup job is executed successfully. When the job completes, all worker nodes will be terminated without incurring any cost.

Backup have completed successfully.

Perform EC2 Restoration
Note: When restoring multiple EC2 instances that have the same EBS volume attached. Veeam Backup for AWS restores one volume per each instance and enables the Multi-Attach option for every restored volume.
Note: The actions that you can perform with restore points of EC2 instances depend on whether you access the restore points using the Veeam Backup & Replication console or the Veeam Backup for AWS Web UI.
Navigate to the Web UI to perform the restoration, navigate to the Protected Data and select EC2. Select the backup ad click on restore.

I am interested in the “Instance restore”

Our EC2 Instance has been selected. Click Next to proceed.

Check the IAM Role permission. I am using the default IAM role created by Veeam.

We have all permission in place to perform our EC2 restore. Close the wizard to proceed.

I want to restore to the original location. Click on Next

To mitigate this warning. I will proceed and have the instance terminated.

Select terminate instance as we are sure of recovery.

On the prompt, select “Terminate”

As you can see, the instance is being terminated.

Give a restore reason and click Next.

I want the Instance to be powered on upon completion. Click Finish to complete the restoration.

As you can see, the restore has completed successfully.
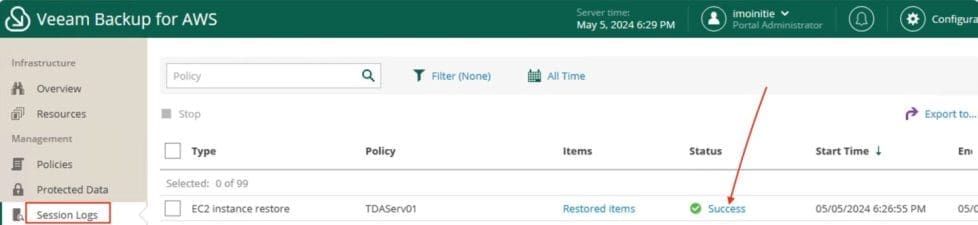
You can view the session log as well and when done, click on Close.

VPC Backup
Note: As mentioned above, the Backup appliance comes with a preconfigured VPC Configuration Backup policy that is disabled by default.
To start protecting your Amazon VPC configuration, you must edit the VPC Configuration Backup policy settings and enable the policy. You can enable over the web browser from the VBAWS appliance or from the VBR console.

Click Enable.
If you were to do this over the VBR console, click on Home from the button switching view, select backup, and on the right pane. Click on the VPC configuration and deselect “Disable”.
You can click on Start to run the AWS VPC backup. You can see from the sumaary session, the job completed successfully.
Also, from the VBAWS, the status is success and the state is enabled.

We can also see from the overview page that the RDS completed 1of1 and we successfully protected 1of2 of our EC2 instance.

FAQs on the Deep Dive into Protecting AWS EC2, RDS Instances and VPC
What happens when removing a backup appliance from the backup infrastructure?
You will no longer be able to create image-level backups of RDS resources, and the existing RDS backup policies configured to create these backups will start failing. To work around the issue, you can disable image-level backup by editing backup policy settings.
Also, you will no longer be able to add and start DynamoDB backup policies. Creating DynamoDB backups manually will also be unavailable.
What happens when the connection between a backup appliance and the backup server is lost for more than 31 days
The appliance will enter the standalone mode, and you will no longer be able to back up RDS resources and DynamoDB tables.
I hope you found this article very useful on the “Deep Dive into Protecting AWS EC2 and RDS Instances and VPC” very helpful. Please feel free to leave a comment below.