Review of the Synology CC400W Installation and Configuration

The Synology CC400W is a compact, Wi-Fi-enabled security camera designed for ultimate flexibility. Therefore, in this guide, we shall discuss the full “Review of the Synology CC400W Installation and Configuration”. The Synology CC400W camera has a 4MP resolution and a 125° wide field of view (FoV), and it delivers sharp, comprehensive coverage which is perfect for indoor corners or sheltered outdoor areas as we will see very shortly. Please, see How to fix Wi-Fi not connecting on Windows 11, and how to Hide or Block Wi-Fi Networks on Windows.
Disclaimer: This review is completely independent. I have not been sponsored or paid to test the Synology CC400W. All opinions, observations, and configurations shared here are entirely my own, based on hands-on experience. Please, see how to add additional CC400W Cameras to Synology Surveillance Station.
It is interesting to note that the Synology CC400W can be mounted anywhere where wireless connection is possible (Wi-Fi signal) and power, and can stay connected with integrated 2-way audio for real-time communication. Built tough with an IP65-rated (weatherproof), the Synology CC400W is ideal for both residential and commercial environments looking for smart, and discreet surveillance.
Also, see How to Prevent Users from Seeing Wi-Fi Password on Windows, how to Create New Users and Join Synology NAS to Active Directory, and learn about “the differences between Private and Public networks in Windows to VPN?“.
Synology Surveillance Cameras lineup Comparison
The Synology CC400W, BC500, and TC500 etc are all part of Synology’s smart camera lineup. But each is built for a different type of deployment. The BC500 and TC500 both offer 5MP resolution with PoE connectivity with extended 30-meter night vision, and IP67/IP66 weatherproofing. This makes them very ideal for demanding outdoor environments where wired stability and full environmental resistance are crucial.
In contrast, the CC400W IP65-rated enclosure offers solid protection against dust and low-pressure water jets from any direction. This makes it suitable for outdoor installations such as under eaves, covered patios, or sheltered entryways. That is, areas that are not exposed to extreme or direct water submersion. Its weather resistance adds flexibility without compromising reliability in typical outdoor conditions.

are packed and delivered.
The CC400W features a 4MP sensor with a wider 145° diagonal field of view as mentioned above already. It was specifically designed for flexible, Wi-Fi-only installations. Its USB-C power and corner-mount form factor make it perfect for indoor or semi-sheltered spaces where running Ethernet may not be practical.
Despite its smaller size, the CC400W offers the full suite of smart features, including people and vehicle detection, motion analytics, and even 2-way audio which is not available in the BC500 or TC500.
However, its 10-meter night vision range and IP65 rating limit its use to more protected environments compared to the more rugged PoE models which extends to 30m. All “three cameras etc. from Synology integrate tightly with Synology’s Surveillance Station and support instant search, audio detection, and AI-based event tagging”.
Ultimately, your choice depends on the deployment environment: CC400W for flexible indoor and outdoor setups. While the BC500 or TC500 (wired) are strictly met for outdoor, and security-critical use cases. The table below drills down on some of its features and comparison.


In recent times, we have written a lot on Synology NAS and here are some of the guides: DSM Security: How to Protect Synology DS923+ NAS, and Cybersecurity Tips to Secure Synology NAS against Ransomware. Also, see how to configure Synology Active Insights, and how to fix Task failed to perform Scheduled Snapshot Replication.
How to Purchase the CC400W Cameras
The CC400W is available through Synology partners and resellers. I would highly recommend you to purchase one and follow along with the setup as discussed in this guide. You could use the Synology where to buy page as shown below to determine the closest partner and reseller close to you..

Alternatively, you can use any third party site such as Amazon, Mediamarkt or a price comparison page such as Idealo and Geizhals etc.

Please, see How to create a Tailscale VPN connection to Synology NAS, how to Backup MacOS to Synology NAS via Time Machine, and how to create New Users and Join Synology NAS to Active Directory.
More on CC400W Presentation
At the time of writing this article, Synology CC400W is the only and latest wireless surveillance camera in their lineup and it is built for effortless security and seamless integration with Synology Surveillance Station. A few of the test units that just landed on my desk are shown below.
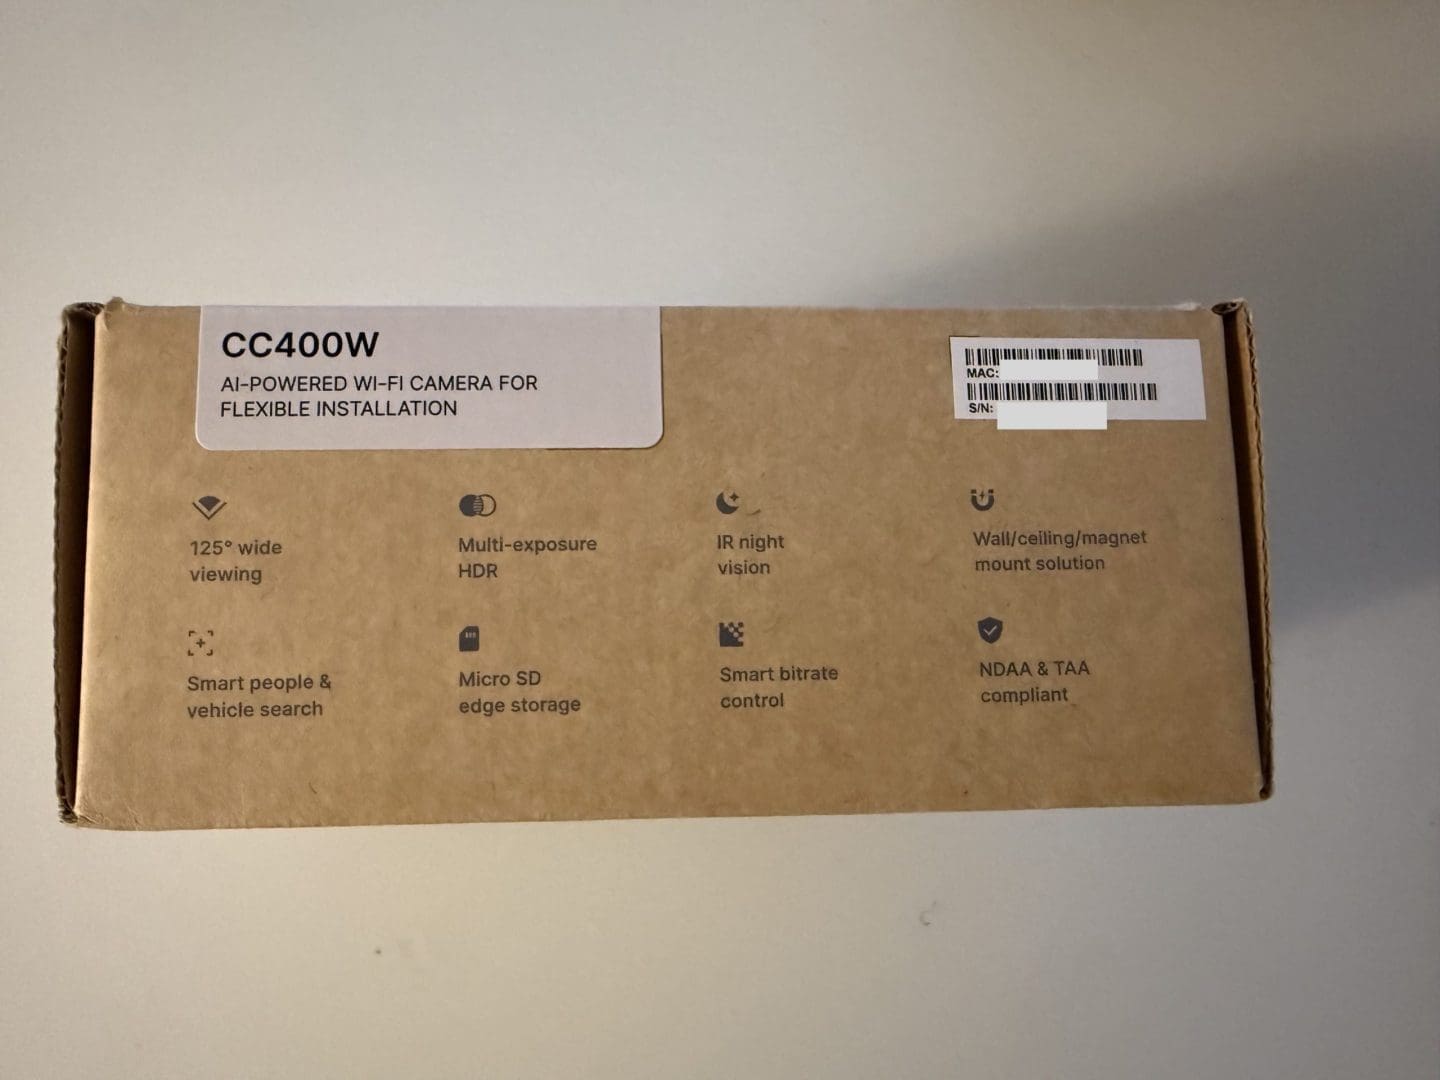
Synology adheres to stringent security and privacy protocols. As such, the CC400W is NDAA/TAA compliant, and supports HTTPS and SRTP for video and data encryption as shown on the pack below.
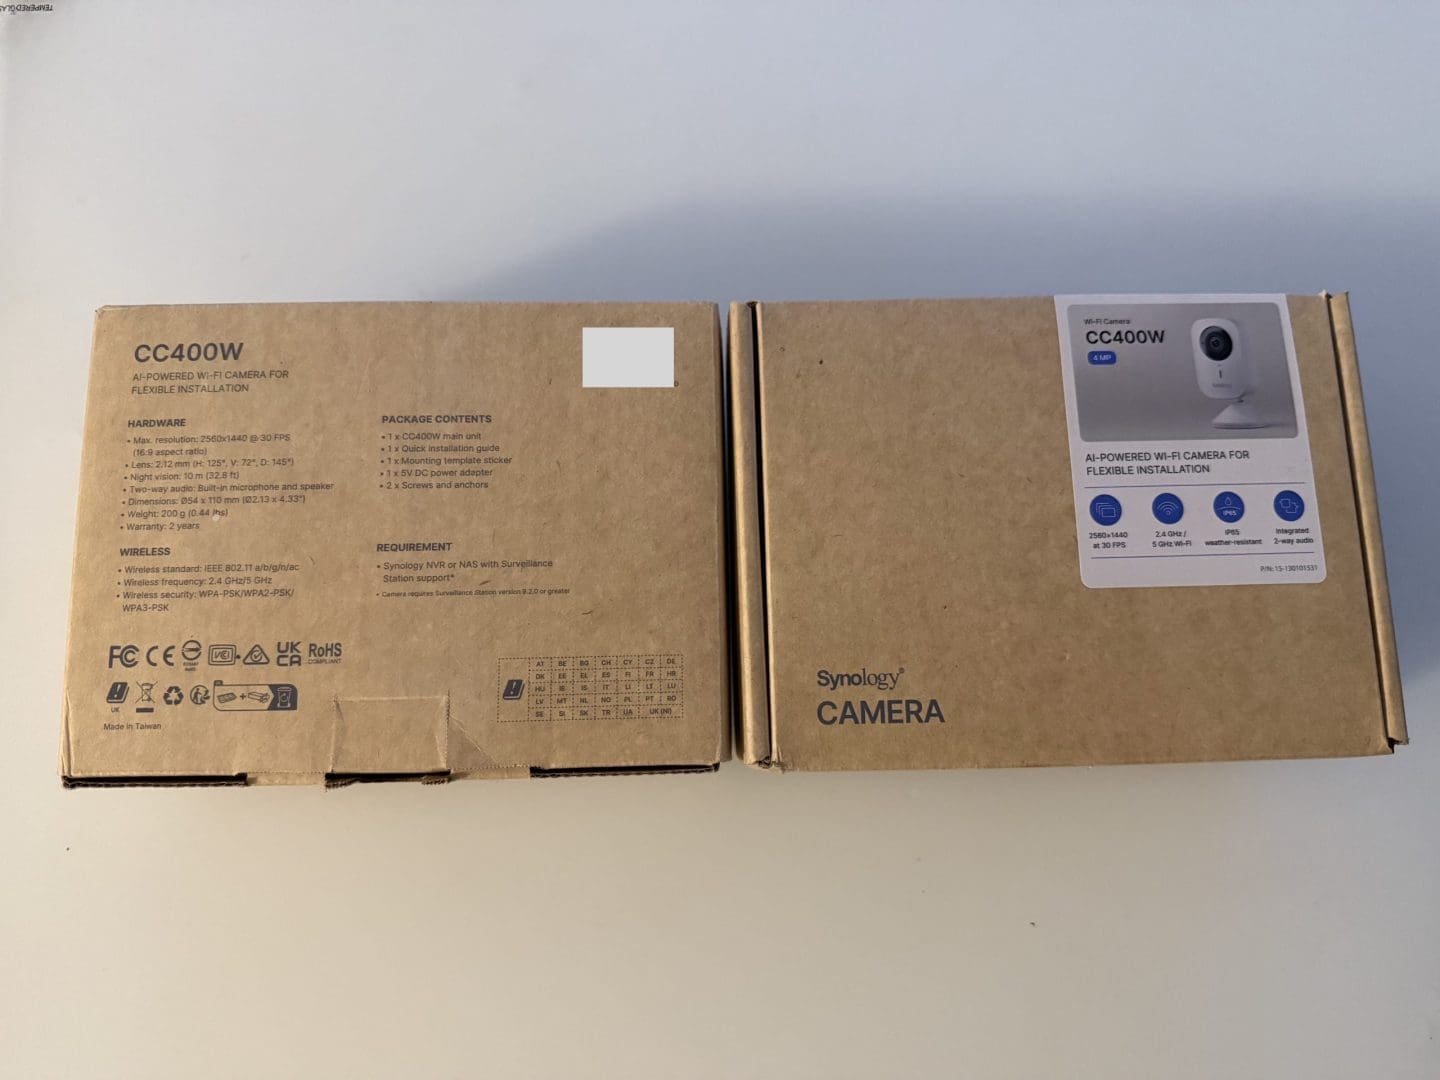
The setup process begins with unboxing and inspecting the Synology CC400W as shown below. I have included a YouTube video further down for a complete walkthrough of the installation and configuration steps.
The CC400W is first Wi-Fi-only camera which makes installation more flexible, but also requires a different approach due to the requirement for a power outlet, unlike the “BC500 and TC500” fleet.
The CC400W camera includes a power-efficient AC adapter that connects via a USB Type-C interface, allowing for flexible power options.
Open up the pack and remove the CC400W camera, corner bracket, USB-C cable, power adapter, screws, anchors, and quick-installation guide from the pack and follow the steps below to mount it on your desired location.

Please, see how to enable Secure Boot: Fix Secure Boot certificates expiration, How to disable Camera Access in Windows, and how to “Fix Windows Can’t find the path: Please check the spelling and try again“.
Mount the Synology CC400W
To mount the CC400W camera, position the Bracket and hold the triangular bracket into a clean 90° junction of wall‑to‑wall or wall‑to‑ceiling as you wish. Ensure it’s straight and level. Use a pencil to lightly mark the two screw holes. Note that you can also place the CC400W directly on a metal surface, as its built-in magnets allow for secure placement without the need for mounting.
For me, I have mounted as shown in the image below. For you to do this, please drill pilot holes at your marks (typically 5mm diameter), and Insert wall anchors if mounting on drywall, plaster, or masonry surfaces. Finally, you will have to attach and secure the bracket with the supplied screws and make sure the bracket is firmly attached to the corner.
After successfully mounting it in your desired position, you should align the USB‑C cable through a bracket’s cable channel from the back if you wish. This helps keep the setup clean and hides the cable from view.
Lastly, align the CC400W camera with the bracket’s groove. Then, slide or snap the camera to locked securely. Most times, you will hear a click.
You can mount the CC400W base-up as shown in the image below. By enabling the 180° image rotation in Surveillance Station or DS Cam App. The camera will record with the correct orientation. Just make sure to adjust the software settings after installation

Please, see how to “Fix we could not find a camera compatible with Windows Hello Face“, and “Windows 11 Hardware and Software Requirements: Upgrade to Windows 11“.
Connecting to USB-C Cable Outlet to Power
To connect the CC400W Camera to Power, this can be done by connecting the other end to the included power (AC) adapter and plug it into a nearby outlet. When this is done, the camera powers on automatically. LEDs may flash to indicate startup.
If you are placing these cameras outside, you would need an “outdoor IP66 (for stronger Outdoor Protection) or IP55 (for moderate outdoor protection) or IP44 (for basic protection) Garden Waterproof Socket RECEPTACLES outlet”. Below is an example of one I will be placing in under my roof to have the camera connected to it.

Please, see how to sync file and photos from iOS and Mac with Synology Drive, Docker Setup: Monitoring Synology with Prometheus and Grafana, and how to manage User Permission on Synology with Active Directory [Part 1].
Install the Synology Surveillance Station
Surveillance Station is a powerful video management system (VMS) built into DiskStation Manager (DSM). It works seamlessly with your existing surveillance equipment, giving you real-time situational awareness and enabling you to make informed decisions to effectively protect your home or office. You can real more about it here.
The CC400W integrates seamlessly with Synology Surveillance Station as mentioned severally above. It also offers a license-free support for two cameras, enterprise-grade encryption, and wireless connectivity. This therefore eliminates the need for camera licenses depending on your camera need, while maintaining secure, centralized video management.
Log in to your Synology NAS using either QuickConnect or Tailscale, whichever method you prefer. Next, launch the Package Center as shown below from the Desktop or Main Menu.
In the search bar, type “Surveillance Station” and hit enter. Click on “Install” next to Surveillance Station and let it download and install.

Soon you will be prompted to also “install Surveillance Video extension”. Click on Yes to have it installed.

I am not interested in the below customization, therefore I will click next to proceed.

Ensure the “Run after installation” is selected. This will save us the time in starting the service afterwards. To confirm the settings, click on “Done”.

As you can see, the surveillance station is installing.

When prompted about the NTP service, click on OK. Afterwards, click on Done.

Launch the Surveillance Station
As you can see below, we have the Surveillance Station and “install Surveillance Video extension installed. You can click to open the Surveillance Station, this will be launched into a new browser (window).

Open Synology Surveillance Station. Do not forget to bookmark this URL. You can always get to it by launching the Synology Surveillance Station if you do not want to bookmark it.
On the Surveillance Station Desktop, we have the IP cameras, a centralized Monitor Center for live viewing, and a recording module for managing footage efficiently. Surveillance Station also includes C2 Backup for offsite storage, interactive maps for camera placement, an Application Center for feature expansion, and built-in Help for quick guidance.

Note that you can manually add your camera as well. But this is not necessary due to the flawless integration when the DS CAM is installed on your mobile.

Important: It also includes license-free support for two IP cameras by default. ou don’t need to purchase licenses for the first two cameras, as they come pre-installed with your Synology NAS

Please, see how to Fix Windows defender blocked incoming connection on Windows, Full Integration Guide on how to Add Nutanix AHV to Veeam, and BitLocker behavior when MBAM agent is removed: No Uninstall Option in Control Panel.
Download the DS Cam mobile app
For remote monitoring, alerts, and camera management on the go, simply download the DS Cam mobile app. This is available via the QR code in Surveillance Station or directly from your device’s App Store.

To download the DS Cam mobile App from the Apple Store as shown below. From the App Store, search for “DS Cam Mobile” by Synology Inc., and install it.

As prompted below, double-click the Side button to install the app.

Upon installing the app, add the DS Cam Mobile App to the Home Screen and launch it.

Enable DS Cam Notification and Login
After launching the DS cam app. You will be prompted to enable notifications. This is vital to receive timely alerts. Simply tap Allow to activate notifications, and finally click on Accept.

You will be required to connect to the DS Cam as shown below.
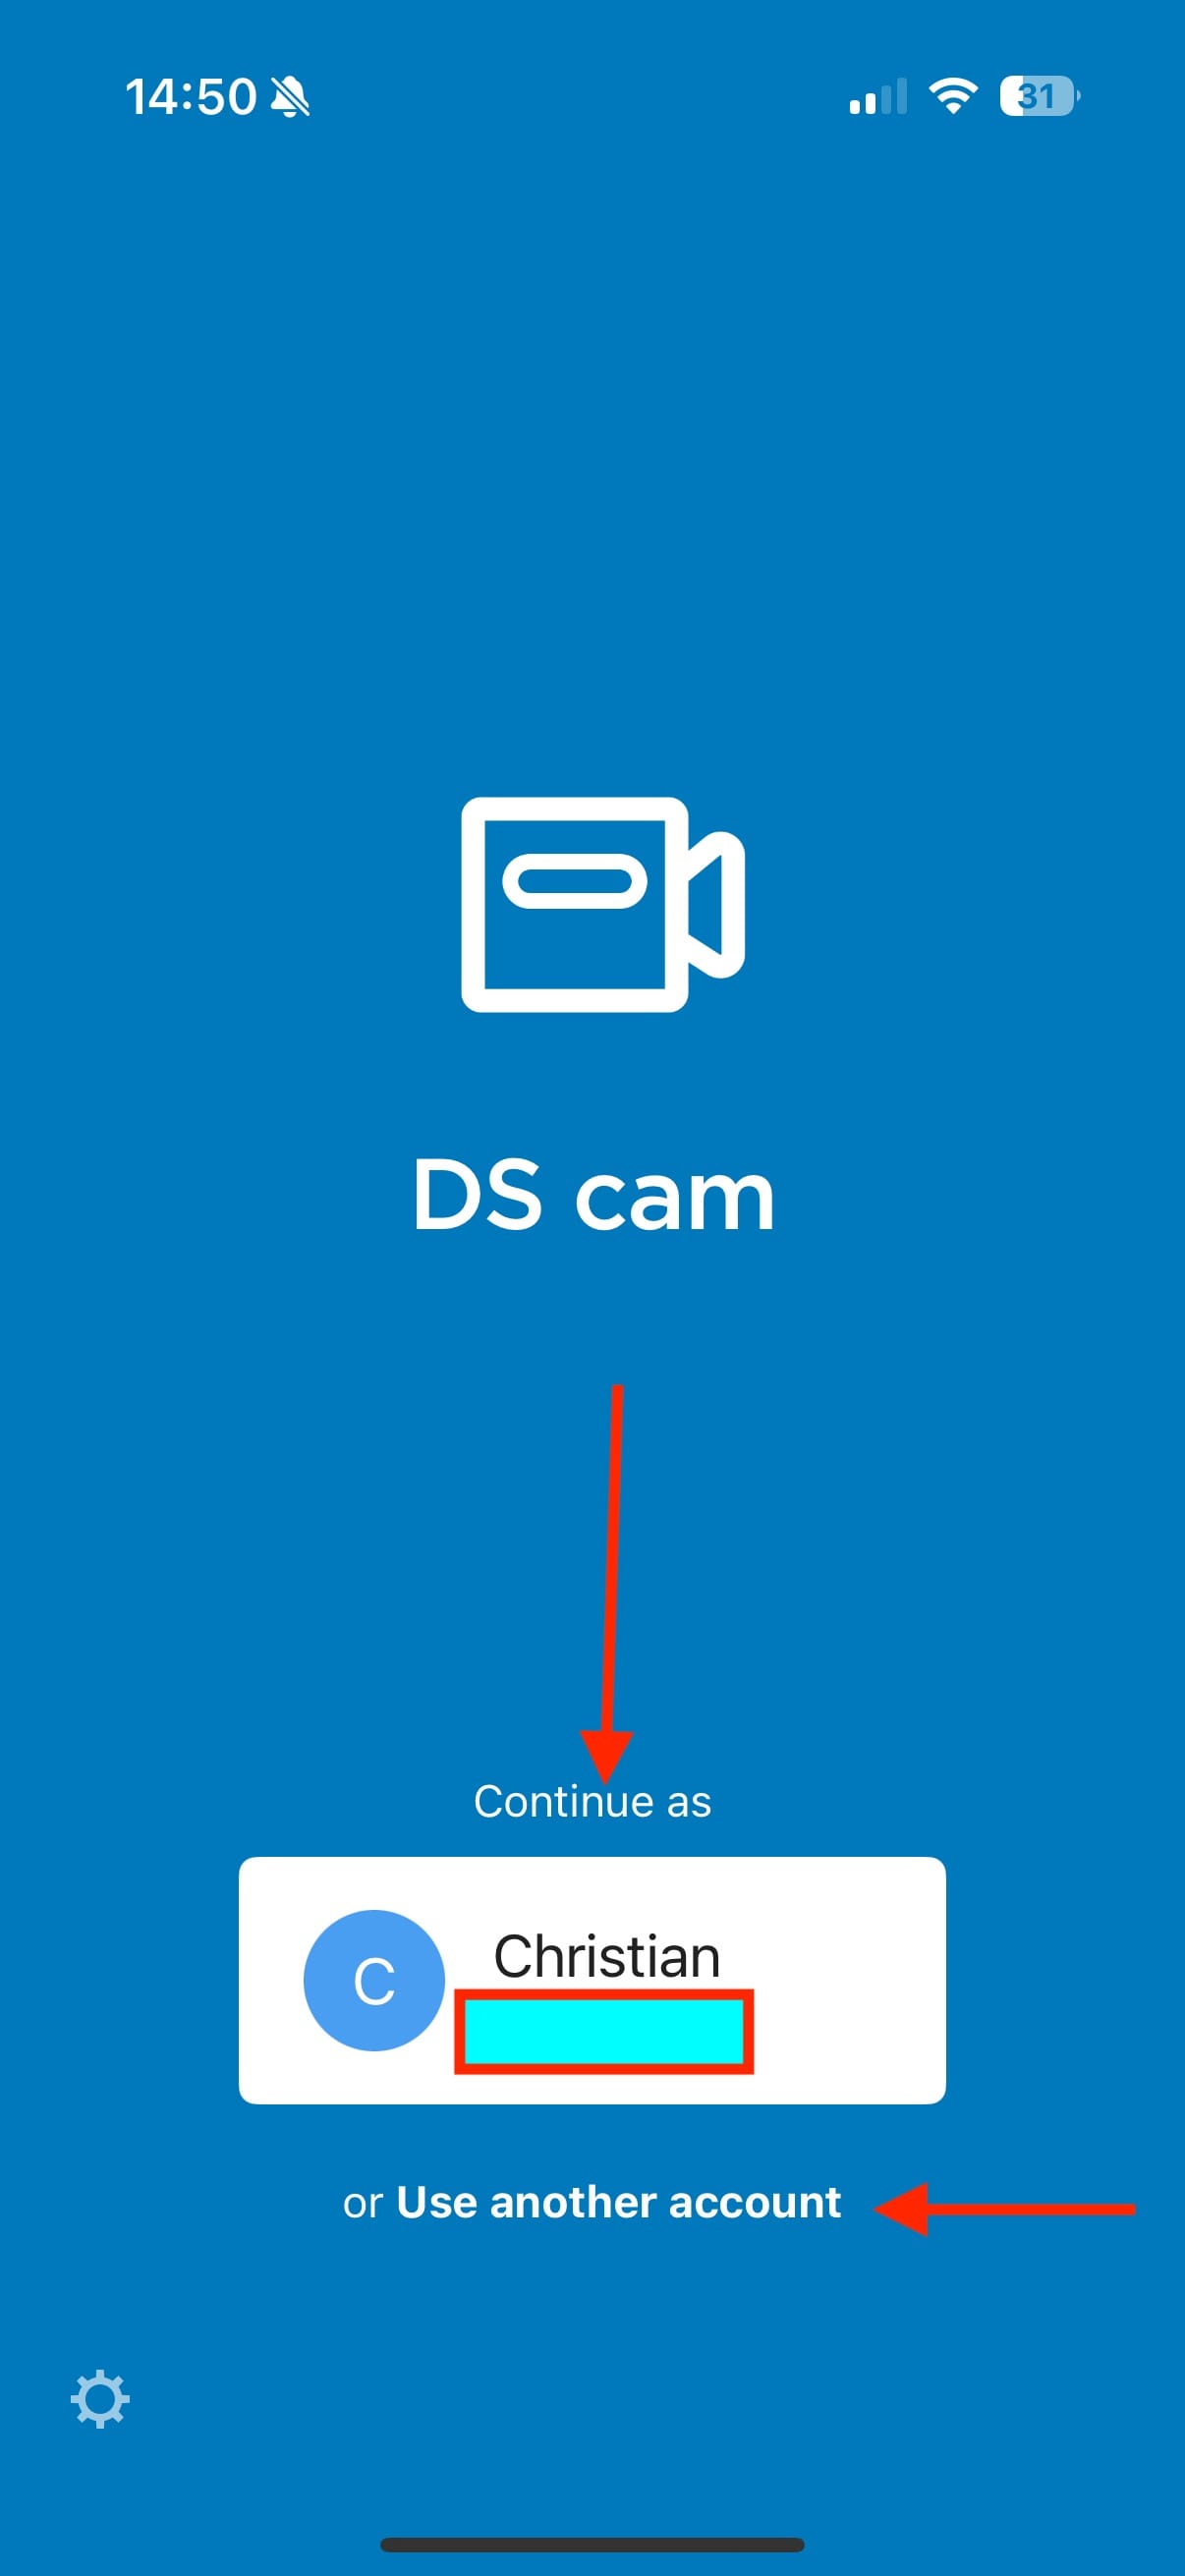
Depending on how you are connecting to your NAS, you could use the “QuickConnect ID”, Domain Name, or IP address. As you can see, I am using the QuickConnect ID.
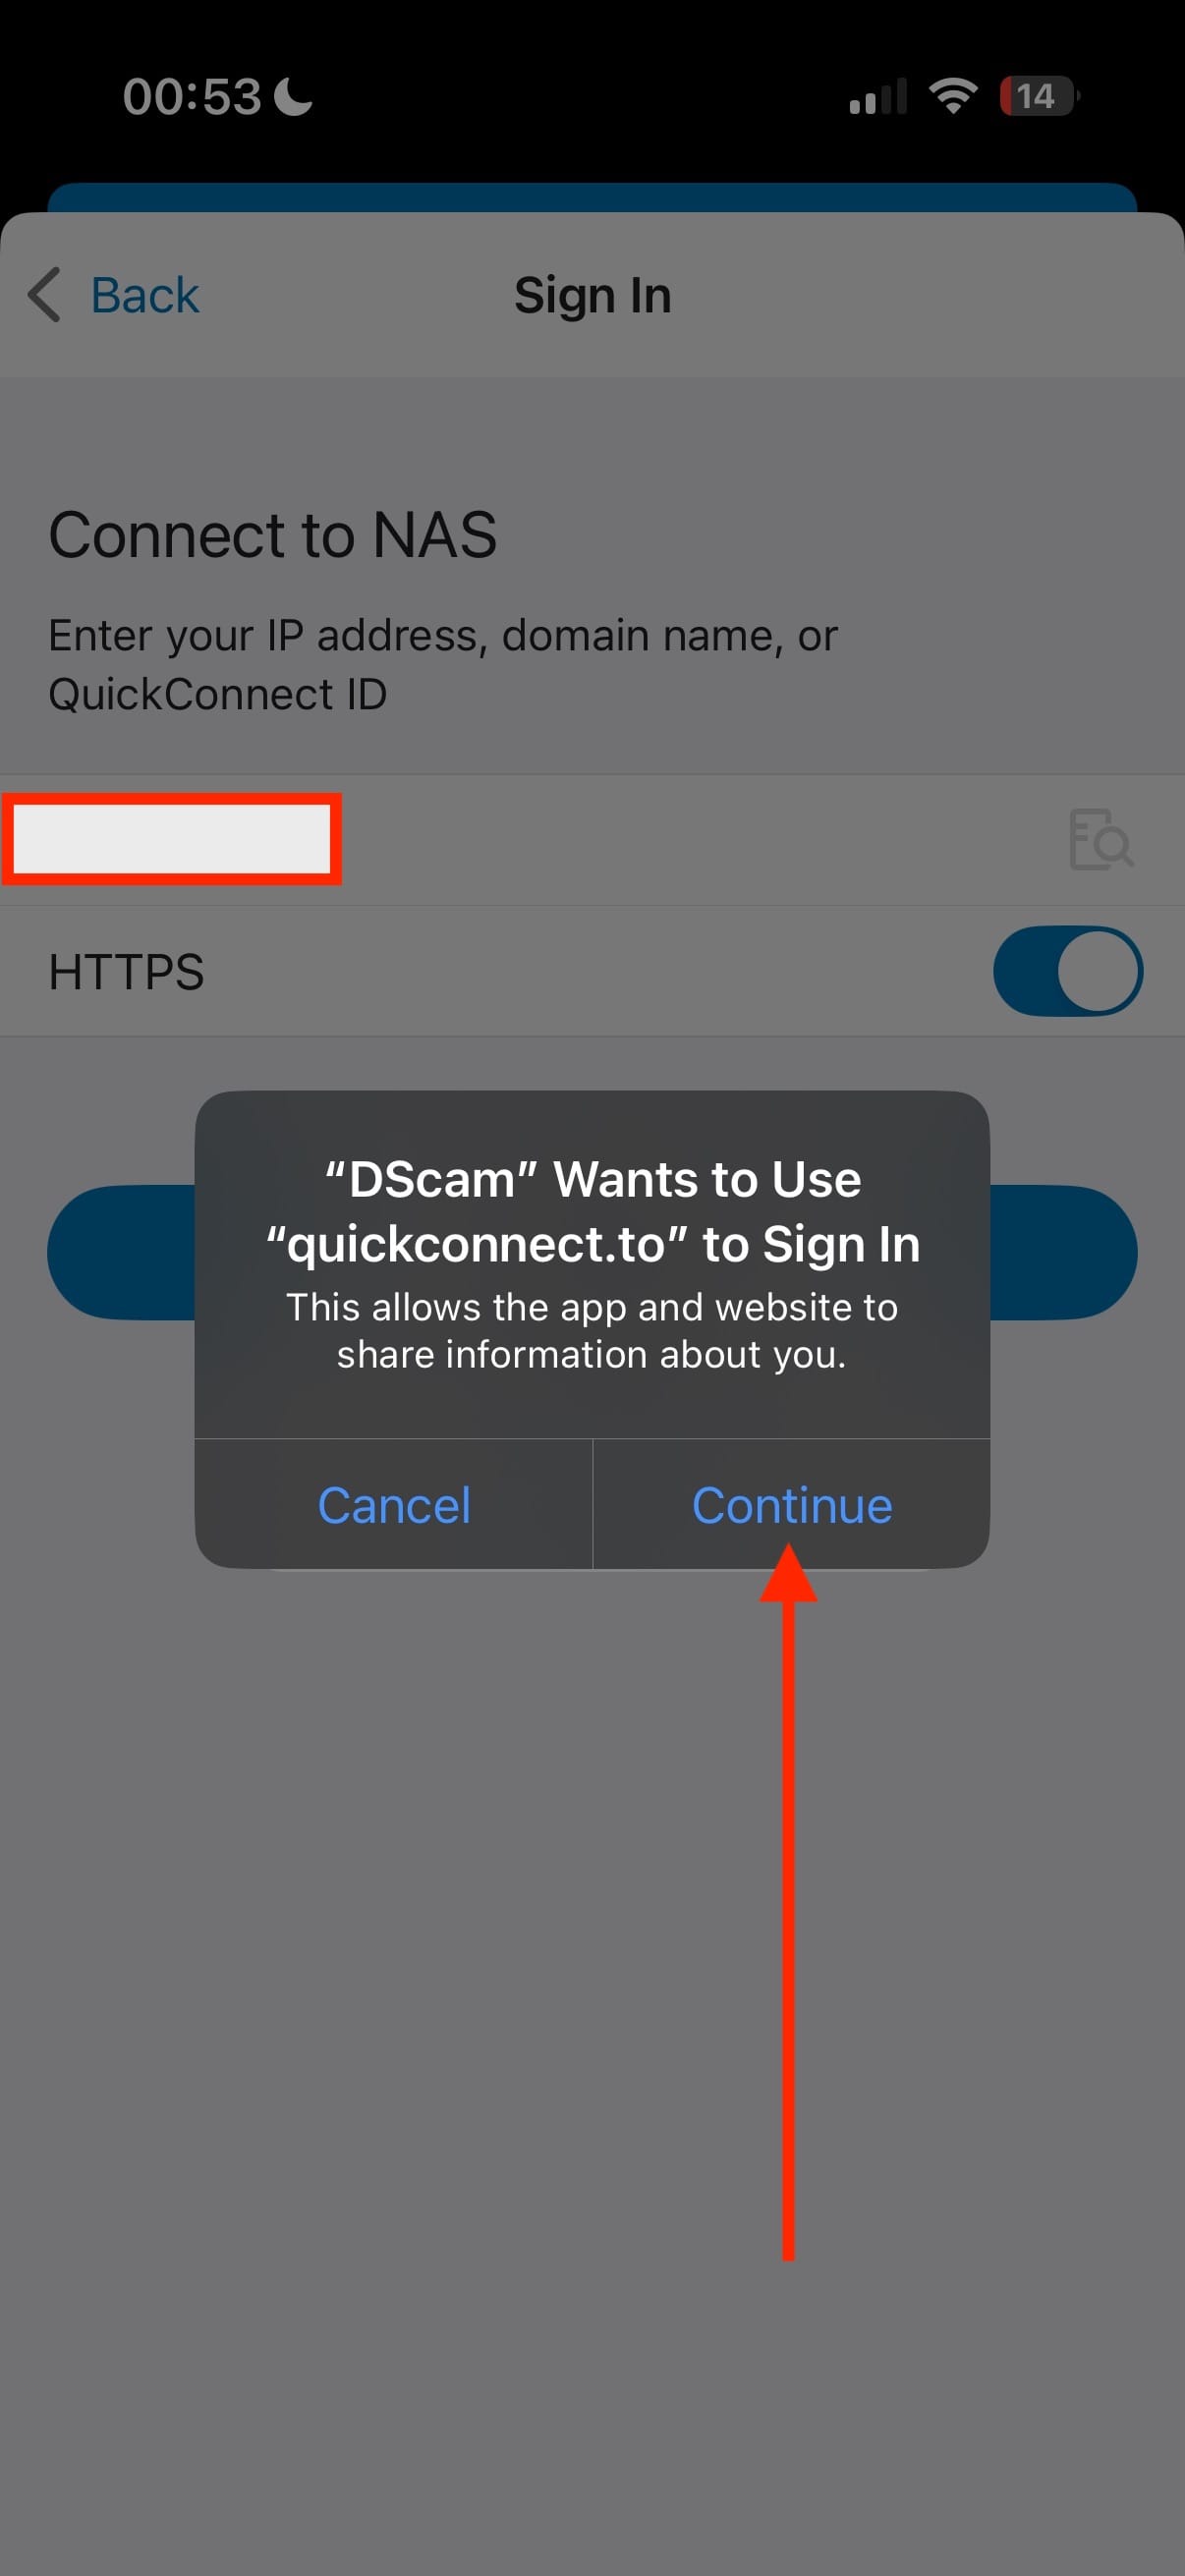
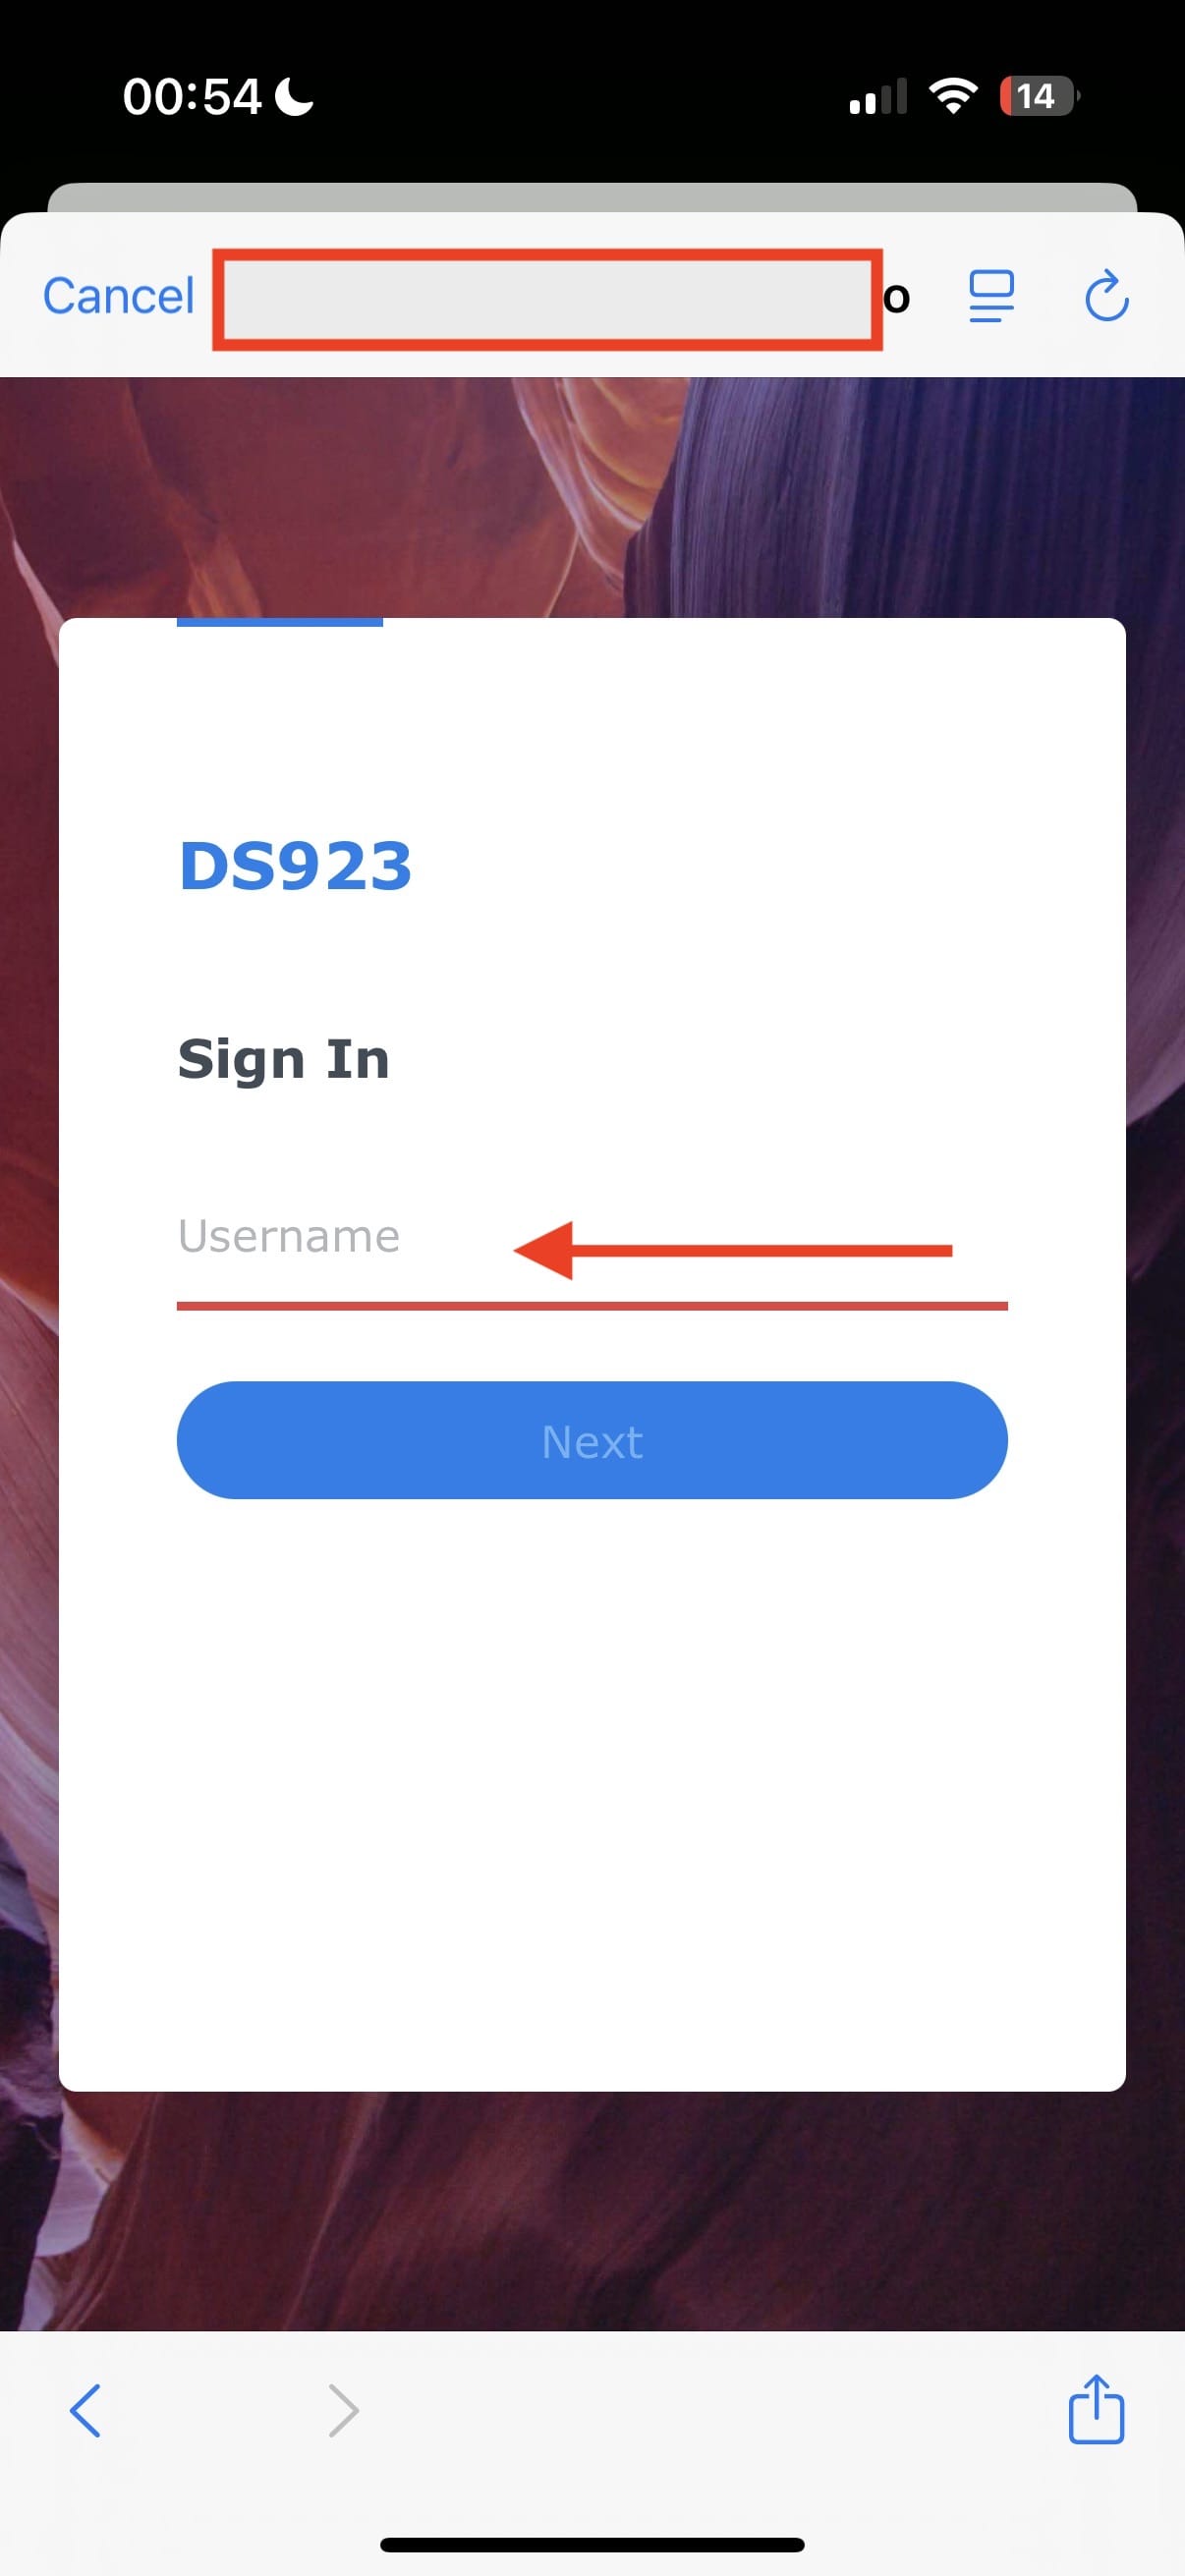
You will be prompted to connect to your NAS. Enter the connection details for your QuickConnect.
Integrate Camera(s)
Since we are working with CC400W, we will select the Wireless Camera option below.

In between, you will be prompted to have “Bluetooth” enabled if you have not already done so. Kindly have this enabled.

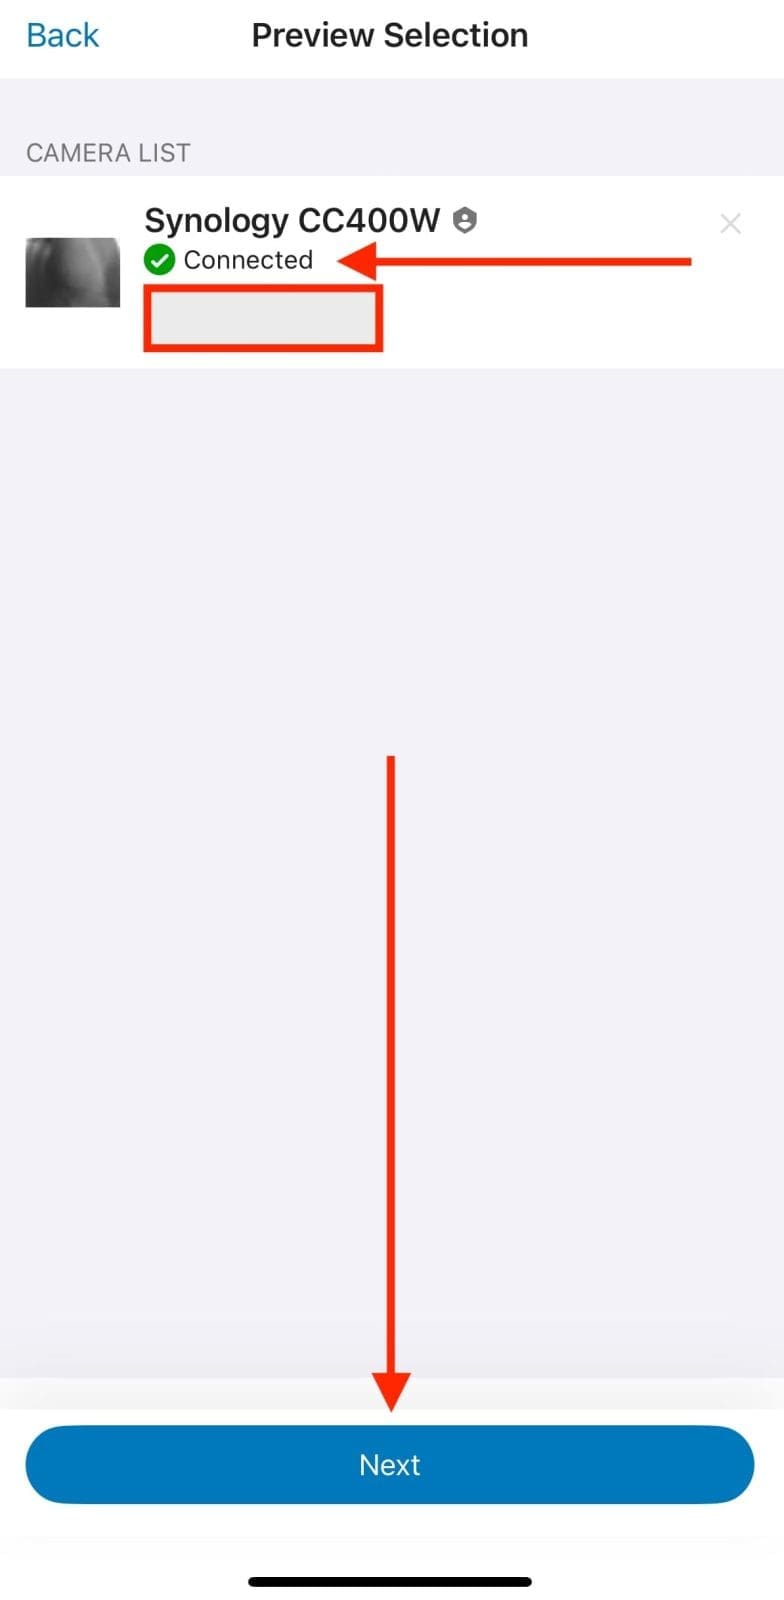
As you can see below, the CC400W camera has been detected.

Select a Wi-Fi network to connect to. I will click on one from my list.

After selecting your WIFI network, you will be required to authenticate. Please, enter your password and click on “Connect”.

To initialize your camera, you will need to set up an account by entering a name and password. Please provide these details to proceed and click on “Initialize”.

As you can see below, our CC400W camara is successfully connected. Despite this, you can run into issues and spend nights awake if you refuse to install the latest firmware when prompted :-). Click Next to proceed.
Just to let you know, the default 30 days to keep file can be changed to whatever you desire. Please, set the below settings as you wish and click on Done when complete.

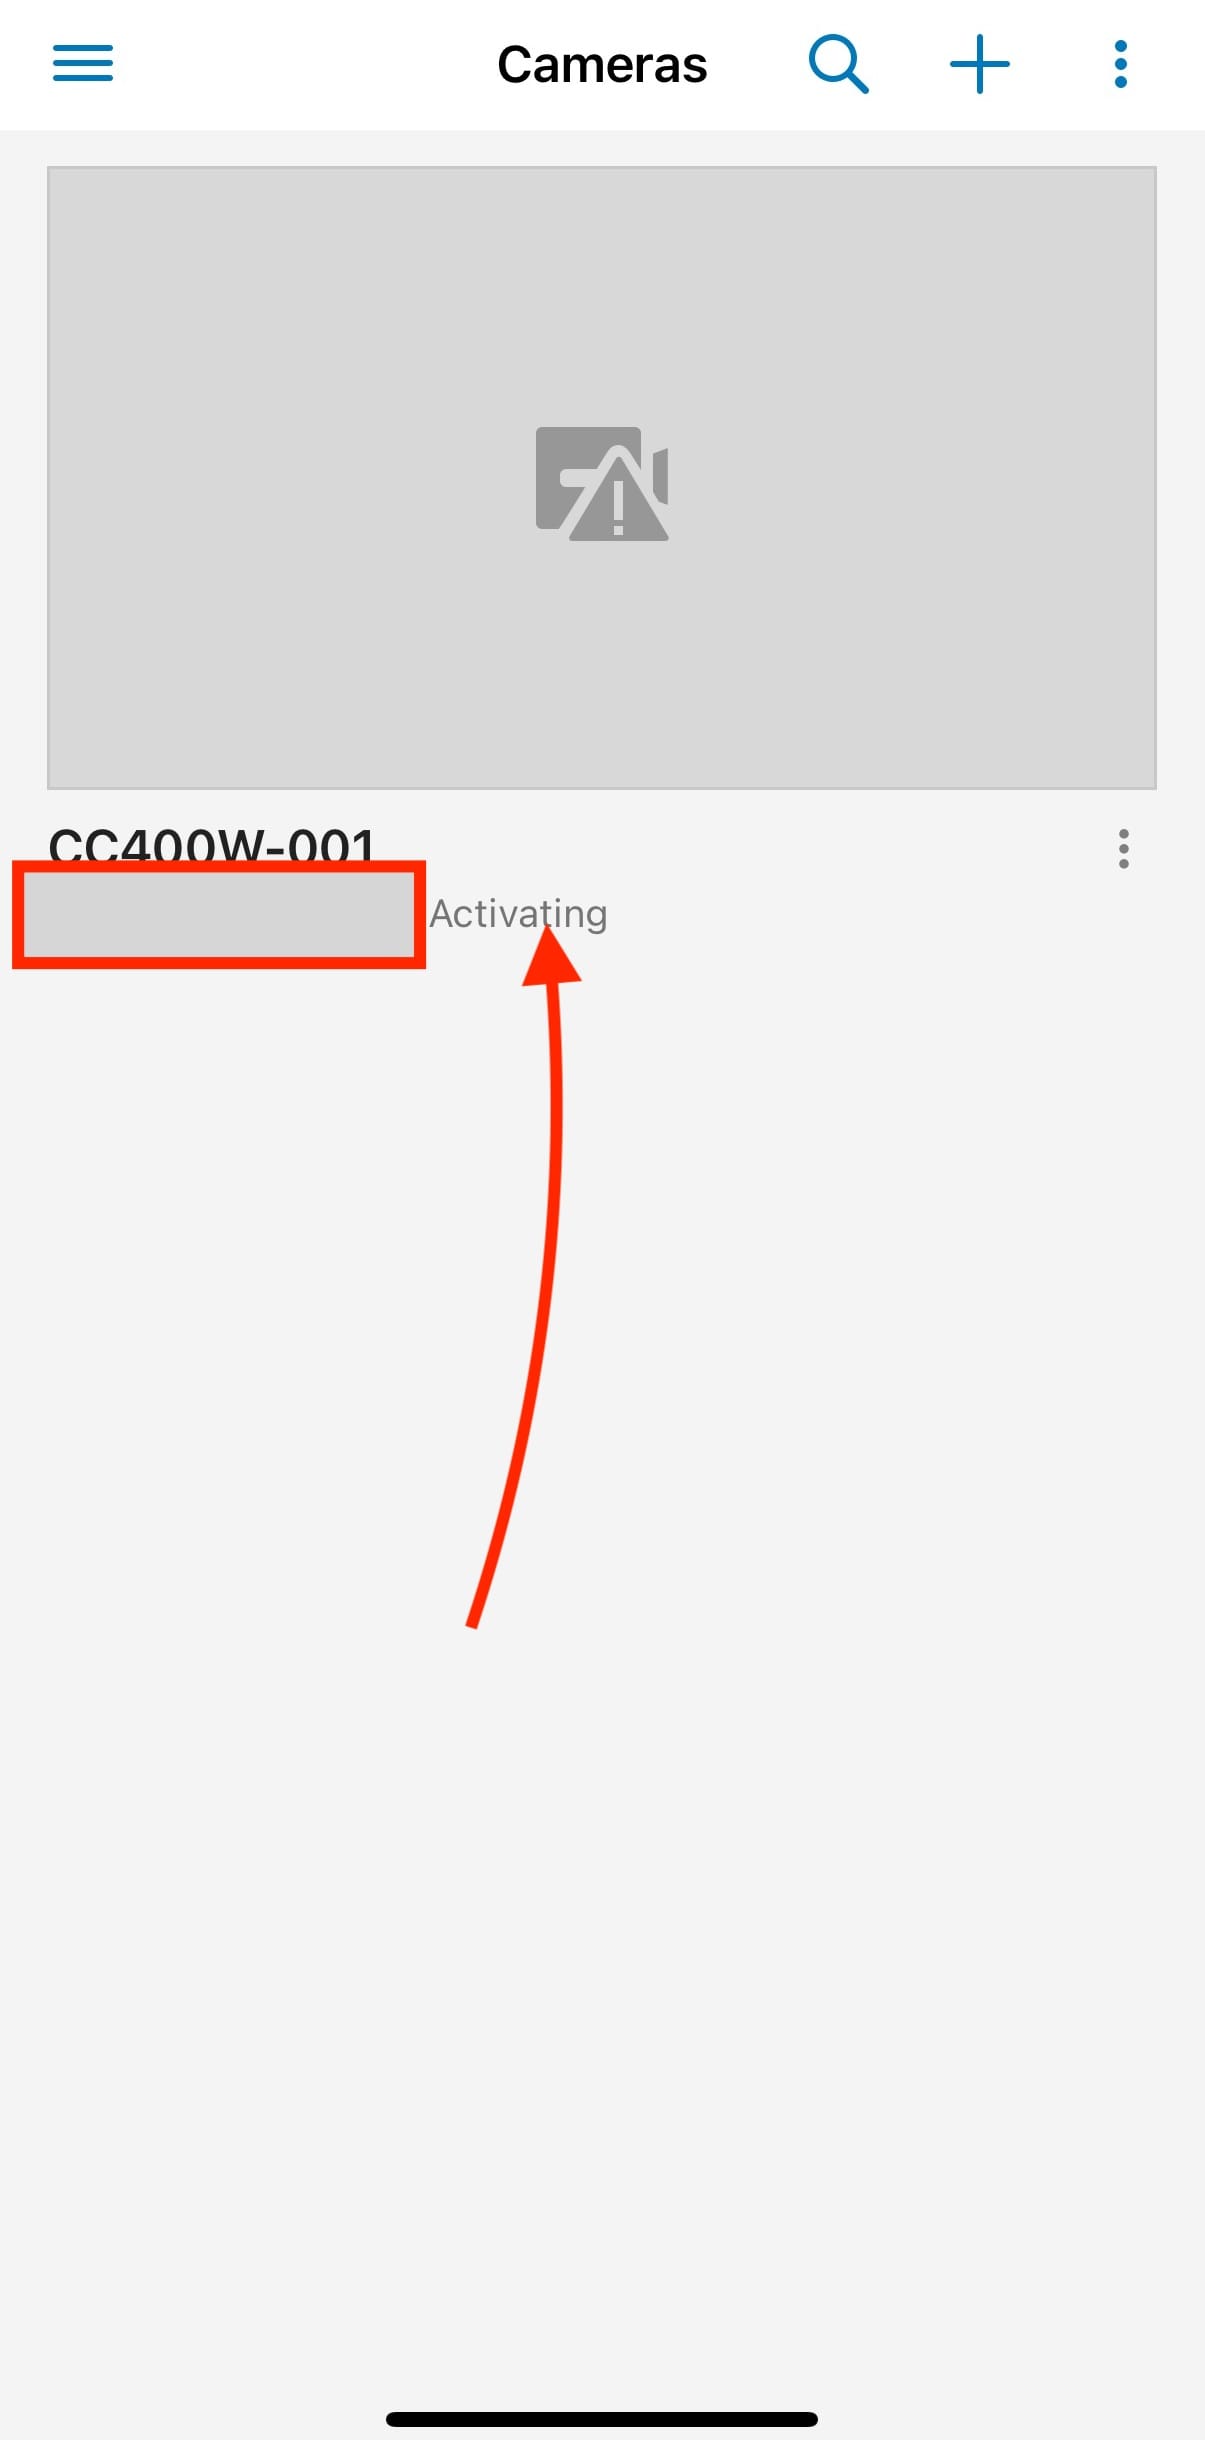
As you can see, the status of our camera has changed to unknown.
Note: When the status shows “Disconnected, please apply the firmware update available. From my experience, all manners of error messages relating to networking will be thrown. These are wrong.

Shortly, the camera status will change to “Activating” because I’ve applied the required firmware update. Next, I’ll show you how to apply firmware updates manually and enable automatic updates for future installations.
Camera Output
Below are recordings from the CC400W during both day and night. In daylight, the camera captures high-definition, full-color footage with sharp detail, while at night, its infrared LEDs provide clear black-and-white imaging with up to 10 meters of visibility in low-light or no-light conditions.
The CC400W uses powerful on-camera AI to streamline monitoring with real-time alerts for people, vehicles, intrusions, instant search, and auto tracking. Paired with Synology DVA models, it unlocks advanced features like face recognition, license plate detection, and people counting for smarter surveillance


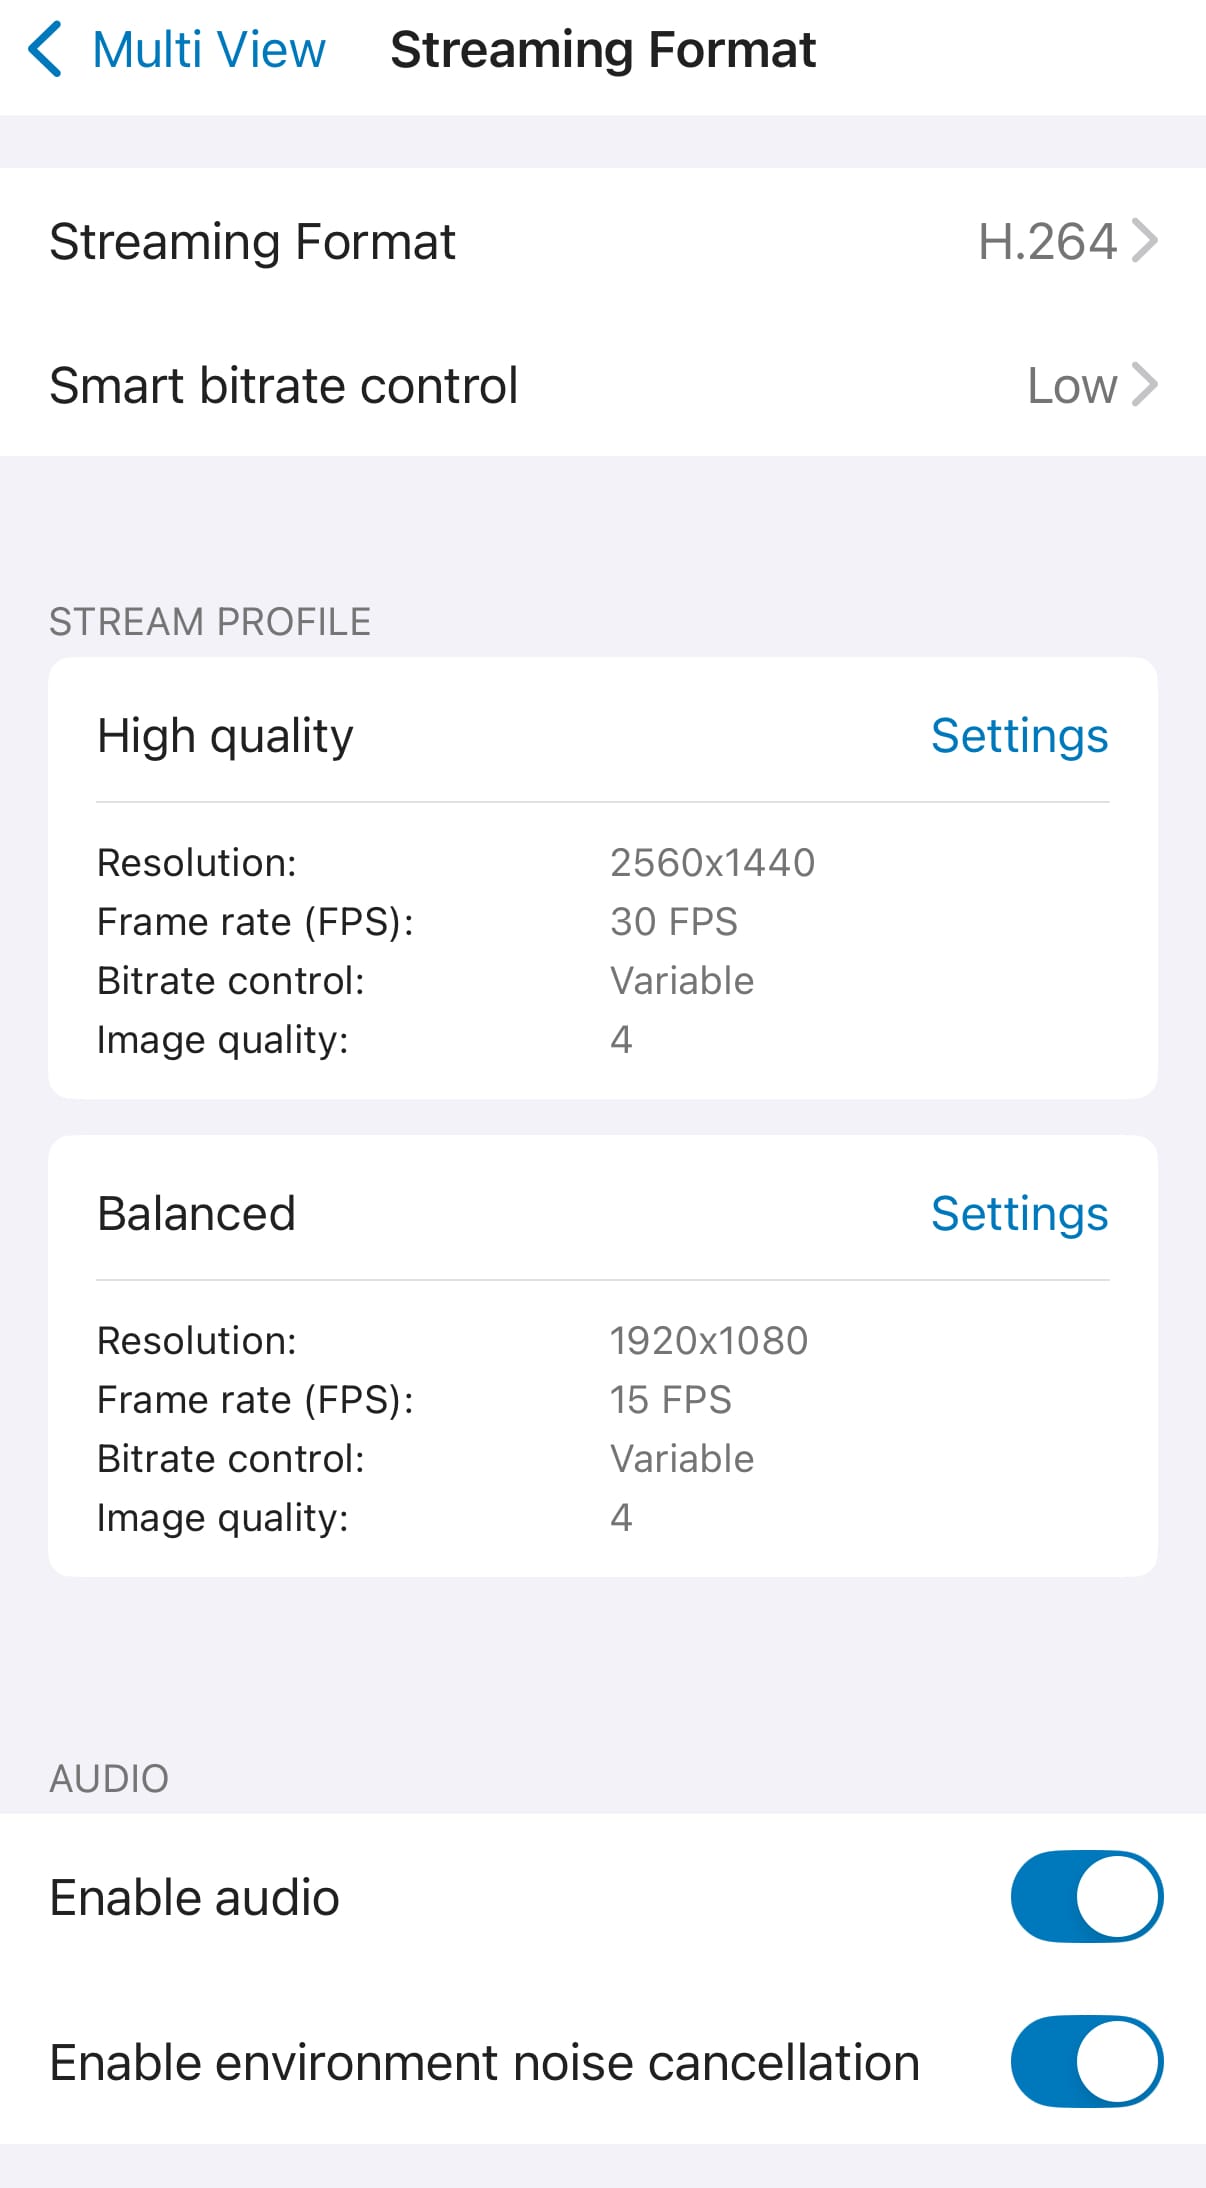
To determine which stream to apply in Surveillance Station under the IP Camera, Edit Camera, Video settings section. The CC400W supports multi-view streaming. This allows it to deliver two simultaneous streams:
- Main Stream (High‑Resolution): 4 MP (2 560 × 1 440) at up to 30 fps using either H.264 or H.265, optimized for clear, detailed recording.
- Sub‑Stream (Lower‑Resolution): intended for bandwidth-efficient viewing, typically 1080p at ~15 fps or 720p at 30 fps, encoded in H.264 (and sometimes H.265 depending on setup
The camera feature in DS cam enables live viewing of surveillance footage, allowing you to monitor your environment in real time. You can also add more cameras from this view and edit various settings of the CC400W camera.

Please, see how to Fix MSIEXEC returned 1602: Trellix Setup cannot use this account, how to Prevent Standard Users from Changing BitLocker Password, and how to Prevent Standard Users from Changing BitLocker Password.
CC400W AI Features
The CC400W uses built-in AI to detect motion, identify people, and recognise vehicles. This helps in delivering smarter, more accurate alerts without relying on cloud processing.
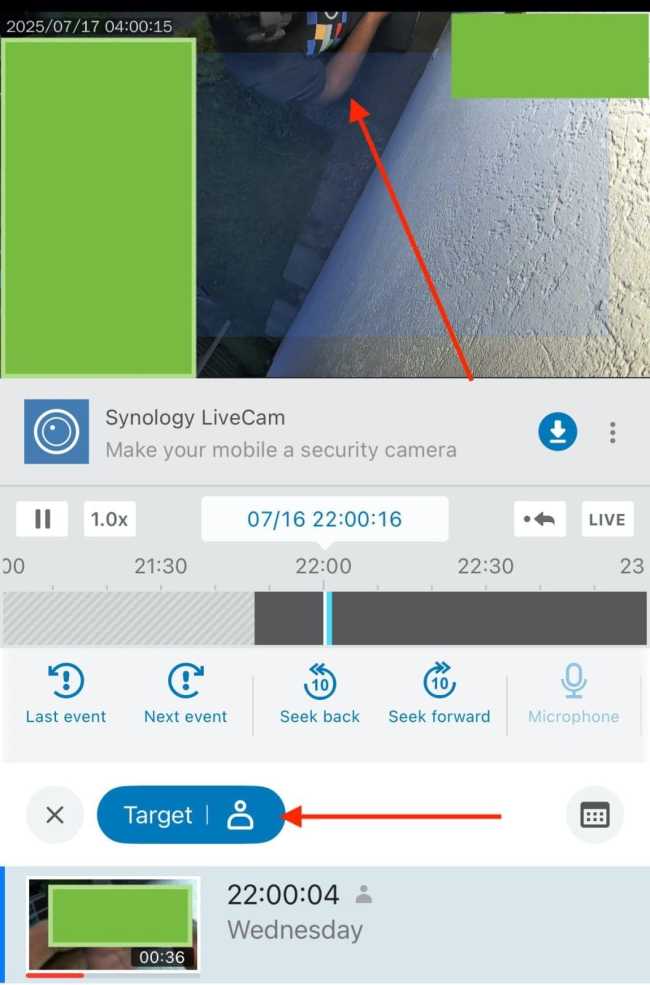
I received an alert about a motion and person being detected. I quickly used the “Instant Search” as shown below from my DS Cam.

Next, I selected the “People” filter, and clicked on “Apply”.
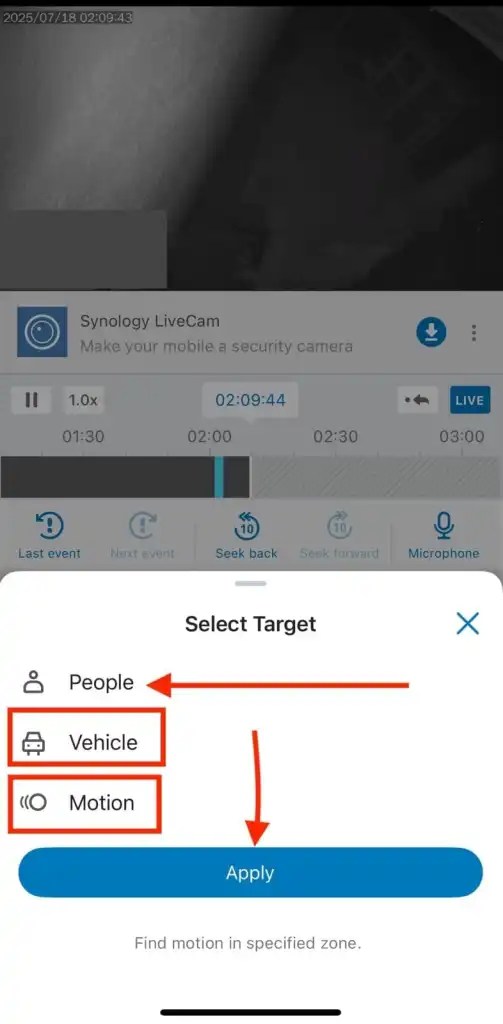
Instantly, I found the exact video clip showing the detection and you can see me right there. I actually took a screenshoot to review the frame where I am mostly not visible for my blofgost.
CC400W Firmware Update
As discussed above previously, if your Synology CC400W camera shows a status of “Disconnected” and you’re unable to activate it.

Note: If you skip the firmware update, the CC400W cameara will not be useable and will appear to be in a disconnected state.
Therefore, when prompted to configure port forwarding etc and the creation of DDNS will not fix the issue. Also, configuring Firewall on your router and NAS to permit certain ports forwarding will not help. The solution is to apply the software update as described in the steps below.
Update Firmware
Since I just recently installed the Synology Surveillance Station, I am already running the latest version. If you have the Surveillance Station already installed, you should ensure that the Surveillance Station is updated to the latest version.
If the camera was added before first use, it may need a firmware update from Synology’s interface. As you can see below, the firmware version is missing in the image.

To download the latest CC400W firmware, please navigate to the Synology download center.

When you click the update link above, the “Update Firmware” window will open. I will show you how to access this window manually and enable automatic firmware updates later in the guide.

The upload firmware version is automatically selected at this time. Click browse and select your downloaded file. As you can see below, this is 19% complete.

Now the firmware upload is 100%

When complete, click on the “Done” button as shown below.

As you can see, the firmware is currently updating

Now, the status has changed from “updating”to “Normal”.

As you can see, the recording is in progress, By the way, if you would like to update the CC400W in the future. You can then launch the IP Camera from the Surveillance Station and click on the drop down menu under “More” and select “Update Firmware”.

Remember previously, the firmware version field was empty. Now, we have a version number due to our recent firmware update.

Please, see How to enable FIPS mode on Windows Server, How to shrink and create new partition on Windows Server, and Fix long path names to files on SQL Server installation media error.
Synology Surveillance Station Auto Update
Keeping your Surveillance Station up to date ensures your video management system (VMS) always runs the latest version with the newest features, security enhancements, and bug fixes, reducing the risk of software vulnerabilities and compatibility issue. This ensures you maintain system reliability and minimise manual maintenance.
To automatically update the CC400W, please navigate to the “Main Menu” on the Synology Surveillance Station and click on “System”.

Next, click on System updates and select Auto-Update and click on Apply.

Recording Encryption
Implementing recording encryption in Synology Surveillance Station is vital for protecting your video footage from unauthorised access and tampering. Below are some of the reasons why you should do this.
- Data Privacy: Encrypted recordings ensure that sensitive footage such as scenes from private homes, offices, or restricted areas can’t be viewed by unauthorized users. Even if the storage device is stolen or compromised.
- Regulatory Compliance: Encryption helps meet data protection regulations (like GDPR or HIPAA) that require secure handling of video surveillance data.
- Tamper Protection: It prevents footage from being altered or forged, preserving its integrity for audits, investigations, or legal use.
- Secure Backup and Transfer: Encrypted recordings remain protected when backed up to Synology C2, remote NAS devices, or external drives.
To enable “Recording Encryption”, please navigate to the “Main Menu” on the Synology Surveillance Station and click on “System”. Under “Security”, select the “Recording Encryption”, and click enable “Recording Encryption”.

As you can see below, we have successfully enabled the recording Encryption, and the key will be download as well.
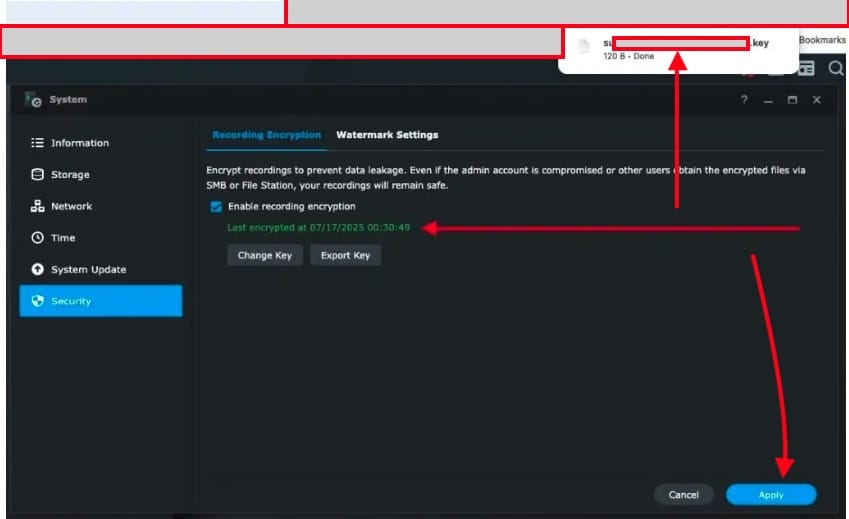
If you ever wish to disable Recording encryption, just uncheck the button and upload the keyfile or enter the key as shown below.

CC400W Auto Update and Reset/Restart
Automatic firmware updates are a good idea because they help keep your camera secure, stable, and up to date without requiring manual intervention. This helps ensure you receive the latest security patches, feature improvements, and bug fixes.
Therefore, helping to reduce the risk of vulnerabilities and compatibility issues especially in a security-critical environment like video surveillance.
To do this, edit the camera and under System, select “maintenance” as shown below. Under Firmware update, I will select to “Automatically install the latest updates”. I am very good with that. This will eliminate any manual intervention from me.

Recording Settings and Schedule etc.
There are tons of functions that can be implemented such as the “keep the files within a number of days” as shown below. I have reduced this to 30 as against 60 days I entered above. This is just to show you the flexibility Synology offers.

Video and Audio Format
The CC400W supports high-quality video in H.264 and H.265 formats. It features audio-in for capturing sound from external microphones, and audio-out for playing back alerts or two-way communication. If you modify any of these settings, do not forget to save.

Enable Uninterrupted Recording: Edge Recording
Note: The Synology CC400W does not come with an inbuilt SD card. Therefore, to avoid uninterrupted recording in an unstable or poor network conditions. These cameras can be equipped with a microSD card to record. This intern guarantees access to clear, uncorrupted footage regardless of network conditions

Edge recording on the Synology CC400W provides the opportunity to store video footage directly onto its internal storage (microSD card), even when the network or NAS connection is temporarily unavailable. This ensures that the camera keeps recording 24/7, even if the NAS or Surveillance Station is offline.
Once the NAS reconnects, Surveillance Station can automatically retrieve and backfill the footage from the camera’s storage. This feature is useful for remote deployments or unstable network environments where recording continuity is critical. At the moment, I do not have an SD-Card inserted and will be doing this in the next days.

Synology recommends using a class 10 (C10)/UHS-1 (U1)/V10 high-quality microSD card with a minimum of 10MB/s write capability. You can read more in this manual. Cards with capacities of up to 128 GB when formatted as exFAT were tested by the Synology Team.

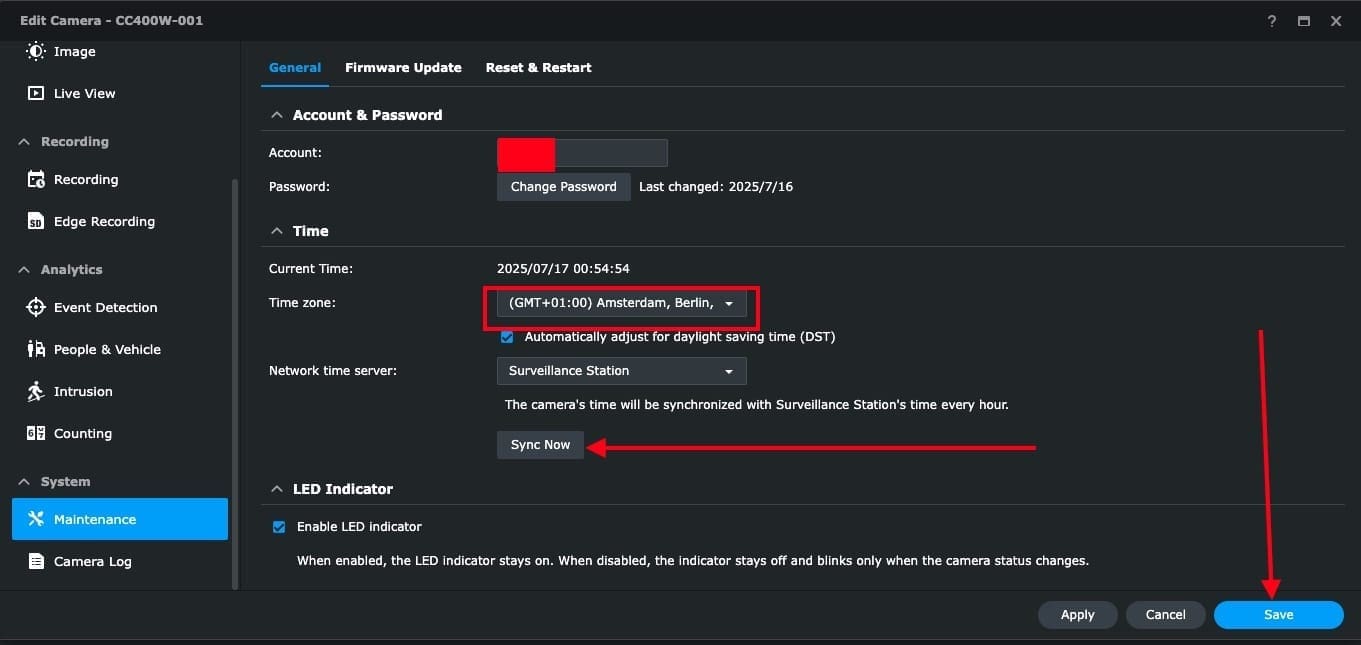
Change Time Zone
Even if you have set the correct time zone on your Synology NAS and Surveillance Station. You also need to configure it on the CC400W camera.
This is important because the camera uses its own internal clock to timestamp recordings, and incorrect settings can lead to mismatched or inaccurate timestamps in your footage.
Therefore, there is a need to change the time zone from the Tapel zone to Berlin and do not forget to save.

As you can see below, I have changed the time zone and will click on Sync now.
Camera Logs
Viewing camera logs for the CC400W is very vital for a number of reasons. This ensures you are to keep track of access attempts, firmware updates, or any changes to the camera’s settings.
This makes it easier to spot unauthorized actions or tampering. For instance, if something goes wrong, like the camera going offline or not recording properly, the logs provide helpful technical information to troubleshoot the issue.
By checking these logs regularly as shown below. You can also keep an eye on the camera’s overall health such reboots, network drops, or SD card errors. This therefore help maintain a stable and reliable setup.

Synology Evidence Integrity Authenticator
You can download and use the Synology Evidence Integrity Authenticator . It verifies that exported video recordings haven’t been altered or tampered with.
This ensures your surveillance footage remains legally admissible and trusted for audits or investigations.

Fault Tolerance: Sync to C2 Backup for Surveillance for Redundancy
The C2 Backup for Surveillance is a cloud-based feature by Synology that lets you securely back up surveillance footage from Surveillance Station directly to Synology C2 cloud storage. This helps protect recordings even if your NAS is stolen, damaged, or compromised.
Once these video footages are uploaded, the video files are encrypted and protected from unauthorised access or deletion. With C2 Backup for Surveillance, you can define your retention time and flexible scheduling.
To do this, launch the Surveillance Station, and select from the DSM desktop the Surveillance Station icon to open the app.

When opened, I currently do not have a subscription. Therefore, I do not know how the windows looks with on. For me, I will be using the trail license as shown below.


You will be redirected to login to C2 backup as shon below.

This section will be completed! Stay tuned and come back for it
Here are some guides on Synology NAS Domain Join: The Importance of DNS Configuration, and how to Configure Synology DS923+ NAS for File Sharing [Part 2]. Also, see how to Sync Data in Cloud Drives to Synology NAS.
Decommission Synology Surveillance Station
This process is basically very simple and it involves uninstalling the application from your synology NAS. To do this, navigate to the Package Center and select uninstall.

On the uninstall Surveillance Station, you can decide what to keep before uninstalling.

Please, see how to setup DS923+ Synology NAS as a Backup Repository for VBR, how to Install Windows Server 2025 via iDRAC Virtual Media or PXE, and What you need to know about Microsoft Defender Antivirus.
Synology CC400W Setup
Below is a YouTube video showing you the steps discussed above. This includes the setup (mounting) and configuration.
FAQs
What did Synology CC400W prompt the disconnected status?
If your Synology CC400W camera is showing a “Disconnected” status in Surveillance Station (or the Synology mobile apps). This means the camera is currently not reachable by the NAS or Synology cloud services.
There are numerous reasons for this, such as network, power issues, and cloud connectivity issues. In my case, the issue was caused by a loose connection with the Power outlet. This falls under a power-related problem.
I hope you found this blogpost very useful on the “Review of the Synology CC400W Installation and Configuration”. Please, feel free to leave a comment below.