How to update PowerShell and Package Management via Group Policy Object

The PowerShell announced PowerShell 7 on March 4th, 2020. PowerShell 7 is built on .NET Core 3 and brings many unique APIs required by modules built on .NET Framework in order for them to work with .NET Core runtime. While PowerShell Core 6 was focusing on bringing cross-platform compatibility, is the latest major update to PowerShell, a cross-platform (Windows, Linux, and macOS) automation tool and configuration framework optimized for dealing with structured data and its focus is on making it a viable replacement for Windows PowerShell 5.1 and bringing near parity with Windows PowerShell. You may want to see the following articles as well. Why use RSAT? How to Install RSAT on Windows 10, Remote Server Administration Tools: To install RSAT on Windows Server, and what is Group Policy Object and how can it be launched in Windows.
Here is how you can install and update PowerShell 7 via GPO. Also for other articles relating to GPO, please see the following linkHere is how you can install and update PowerShell 7 via GPO. Also for other articles relating to GPO, please see the following link
As you can see from the above link, manually installing PowerShell 7 is a hurdle and must be automated if it must be used across the organization. To role this out, a Computer-Based policy needed your goal is to deploy PowerShell 7 to the computer regardless of the user interaction.
Follow the steps below to implement PowerShell version 7 via GPO.
– The PowerShell .MSI file can be downloaded from here.
– Launch the Group Policy Management Console as shown below

This will open up the Group Policy Management console as shown below. I prefer creating a new GPO before linking it to the domain or OU.
– Right Click on the Group Policy Object as shown below and
– Select New GPO
– Enter a name and click on ok
Note: You can on the fly create a GPO in the Domain, OU, and link it right there.
– Either way you chose to go, you will achieve the same result!

Next, right-click on the the newly created Group Policy Object as shown below
– Click on Edit
Note: If you're sitting in front of a Windows computer right now, Local Group Policy can be accessed by
- Clicking  on Start
- Launch the Run dialog box,
- Typing GPEDIT.MSC, and
- Pressing Enter: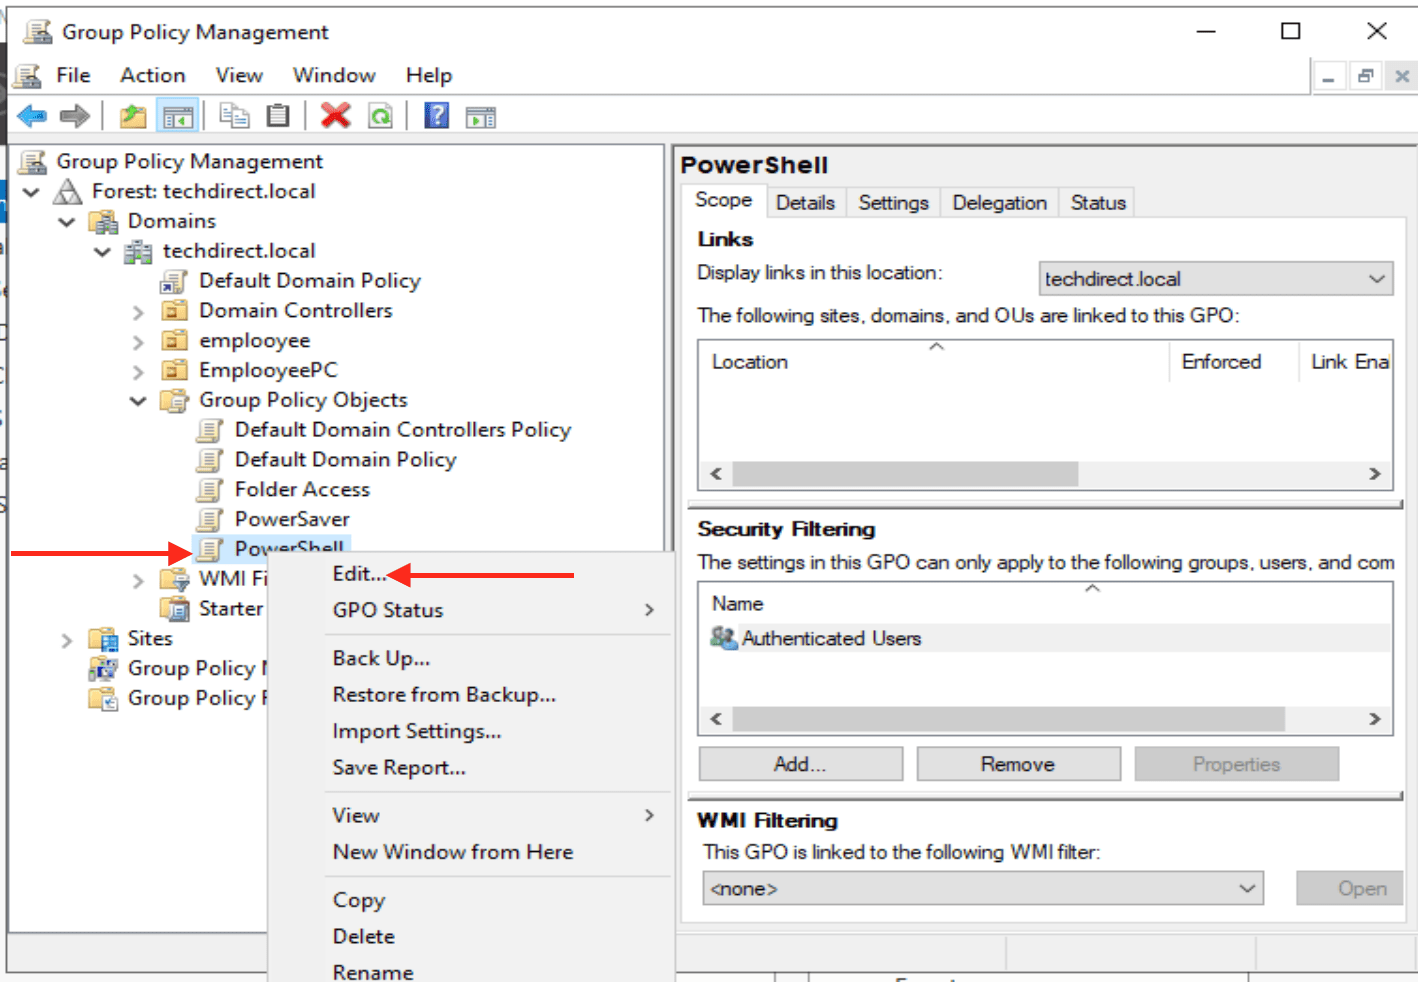
This will open up the console “Group Policy Management Editor” as shown below.
Since we are interested in the computer side configuration, we will be expanding the Computer configuration
– Click on Software Settings
– Right-click Software Installation
– Select select New
– Package

In the dialog box, add the full path or the (UNC) to the MSI file. In my case, here is the path C:\Users\Administrator\Downloads since this is being deployed in a lab environment.
– Note: In a production environment, it will advisable to place this MSI file in a shared folder that other users (computers) can access these files.

Select the right MSI file, in my case, it is PowerShell 7
– Click on open as shown below

Since, I am using a local path, behold the warning below
– For me, I will click on Yes,

– Click on Assigned as shown below and
– Click on Ok

Close the Group Policy Management Console as shown below

Next, attach the GPO to your desired OU or Domain. I will li k this to my Domain as shown below. There are two ways to have this done.
1: Drag and drop the Power “GPO” to the Domain or use my preferred method below
2: Right-click on the Domain or OU of your choice and click on “Link an Existing GPO”

This will prompt you with the Select GPO window as shown below
– Click on OK

Now the GPO is linked to the Domain as shown below

By default, these updates are applied every 90 minutes. To us, this is like forever, and we want these policies to be applied immediately. In this case, the GPUpdate command can be used to achieve this. For more information on this, see the following link. In this way, other computers in the Domain will get this update.
If you’d like to spot check specific servers, the below command will come in handy. It reaches out to a remote computer ($computer) and checks the version of PowerShell installed on that computer with $PSVersionTable.PSVersion.
PS> Invoke-Command -Computername $computer -Scriptblock {$PSVersionTable.psversion}If you find any computers that don’t have the group policy applied, you can run the following command and it will force group policy to refresh on the target computer.
PS> Invoke-GPUpdate -Computer $computerTo deploy PowerShell 7 with PSRemoting:
Additionally, Windows PowerShell remoting lets you run any Windows PowerShell command on one or more remote computers. Therefore, You can establish persistent connections, start interactive sessions, and run scripts on remote computers. PowerShell remoting is similar to SSH used in accessing remote computers.
Nevertheless, To proceed with this step, ensure that PowerShell remoting is enabled and that you have set up the appropriate permissions for executing remote commands across your environment. For more information on PSRemoting, visit the following link.
– How to configure servers for remote access (WinRM and PSRemoting), see the following link.
Below is an example of looping through a list of computers stored in the $computers array then running the install-PowerShell.ps1 script on all of them. The idea behind this is similar to what we used here
$creds = $(Get-Credential)
ForEach ($computer in $computers) {
    Invoke-Command -ComputerName $computer -Credential $creds {iex "& { $(irm https://aka.ms/install-powershell.ps1) } -UseMSI -Preview -Quiet"}
}
Having updated PowerShell, you will now be able be able to use the latest features, take advantage of the performance enhancements, and even ensure that your older code won’t break on the newer versions.
I hope you found this blog post helpful. If you have any questions, please let me know in the comment session.