Mastering Vim in Linux: How to Create, Edit, Save, and Quit Files

Vi/Vim is a very powerful editor that has many commands, too many to explain in a tutor such as this. This tutorial aims to take you through how to create, edit and save files in Linux via Vi/Vim editor. In addition, Vim is a screen editor for Linux, Unix, and other Unix-like operating systems. Please see how to setup SELinux on a Linux server, how to Fix Windows defender blocked incoming connection on Windows and a brief introduction to Linux, and how to create disk partition in Ubuntu Linux.
Vim stands for Visual instrument Improved. It is a widely-used default text editor for Unix-based systems and is shipped with virtually all versions of Unix. Furthermore, it exclusively uses the keyboard and provides a very efficient interface for editing programs and scripts.
Kindly refer to these related guides: How to install and remove Microsoft Edge Browser on Linux, and how to install and configure BigBlueButton on Ubuntu Linux 16.04 LTS Xenial Xerus.
What you need to know about Vim Editor
Vi Improved (Vim) is somewhat difficult to learn, but most users are happy and ready to go through the learning curve to be more efficient in their jobs. When compared to the general-purpose word processor program, Vim is best for a more specific profile of usage and users i.e. programmers of Linux-based systems.
Vim is the text editor of choice for many users that spend a lot of time on the command line. Unlike other editors, Vim has several modes of operation, which can be a little intimidating for new users.
Vim or its predecessor Vi (Visual Instrument) comes preinstalled on all Linux distributions. Knowing the basics of Vim will help you when you encounter a situation where your favorite editor is not available.
Although, Vim could be intimidating for beginners because unlike the widely-adopted and most used word processor such as Microsoft Word, it doesn’t offer any form of formatting of “What You See Is What Get (WYSIWYG)” but it’s necessary you know how to use it mostly those intending to start a career in Pentesting or Ethical Hacking.
Vim Modes
There are several modes in Vim editor. When you launch the Vim editor, you’re in normal mode. In this mode, you can use vim commands and navigate through the file.
To type a text, you need to enter the insert mode by pressing the i key. This mode allows you to insert and delete characters in the same way you do in a regular text editor. To go back to the normal mode from any other mode, just press the Esc key.
Please, see “Azure Virtual Networks: Preparing Azure and On-Premises Virtual Networks with Azure CLI Commands“, and “Read-only Files: Saving Files in VIM Editor on Linux/Unix-like OS“.
VI VS VIM
Vi and Vim are both text editors available in Linux-based/Unix-like operating system. The text editor, with its numerous implementations, is by far the most distributed and widely used text editor. This section briefly explains the differences between the Vi and Vim editors in detail.
Vi is the universal text editor of Linux. If you know how to use the Vi text editor, you can edit any text file on any mode and version of Linux. Vim is simply an improved version of Vi, but unlike Vi, Vim is not universal. Depending on your Linux distro, it may or may not be installed by default.
Vim, which stands for Vi IMproved, has all the features of Vi with some excellent additions that aid in editing source code by programmers. There’s also a comprehensive help system and lots of customization options available. The diagram below gives a clearer picture of the differences and what both Vi and Vim shares in common.

In this guide you will learn how to do the following:
- create a file
- edit it in insert mode and
- save it and quit the Vim editor
Requirements to create, edit and save file in Vim Editor
- A system running Linux
- A user account with
sudoorrootprivileges - Access to a terminal window / command line (Activities > Search > Terminal). To use Vim editor in a terminal running on a Windows OS, run
vimtutorand press theEnterkey. For the purpose of this guide, we are going to use a terminal from Ubuntu Linux OS.
To get started with Linux and Ubuntu Linux Distribution.
Pease refer to the following related guides: how to install and configure Ubuntu Linux on VirtualBox, how to create and deliver a report on System Utilization on a Linux based OS, how to install, remove, and upgrade packages in Ubuntu Linux.
Now let’s get started by launching the terminal from Ubuntu.
Creating a File in Vim Editor
I’m going to create a simple file with a html extension. To do so and get vim editor launched run vim filename (not filename as used here indicate the name of the file you want to edit) followed by the enter key in your terminal window. See my screenshot below for clarification.

The screenshot above shows that my file name is contactform.html. You create any type of file, it must not be an html file.
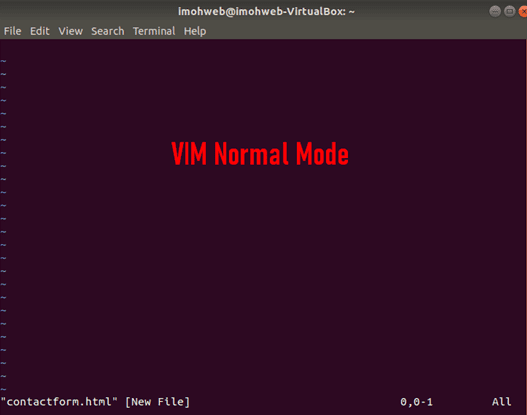
Once you press enter on your keyboard, the first screen that will show up is the normal mode screen.
By default, Vim starts in “normal” mode. Meanwhile, normal mode can be accessed from other modes by pressing Esc or <C-[>. In Normal mode key presses do not work as one would expect.
That is, they don’t insert text into the document until you press letter i on your keyboard. Hence, see my screenshot below for your information.
Editing a file in Vim Editor
Now let’s enter into the insert mode by pressing i on our keyboard and start write our text file right away. Refer to the below screenshot for your reference.

Vim editor is very powerful and comes with some intuitive features that give users the best experience they need. Certainly one of the key selling points of Vim over its precursor, Vi editor is its syntax highlighting.
Vim can be programmed to highlight portions of the buffer in different colors or styles, based on the type of file being edited. So, this improvement over Vi comes in handy for programmers using Vim to write/edit code. Just as shown in the html file we just created.
Please, see How to Exit Linux Vim or Vi Editor, How to install Amazon RDS using Terraform, and Shell Scripting: How to Automate a Process in Linux.
Save a file and Quit Vim Editor
Now let’s get back to our editor to save and quit Vim editor;
To save and quite the Vim editor, run :wq! or :wq (write and quit) in normal mode and press the Enter key. You must press the Esc key to get back into normal mode.
Note, running only :q! without running the :wq! will quit the editor without saving your file.

Another command to save a file and quit Vim is :x. The difference between these two commands is that :x writes the buffer to the file only if there are unsaved changes, whereas :wq! or :wq always writes the buffer to file and updates the file modification time.
To open the file you just created in case you wish to make changes to it, simply run vim filename and hit the enter key. That’s all!
You now have a grasp of how to create, edit, save and quit file in Vim Editor.I hope you found this article useful on how to create, edit and save files in Linux via Vim Editor. Please feel free to leave a comment below.