Shell Scripting: How to Automate a Process in Linux

A shell script is a text file that contains a series of commands in plain text. It executes the commands in the text beginning with the one at the top, one line at a time until every of the command has been successfully executed. What’s more, executing a shell script will give you the same result as if you were directly typing those commands with your own hand. Please see How to use the Azure Cloud Shell or Azure CLI and Azure PowerShell, and how to Exit Linux Vim or Vi Editor.
In other words. Before writing this article, I did research on all popular software jobs and shell scripting appears on almost all of the job descriptions. In order words, it’s an invaluable skill as it can help you automate processes fast.
You can find other guides here
Shell scripting enables us to automate system maintainance task. It can help reduce the possibility of having error in our work by providing a consistent process. In this guide, I will walk you through :
How to create a shell script using a text editor
How to create a shell script: Because shell scripts are text files, we can use any of the text editors such as nano or vim to create our shell script. if you are using centos or related distributions like RHEL, you can use
sudo yum install -y vim
So, if you are using a Debian or related distribution you can use
sudo apt-get install -y vim
Also, see The Overview of Azure Cloud Shell, Vim Editor: Create, Edit, Save, and Quit file in Linux, and how to use the Azure Cloud Shell or Azure CLI and Azure PowerShell.
Naming our script
The first step would be to create a name for the script by convention, file extensions end in .sh
The naming is not so significant as we are allowed to use any name so long as it does not start with a digit or a number. Some examples of valid file names are
- techdirectarchive.sh
- techdirectarchive_1.sh
- Techdirectarchiveone.sh
- _techdirectarchive1.sh
In all these, we see that we can literally use any format except, starting with a digit. To begin writing our script, we need to use the format the convention would be as shown below
vim < name of script .sh>
In our example, we decided our script’s name will be techdirectarchive.sh so the command to create this in the terminal will be
vim techdirectarchive.sh
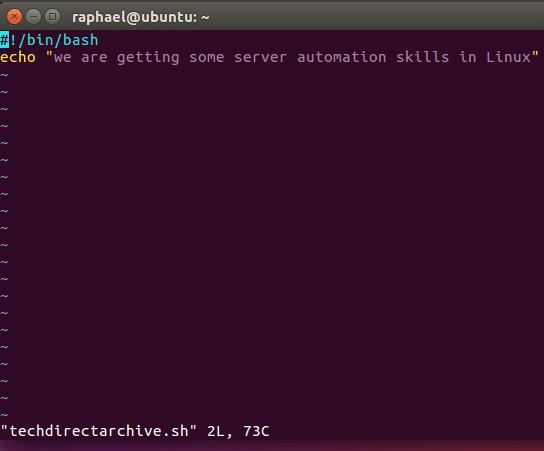
The second step for creating a script will be a shebang (#!)and the shell (/bin/ bash) from which we want to execute our command.
Thus, the # is actually similar to a musical sharp and the exclamation mark is called a bang. So the combination of sharp and bang leads to the formation of shebang.
#!/bin/bash
echo is a built-in shell that will display anything that is placed in it for the user to view. So for our example, we echo ” we are getting some automation skills in Linux” and we exit using the usual Linux command to exit vim press the escape key, then:wq
Running of the Shell Script
To execute our shell script, we need to add a. ( a period), a forward slash, and the file name as shown below
./<script name >
The period signifies our current working directory and as such if we hit . on the command line our position will not change as it is the current working directory.
The run command is just a shortcut for the full working directory so do not be daunted by the format. ./techdirectarchive.sh is the same as what you see in the image below.

Execute Permission
chmod +x <script name>The +x gives the file execute permission. Ch means change with the mode being another way to say permission.
we can take a close look at the permissions given to the owner after running chmod + x as shown below. The owner, raphael has read, write and execute permission and that is just enough for our script to run.

Using Variables in our script
#!/bin/bash
NAME=raphael
echo'my name is ${name}
We can use variables in our script and assign them a value. Whenever we want to call the value in our code all we need to do is to write the variable in between the curly bracket after the dollar sign $ and the value we assign to it will be called into play.
So assuming we run the script above, what will show is my name is raphael.

Furthermore, to run the script above, we can just need to follow all the instructions in the first example. 1. give the script execute permissions with chmod +x <name of script> 2. we need to run the script with ./<name of script> just as shown below

As we can see running the script with ./demo.sh shows the output of echo which is my name is Raphael.
Variable reassignment and Comments in shell scripts
When variables are reassigned they won’t hold the meaning of the first value they were assigned to. Comments are usually to give instructions above what our command will do and it’s often best to give them before the first variable assignment.

So, if we run this script, our output will be scripting is fun and reading is fun just as shown below

Blank lines in Script
They make our code easier to read and do not affect the execution of our code, so always feel free to add blank lines to your code for readability sake as this will not affect your result in any way.
Real-world implementation
Comments are called sudo code, they help in creating an outline for our script before we start scripting. Our final demo will be called machineinfo.sh is a typical script that one would find in real life if you were working with servers and Linux OS.
The steps are not different from the other demos above.
1. We created the name (machineinfo. sh)
2. shebang command and specified the shell we want our script to use (/bin/bash)
3. Then, we wrote a comment to describe what the script aims to accomplish
4. We described each action with a comment and what the line does.
5. The script ended and let the user know this with its the final command.
6. We saved with the usual step you would use to save a vim file (:wq) and gave the script execute permission, chmod + x machineinfo.sh


Summary
Every other script will pass through the process and steps, no matter how many examples we give here, the steps will always be the same.
1. give your script a name starting with vim or nano depending on the text editor you are using just like (vim <name of script.sh>
2. Start with shebang and the shell you want your script to use for example ( #!/bin/bash)
3. Use a comment to descript the purpose of the script 4. Use variables and assign them accordingly. 4. Save your script with (:wq) if you are using vim 5. Give your script the required execute permission with chmod +x <name of script.sh) 6. run your script with ./<name of script.sh>
So follow along and get creative with writing your own script. Please leave us a comment and we will be happy to assist.


