Skip to content

TechDirectArchive

Hands-on IT, Cloud, Security & DevOps Insights

  • Home
  • About
  • Advertise With US
  • Reviews
  • Contact
  • Toggle search form
Home » Linux » How to Install and Configure Postfix as a Send-Only SMTP Server
  • sync
    AD Connect Sync Service Not Running: Start ADSync to Continue AWS/Azure/OpenShift
  • banner
    How to Secure your API key in Postman Password Manager
  • Remove icons from Launchpad
    Remove an icon from launchpad that has been deleted Mac
  • Container insights
    How to use Container Insights for Azure Kubernetes Workload Network | Monitoring
  • macos app switcher shortcuts
    How to enable or disable automatic software updates on Mac Mac
  • whatsappImage
    How to add WhatsApp UWP on Windows 11 Windows
  • Open Outlook links from your default browser
    How to stop Outlook from opening links in Edge Browser Network | Monitoring
  • UnregisterGitLabRunner
    How to unregister GitLab Runner in Windows Version Control System

How to Install and Configure Postfix as a Send-Only SMTP Server

Posted on 21/11/202128/03/2024 Raphael Gab-Momoh By Raphael Gab-Momoh 1 Comment on How to Install and Configure Postfix as a Send-Only SMTP Server
posfix-as-an-smtp-server

Postfix is an open-source mail server released under IBM in 1998. Furthermore, it helps to route traffic between various mail servers across the internet. It is still in use because Postfix strives to be fast, uncomplicated, and trustworthy. To run a mail-in Linux, we need to understand servers’ separate roles in an email configuration. The most important role of emails is what we call a null client. This article explains how to install and configure Postfix as a Send-Only SMTP Server. Please see How to add or remove email addresses from a mailbox.

Please refer to the following guides for information: How to locate directory file context and restore it with SELinux, and How to Restore Deleted Azure App Service Using PowerShell.

A null client is a mail server that is running in SMTP process

SMTP is a simple mail transfer protocol. Every Linux server runs SMTP processes to send mail to the outside.

A forwarder configures Null clients. In addition, the mail forwarder is a server that sits somewhere, sending emails to the rest of the world. Concisely, we will call the Null client an SMTP server.

Also, there is an email role where users can receive emails via a server known as an IMAP/POP server. It listens for all incoming messages on port 25. Null Clients do not receive messages from the outside world. Thus, null clients are just for sending messages to the internet.

Steps to Install and Configure Postfix

The following steps explain the installation and configuration of Postfix. Please see How to Install and Configure Nagios on Ubuntu, and Configure WSUS Email Notification for Office365.

Installing Postfix on RHEL

To install and configure Postfix as a send-only SMTP server, execute the following command,

#dnf install postfix 
postfix-installed-1

It has been installed, so let’s start it

#Postfix start
How to Install and Configure Postfix as a Send-Only SMTP Server-postfix-start

Configure Postfix On Centos

Postfix came out of the box with a null client configuration installed on Centos and started automatically because you need Postfix for processes that need to send out information online. So, the next thing to do is check the status using the below command. We shall be using Centos for the configuration.

#systemctl status postfix
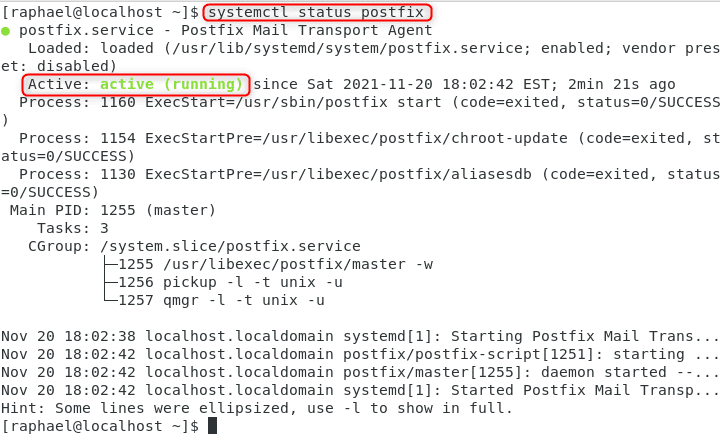
status-postfix-1

Configuring Postfix

After you’ve installed Postfix, the next thing to do is to configure it. The configuration file for Postfix can be found at:

#cd /etc/postfix
#ls

The config file we need to edit is the main .cf file

How to Install and Configure Postfix as a Send-Only SMTP Server-main.cf_
.cf

When we are in the /etc/postfix directory, run ls to see all the files and choose main.cf; the next step would be to edit the main.cf file. The file has a lot of parameters, and we can change them to suit what we want the Postfix mail server to do.

vim main.cf

One such parameter that we can change is inet_interfaces. In the config file, inet _interfaces are set to localhost, meaning that the Postfix servers won’t accept incoming messages. So, we need to fix that by replacing the local host with the IP address device.

How to Install and Configure Postfix as a Send-Only SMTP Server- inet
Inet interfaces

To configure Postfix, let’s verify that the default configuration does not allow messages from the outside into the server with the command

#netstat -tulpen
How to Install and Configure Postfix as a Send-Only SMTP Server-netstattulpen
netstat -tulpen

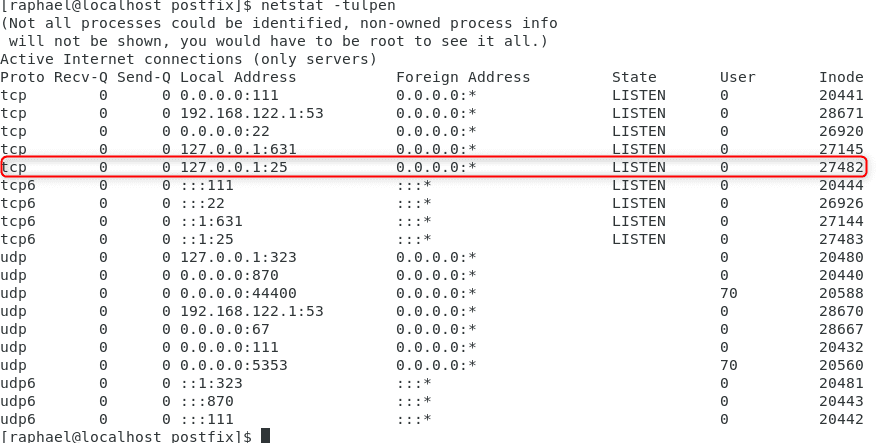
We see that the inode is bound to the local host and not accessible from the outside.

Relay Messages

Another parameter in the main.cf is the relayhost. If we want our postfix server to relay messages (forward messages) to another host, we need to change it there.

relayhost
relay host

So, we just need to add the name or IP address of the forward or relay host. It is a widespread practice to put the IP address or name in square brackets, as shown above so that the postfix server will not do a DNS/MX mail lookup as it will just send the messages directly to the relay host.

Before we put any IP address, we must ensure the owner has given their consent because, by default, nobody would want to be used as a reply host and become a” dumping ground” for unwanted messages. To ensure the change takes place, we must run the command below so that the change is persistent.

# systemctl restart postfix

The following commands can start, stop, and restart the mail system. Please remember that the following commands are only available to the superuser, which implies you must be root to use them.

 Important Commands

To install and configure Postfix, ensure you note the following commands:

Objective: Stop Postfix

To stop postfix use:

# Postfix stop

Objective: Start Postfix

To start postfix use:

#Postfix start

Objective: Restart Postfix

To reload Postfix, use:

#Postfix restart

Objective: Reload postfix

To reload the config files, use the following:

#postfix reload

Objective: Postfix status

To check the status of Postfix:

#Systemctl status postfix

Distro specific Start-stop commands

Debian Centos/RHEL/Fedora
$ sudo service postfix start
$ sudo service postfix stop
$ sudo service postfix restart
# /sbin/service postfix start
# /sbin/service postfix stop
# /sbin/service postfix restart

Summary

In conclusion, Postfix is an open-source mail server with its config file called main.cf located at /etc/Postfix.

To be able to forward messages, we need to change the configuration of the relay host in the config file with the IP address or name of the relay host we want to send the messages. Guess you have a clear understanding of how to install and configure Postfix as a send-only SMTP server.

Rate this post

Thank you for reading this post. Kindly share it with others.

  • Click to share on X (Opens in new window) X
  • Click to share on Reddit (Opens in new window) Reddit
  • Click to share on LinkedIn (Opens in new window) LinkedIn
  • Click to share on Facebook (Opens in new window) Facebook
  • Click to share on Pinterest (Opens in new window) Pinterest
  • Click to share on Tumblr (Opens in new window) Tumblr
  • Click to share on Telegram (Opens in new window) Telegram
  • Click to share on WhatsApp (Opens in new window) WhatsApp
  • Click to share on Pocket (Opens in new window) Pocket
  • Click to share on Mastodon (Opens in new window) Mastodon
  • Click to share on Bluesky (Opens in new window) Bluesky
  • Click to share on Threads (Opens in new window) Threads
  • Click to share on Nextdoor (Opens in new window) Nextdoor
Linux

Post navigation

Previous Post: How to Improve Website Response Using Traffic Manager
Next Post: Docker Engine Installation on Ubuntu

Related Posts

  • google sdk feature
    How To Install Google Cloud SDK on a Linux System Linux
  • FimageUbuntuUpgrade
    How to Upgrade From Ubuntu 20.04 LTS to 22.04 LTS Linux
  • images copy
    How to disable automatic screen lock in Ubuntu Linux Linux
  • feature image nodejs
    How to install Node.js on Ubuntu Linux
  • Screenshot 2020 05 14 at 17.47.09
    SSH access on Ubuntu server: Easy Guide Linux
  • Feature image nagios
    How to Install and Configure Nagios on Ubuntu Linux

More Related Articles

google sdk feature How To Install Google Cloud SDK on a Linux System Linux
FimageUbuntuUpgrade How to Upgrade From Ubuntu 20.04 LTS to 22.04 LTS Linux
images copy How to disable automatic screen lock in Ubuntu Linux Linux
feature image nodejs How to install Node.js on Ubuntu Linux
Screenshot 2020 05 14 at 17.47.09 SSH access on Ubuntu server: Easy Guide Linux
Feature image nagios How to Install and Configure Nagios on Ubuntu Linux

Comment (1) on “How to Install and Configure Postfix as a Send-Only SMTP Server”

  1. Avatar photo m101p says:
    21/11/2021 at 5:45 PM

    Very nice

    Log in to Reply

Leave a Reply Cancel reply

You must be logged in to post a comment.

Microsoft MVP

VEEAMLEGEND

vexpert-badge-stars-5

Virtual Background

GoogleNews

Categories

sysadmin top30a
 
  • sync
    AD Connect Sync Service Not Running: Start ADSync to Continue AWS/Azure/OpenShift
  • banner
    How to Secure your API key in Postman Password Manager
  • Remove icons from Launchpad
    Remove an icon from launchpad that has been deleted Mac
  • Container insights
    How to use Container Insights for Azure Kubernetes Workload Network | Monitoring
  • macos app switcher shortcuts
    How to enable or disable automatic software updates on Mac Mac
  • whatsappImage
    How to add WhatsApp UWP on Windows 11 Windows
  • Open Outlook links from your default browser
    How to stop Outlook from opening links in Edge Browser Network | Monitoring
  • UnregisterGitLabRunner
    How to unregister GitLab Runner in Windows Version Control System

Subscribe to Blog via Email

Enter your email address to subscribe to this blog and receive notifications of new posts by email.

Join 1,841 other subscribers

veeaam100

  • RSS - Posts
  • RSS - Comments
  • About
  • Authors
  • Write for us
  • Advertise with us
  • General Terms and Conditions
  • Privacy policy
  • Feedly
  • Telegram
  • Youtube
  • Facebook
  • Instagram
  • LinkedIn
  • Tumblr
  • Pinterest
  • Twitter
  • mastodon

Tags

AWS Azure Bitlocker Microsoft Windows PowerShell WDS Windows 10 Windows 11 Windows Deployment Services Windows Server 2016

Copyright © 2025 TechDirectArchive


Loading Comments...
 

You must be logged in to post a comment.