USB Drive: Create a Multiboot with Multiple OS ISOs

Being able to put in a single USB to your PC and be presented with several choices of Operating Systems be it Windows or Linux to Boot from is something that will ease your workloads as IT, Admin. This write-up will take through the process of making one single USB drive to have more than one Bootable Operating System ISO file (Create a Multiboot with Multiple OS ISOs). The aim is to make a single USB to be a multiboot device. Please see How to create a Windows 11 Bootable USB drive, and Create a Windows 10 or 11 bootable USB with UEFI support.
The aim is to make a single USB to be a multiboot device. Creating a bootable USB disk comes in handy when we have to reinstall our operating system in the case of a system failure.
It’s effortless to put ISO files on portable flash drives by using various tools like Windows USB/DVD tool and the Startup Disk Creator in Ubuntu. There are many operating systems available in the market, either free or paid.
Each is having its multiple versions and features. You can’t waste a flash drive for each of them. It would be great if you put all the ISO files on a flash drive and make a multiboot USB. Life is a lot easier when a single storage media houses many ISO files.
See also how to fix CPU at 100% when nothing is running problem on Windows, how to Disable Or Enable Secure Boot on Windows 10 & 11, and how to Solve “The parameter is incorrect” problem on External Hard Disk in Windows.
Create a Multiboot USB Disk with WinSetupFromUSB
The process to create a multiboot USB disk is quite simple. For Windows OS, these multiboot USB disks can be created using a popular tool known as WinSetupFromUSB. It allows you to put multiple ISOs in one flash drive.
You can put Windows and Linux in the same bootable disk or create a master installation disk of Windows 10, and Windows 11. The choice is up to you. Moreover, making multiboot USBs can be very helpful for Linux users who have to deal with various distributions each having its own set of features.
Let’s get started with creating a multiboot USB drive. Before proceeding with the method, if you don’t have the ISO files for Windows OS, visit the Microsoft evaluation centre to download the ISO files for Windows 10, 11 or Windows Server. You must have it handy with you a USB flash drive of considerable size.
Create Multiboot in Windows
Please follow these steps below to create a multiboot in Windows PC.
- Download WinSetupFromUSB and extract the file after downloading it.
- Connect the flash drive to your computer.
- Double click to open
WinSetupFromUSB. Open the 32-bit and 64-bit version according to your OS. It will work without any installation. - Make sure your flash drive is listed and selected in the drop-down menu. Click Refresh, if it is not on the list.
- Tick Auto format it with FBinst.
Note: You have to tick this option only for the first ISO installation. Choose FAT32 if your computer is set to boot using UEFI mode or if UEFI sounds strange to your ears. Else, go with the NTFS option.

6. Click Advanced options.
7. Tick the Custom menu names for Vista/7/8/Server Source checkbox. Click the Cross (X) button to exit Advanced Options.

8. To add the ISO file for your multiboot USB Drive, tick the checkbox corresponding to OS under Add to USB disk subheading.
Note that if the size of your ISO is larger than 4 Gb, it will show a message to split the file into parts. This is because you’ve chosen the FAT32 option. Click OK.
9. Click GO. A data deletion warning message will be displayed. This is because you’ve chosen to format the flash drive. Click Yes. Else, you’ll end up formatting some other connected storage media.
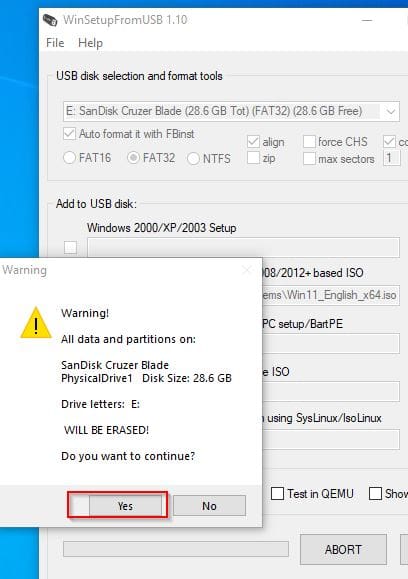
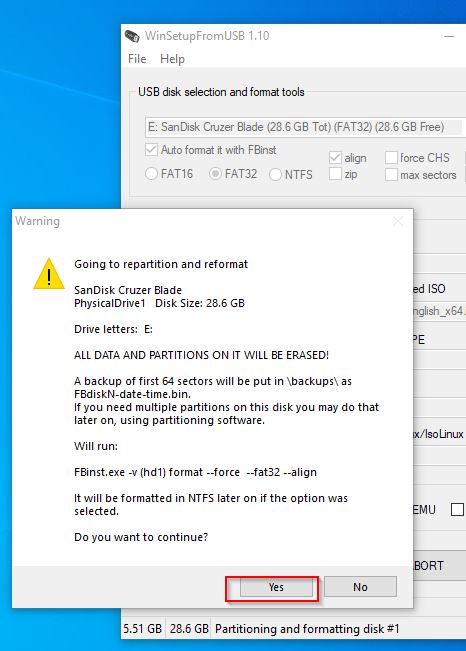
10. The second warning message displayed is the one telling you that all the partitions will be erased. Click Yes to continue.
This happens if you’re creating Windows 10 ISO Image file. If that happens, type the desired name in 45 seconds or it’ll auto select. Click Ok.

The process will take a few minutes to finish.


Finally, click EXIT to finish.
Note from the above exercises, the ISO images were not added simultaneously. They were added one after the other. See the steps for adding additional ISO image files below to make your USB drive a Multiboot drive.Also, see Enable or disable BitLocker Drive Encryption on Windows, and how to create a bootable USB using Rufus on Windows.
Add a second ISO file
1: Adding a second, third or fourth ISO files to your USB depending on the size involves launching the tool again.
2: Select the same flash drive in the drop-down menu.
3: Click Advanced Options and look for Custom menu names for Vista/7/8/10/Server Source.
Don’t Click Auto format with FBinst. That’s because it will remove your previous ISO files.4: Add the second ISO file for your multiboot USB.
5: Click GO and repeat the steps mentioned earlier.
Follow the same process to add more ISO files.What to do after making your multiboot USB Drive?
Plug the flash drive into your computer and set the boot device to USB. Most desktops and laptops have a dedicated key to trigger the boot menu (which is often F9, or F12). After the multiboot USB loads, choose the desired operating system from the list.
In the above, we have learned about how to create a multiboot USB flash drive that allows you to choose between multiple operating systems at a time.
You can use the same method to put a 32-bit version of the same OS in one bootable media and watch the game played out perfectly for you. Enjoy!!
I hope you found this article useful on Create a Multiboot with Multiple OS ISOs useful. Please feel free to leave a comment below.


Nice article written about how to use a bootable USB drive. If you are looking for Promotional USB sticks in Australia Then Implant media is the best choice.
Implant media provides the best quality USB sticks, Cd, Dvd, Blu-ray Duplication and Replication Services, custom Vinyl record Pressing, Business card printing throughout Australia.
Contact us for a review!