Enable Exploit Protection feature on Windows using the Windows Security App, Microsoft Endpoint Configuration Manager, and Group Policy

Exploit Protection, according to the official reference by Microsoft provides advanced protections for applications that IT Pros can apply after the developer has compiled and distributed the software. This is on the premise that the struggle between the man-in-the-middle attack and IT Pros/Sysadmin has not always been easy as hackers are constantly exploring more options to infiltrate your devices and exploit your network to have access to your data. Please see how to Activate and Press Ctrl+Alt+Del in Anydesk for Remote Access Connection to Windows system, and How to fix HyperV Virtual Machine display taking over the entire screen.
As an IT Admin, it’s expected of you to live up to the expectations of being able to apply all available measures to protect corporate or personal devices from any internal or external attacks.
Taking time to explore the built-in feature in Windows 10 and above can save you from a lot of pending attacks. Hence, this article intends to guide you through the step-by-step process of enabling the Exploit Protection feature on Windows using the Windows Security App, Microsoft Endpoint Configuration Manager, and Group Policy. Before we proceed to the steps, let’s look at the meaning of Exploit Protection.
Exploit Protection is a security feature that is available in windows (Windows Servers and normal Windows OS like Windows 10, & 11) as well as Microsoft 365 which helps protect against malware that uses exploits to infect devices and spread. It consists of many mitigations that can be applied to either the operating system or computer programs.
Exploit Protection includes many features from the Enhanced Mitigation Experience Toolkit (EMET). There are various ways to enable are:
- Windows Security App
- Microsoft Endpoint Configuration Manager
- Group Policy
- PowerShell
You may also be interested in the following posts; How to create and delete a custom AD DS partition with the NTDSUTIL.EXE Tool on Windows Server (Applies to 2012, 2016, 2019 and 2022 versions), and What are the differences between vSphere, ESXi and vCenter.
Enabling Exploit Protection using the Windows Security app
1: Open the Windows Security app by searching the Start menu for Security.
2: Select the App & browser control tile (or the app icon on the left menu bar) and then select Exploit protection settings as shown in the screenshot below.


3. Go to Program settings and choose the app you want to apply mitigations to. Things to do under program settings. Next, select the listed app you want to configure. Edit.
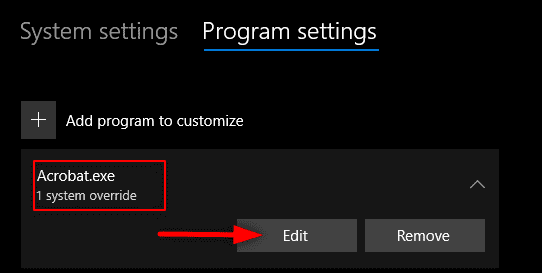

If the app is not listed, look the top and select Add program to customize and then choose how you want to add the app.
There are two options here to choose from. It is either you select Add by program name to have the mitigation applied to any running process with that name.


Specifying Program Extensions and Paths for Mitigation
As shown in the screenshot above, the program or file must be specified with its extension e.g. adding a Zoom desktop application will follow by the .exe extension which you can enter a full path to limit the mitigation to only the app with that name in that location.
Or use Choose exact file path to use the standard Windows Explorer file picker window to find and select the file or the program you want as shown in the screenshot below.


4. After selecting the app, you will see a list of all the mitigations that can be applied. Choosing Audit will apply the mitigation in audit mode only. Audit modely only will allow you to test how mitigation works for certain apps in a test environment.
This will help to know how it will work in a production environment when you finally enable it. This way, you can attest that exploit protection doesn’t have any negative impact on your line-of-business (LOB) apps. You will be notified if you need to restart the app, or if you need to restart Windows after applying it.
Configuring Mitigations for All Apps and Files
5.If you wish to apply mitigations for all your apps or files, repeat the same step processes in point 3 and 4 above, and select the mitigations you want to configure.
6. Under the System settings section, find the mitigation you want to configure and then specify one of the following settings. The settings configured here are used by apps that are not individually configured in the Program settings section.
- On by default: Apps that don’t have this mitigation set in the app-specific Program settings section enable the mitigation.
- Off by default: The mitigation is disabled for apps that don’t have this mitigation set in the app-specific Program settings section
- Use default: The mitigation is either enabled or disabled, depending on the default configuration that is set up by Windows 10 or Windows 11 installation; the default value (On or Off) is always specified next to the Use default label for each mitigation
Repeat step 6 for all the system-level mitigations you want to configure. Select Apply when you’re done setting up your configuration.
Enabling Exploit Protection using Microsoft Endpoint Configuration Manager
Sign in to the Endpoint Configuration Manager portal. When you sign in, go to Endpoint Security > Attack surface reduction.
Select Create Policy > Platform, and for Profile, choose Exploit Protection and then select Create.

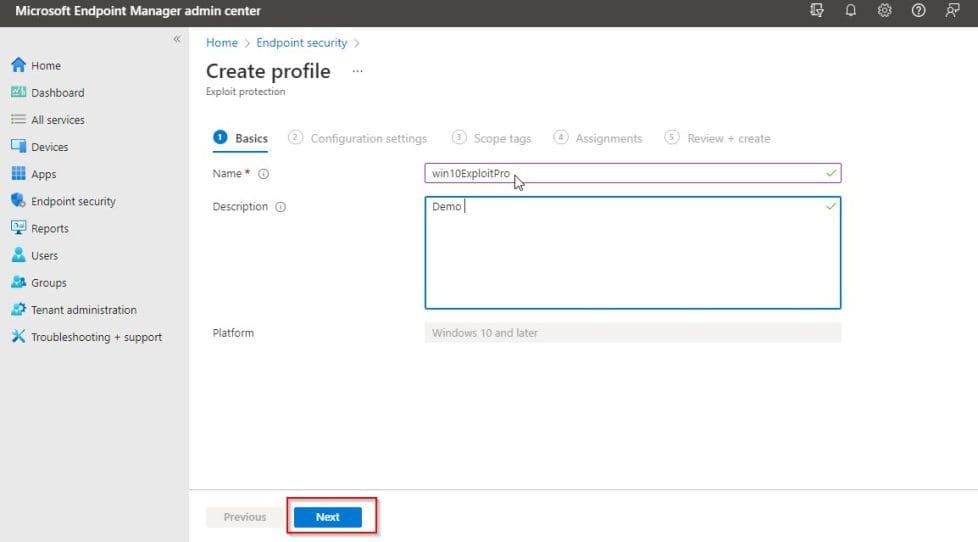
4. Specify a name and a description, and then choose Next. As shown in the screenshot below, we’re name is as win10ExploitPro and added a description as Demo.
There is no fixed name for this. You’re free to name it with any name as long it meets the naming standard specifications.
5. Choose Select XML File and browse to the location of the XML file. Select the file, and then choose Next. We have created our XML file already with policy conditions defined as shown in the screenshot below:


6. Configure Scope tags and Assignments if necessary. Here we will leave the Scope tags as default but configure the Assignments so that it will assign to those we want it assign to at once.
In the Assignments tab, we defined it to be assigned to groups, all users, and devices. This is dependent on what you hope to achieve with your configuration.

7. Under Review + create, review your configuration settings, and then choose Create.

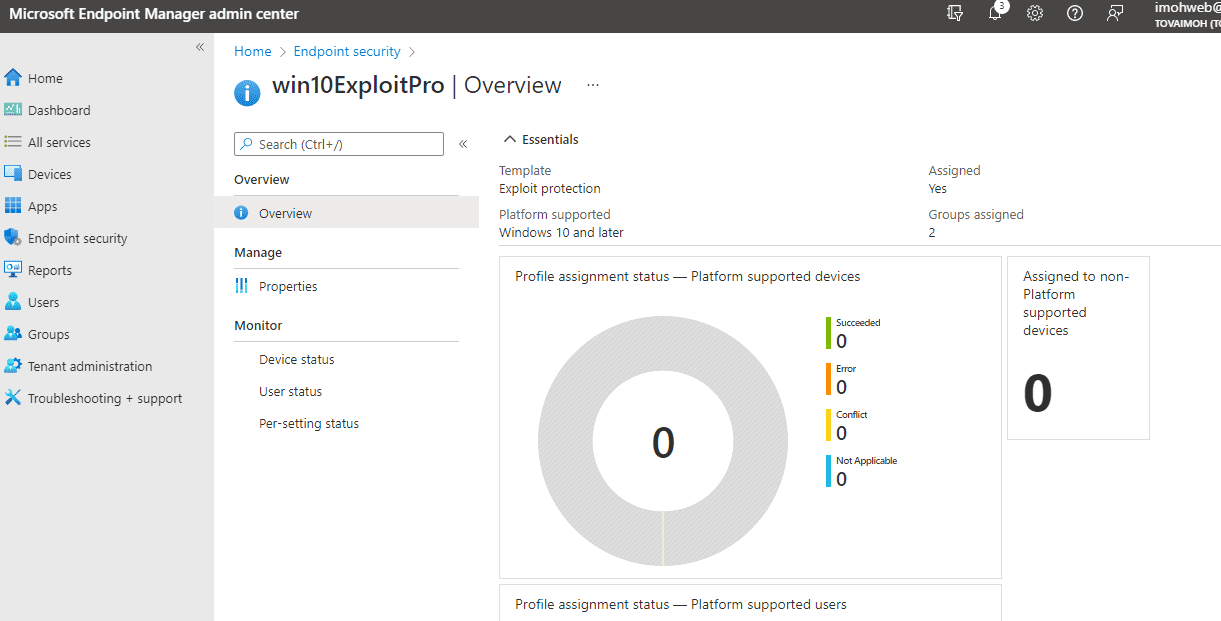
After creating the Policy, you can double-click on the Exploit Protection policy name to have an overview of the matrics of the policy for performance tracking as hown in the screenshot
Activating via Group Policy Configuration
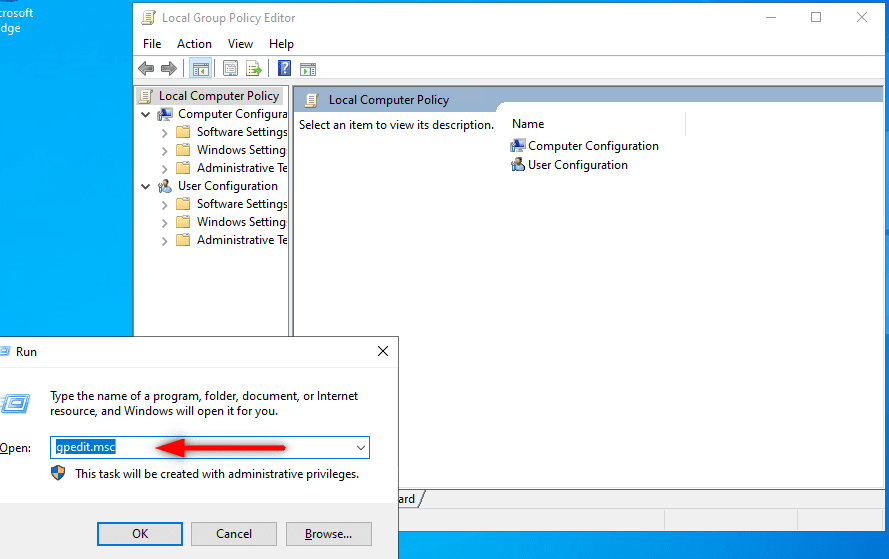
1: Press the Windows + R to open the Run dialogue box and type the gpedit.exe command. Then press Enter
2. In the Local Group Policy Editor management console, go to Computer configuration and select Administrative templates.
3. Expand the tree to Windows components > Windows Defender Exploit Guard > Exploit Protection > Right-click on the <Use a common set of exploit protection settings>
4. Select Enabled and type the file path to the XML file in the column provided, and then click OK. The path here is C:\Program Files\XMLFile. Your path may be different from what we have here.


Note: The above steps apply to both Windows 10, 11 and Windows Server. Exploit Protection Group Policy Management Console on standalone Windows Operating System is in form of Local Group Policy because it’s domiciled on your local system not on a Server with a Domain Controller
I hope you found this guide useful on enabling Exploit Protection feature on Windows using the Windows Security App, Microsoft Endpoint Configuration Manager, and Group Policy. Please feel free to leave a comment below.


