How to install and configure JIRA on Linux

JIRA is a proprietary and comprehensive software program developed by Atlassian that is primarily used for project management, problem tracking, and bug resolution. In this article, we will discuss how to install and configure JIRA on Linux. JIRA has an easy-to-use dashboard that allows you to keep track of issues. These concerns could include software flaws or defects, new features, or requirements, to name a few. Workflows are also included, allowing you to track job progress and pinpoint where an issue is occurring. Jira: What is Jira re-indexing.
Note: Support for Atlassian Server products ended on Feb. 15, 2024. Server products and apps no longer receive technical support, security updates, and bug fixes for vulnerabilities. Atlassian recommends migrating to the cloud and that remaining on Server is not recommended. This ensures you avoid costly data breaches and security risks. Unsupported licenses no longer have access to tech support, security updates, and bug fixes.
Other useful guides can be found here: how to install and configure Apache Cassandra on Linux Server and how to Install and Configure Elasticsearch on Linux, and how to download, install and activate, and uninstall IBM SPSS Statistics
Jira Installation Prerequisites
Below are the prerequisites necessary for installing Jira on Linux. Here are some interesting articles we have written: and how to install, configure Prometheus for Monitoring on a Linux Server, and how to Install Terraform on Linux
- Ubuntu 18 and above
- Install the MariaDB database on your instance. Because JIRA needs a database to install all or most of the files, MariaDB will be useful.
- A user account with root privileges. To install JIRA on Ubuntu, simply follow the steps below.
Step 1: Install MariaDB Database Server
Because JIRA stores its data in MariaDB, we must install and setup it up for JIRA. To install the MariaDB Server, use the command below.
If you haven’t done so recently, refresh the package index on your server to install it: Install the mariadb-server package: sudo apt install mariadb-server -y
root@ubuntu:/home/rdgmh# sudo apt install mariadb-server -yMake sure that the server is running
sudo systemctl start mariadb.service
sudo systemctl status mariadb.service
Step2: Configure a database for JIRA
Type this command to login
sudo mysql
Create a database for JIRA
CREATE DATABASE techdirectarchivedb CHARACTER SET utf8mb4 COLLATE utf8mb4_bin;
CREATE USER 'techdirectarchiveuser'@'localhost' IDENTIFIED BY 'password';
GRANT ALL ON techdirectarchivedb.* TO 'techdirectarchiveuser'@'localhost' WITH GRANT OPTION;
FLUSH PRIVILEGES;
EXIT;
edit the /etc/mysql/mariadb.conf.d/50-server.cnf file by typing:
sudo vim /etc/mysql/mariadb.conf.d/50-server.cnfadd the below data under [mysqld] section:
default-storage-engine= INNODB
 character_set_server = utf8mb4
 innodb_default_row_format = DYNAMIC
 innodb_large_prefix = ON
 innodb_file_format = Barracuda
 innodb_log_file_size = 2G
 sql_mode = NO_AUTO_VALUE_ON_ZERO
close the file and exit then restart mariadb with the command:
sudo systemctl restart mariadb.serviceStep 3: Install JIRA
Use wget command to get the latest version of Jira “wget https://www.atlassian.com/software/jira/downloads/binary/atlassian-jira-software-8.14.0-x64.bin“
root@ubuntu:/home/rdgmh# wget https://www.atlassian.com/software/jira/downloads/binary/atlassian-jira-software-8.14.0-x64.binset the correct permissions for the downloaded file.
sudo chmod a+x atlassian-jira-software-8.14.0-x64.binUse this command to install the JIRA software “sudo ./atlassian-jira-software-8.14.0-x64.bin“. Follow all the steps interactively responding with yes, enter or positively according to the instructions to fully install Jira
root@ubuntu:/home/rdgmh# sudo ./atlassian-jira-software-8.14.0-x64.bin
automatically whenever the computer restarts.
Install Jira as Service?
Yes [y, Enter], No [n]
y
Whenever you are prompted for a confirmation, please type “y” and hit the enter key to continue with the installation of Jira. Please wait a few moments while Jira Software is configured. Shortly, you would be notified that the installation of Jira Software 8.14.0 is complete and that Jira Software 8.14.0 is starting.
Step 4: Configure JIRA
To set up JIRA, you must first download the MySQL JDBC driver and then copy it to the Jira folder. You can do so by using the following command “wget https://dev.mysql.com/get/Downloads/Connector-J/mysql-connector-java-8.0.18.zip“.
root@ubuntu:/home/rdgmh# wget https://dev.mysql.com/get/Downloads/Connector-J/mysql-connector-java-8.0.18.zipUnzip the above-downloaded file with the command:
sudo unzip mysql-connector-java-8.0.18.zipThen, by entering, copy the MySQL connector.
sudo cp mysql-connector-java-8.0.18/mysql-connector-java-8.0.18.jar /opt/atlassian/jira/libNow, stop and restart Jira services by pressing
sudo /etc/init.d/jira stop
sudo /etc/init.d/jira start
output
root@ubuntu:/home/rdgmh# sudo /etc/init.d/jira stop
executing using dedicated user

                  `sMMMMMMMMMMMMMM+
                     MMMMMMMMMMMMMM
                     :sdMMMMMMMMMMM
                             MMMMMM
          `sMMMMMMMMMMMMMM+  MMMMMM
             MMMMMMMMMMMMMM  +MMMMM
              :sMMMMMMMMMMM   MMMMM
                     MMMMMM    `UOJ
   `sMMMMMMMMMMMMM+  MMMMMM
     MMMMMMMMMMMMMM  +MMMMM
      :sdMMMMMMMMMM   MMMMM
             MMMMMM    `UOJ
             MMMMMM
             +MMMMM
              MMMMM
               `UOJ

      Atlassian Jira
      Version : 8.14.0


If you encounter issues starting or stopping Jira, please see the Troubleshooting guide at https://docs.atlassian.com/jira/jadm-docs-0814/Troubleshooting+installation


Server startup logs are located in /opt/atlassian/jira/logs/catalina.out
Using CATALINA_BASE:   /opt/atlassian/jira
Using CATALINA_HOME:   /opt/atlassian/jira
Using CATALINA_TMPDIR: /opt/atlassian/jira/temp
Using JRE_HOME:        /opt/atlassian/jira/jre/
Using CLASSPATH:       /opt/atlassian/jira/bin/bootstrap.jar:/opt/atlassian/jira/bin/tomcat-juli.jar
Using CATALINA_PID:    /opt/atlassian/jira/work/catalina.pid
Tomcat stopped.
root@ubuntu:/home/rdgmh# sudo /etc/init.d/jira start

To run Jira in the foreground, start the server with start-jira.sh -fg
executing using dedicated user: jira

                  `sMMMMMMMMMMMMMM+
                     MMMMMMMMMMMMMM
                     :sdMMMMMMMMMMM
                             MMMMMM
          `sMMMMMMMMMMMMMM+  MMMMMM
             MMMMMMMMMMMMMM  +MMMMM
              :sMMMMMMMMMMM   MMMMM
                     MMMMMM    `UOJ
   `sMMMMMMMMMMMMM+  MMMMMM
     MMMMMMMMMMMMMM  +MMMMM
      :sdMMMMMMMMMM   MMMMM
             MMMMMM    `UOJ
             MMMMMM
             +MMMMM
              MMMMM
               `UOJ

      Atlassian Jira
      Version : 8.14.0


If you encounter issues starting or stopping Jira, please see the Troubleshooting guide at https://docs.atlassian.com/jira/jadm-docs-0814/Troubleshooting+installation


Server startup logs are located in /opt/atlassian/jira/logs/catalina.out
Using CATALINA_BASE:   /opt/atlassian/jira
Using CATALINA_HOME:   /opt/atlassian/jira
Using CATALINA_TMPDIR: /opt/atlassian/jira/temp
Using JRE_HOME:        /opt/atlassian/jira/jre/
Using CLASSPATH:       /opt/atlassian/jira/bin/bootstrap.jar:/opt/atlassian/jira/bin/tomcat-juli.jar
Using CATALINA_PID:    /opt/atlassian/jira/work/catalina.pid
Tomcat started.
root@ubuntu:/home/rdgmh#
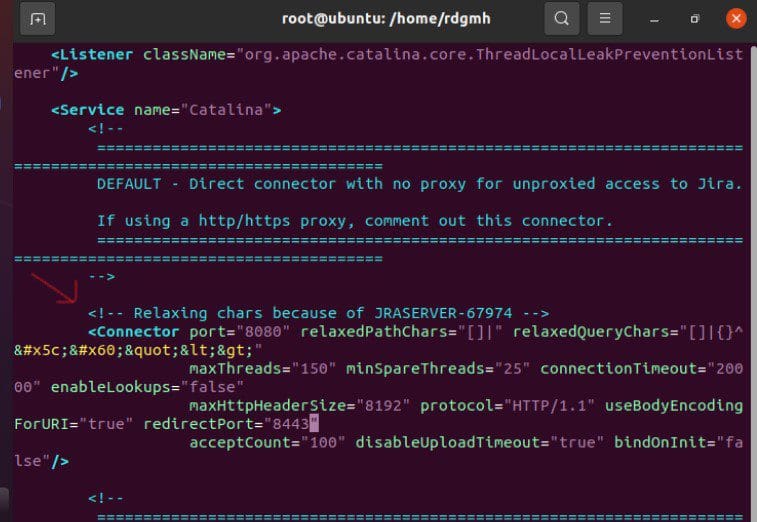
Step 5: Configure Proxy For JIRA
Edit the /opt/atlassian/jira/conf/server.xml file to configure the proxy for JIRA using the command :
sudo nano /opt/atlassian/jira/conf/server.xml
And look for the given lines.
<Connector port="8080" relaxedPathChars="[]|" relaxedQueryChars="[]|{}^`"<>"
maxThreads="150" minSpareThreads="25" connectionTimeout="20000" enableLookups="false"
                    maxHttpHeaderSize="8192" protocol="HTTP/1.1" useBodyEncodingForURI="true" redirectPacceptCount="100" disableUploadTimeout="true" bindOnInit="false"/>
replace with
<Connector port="8080" relaxedPathChars="[]|" relaxedQueryChars="[]|{}^`"<>"
maxThreads="150" minSpareThreads="25" connectionTimeout="20000" enableLookups="false"
maxHttpHeaderSize="8192" protocol="HTTP/1.1" useBodyEncodingForURI="true" redirectPort="8443"
acceptCount="100" disableUploadTimeout="true" bindOnInit="false" scheme="http"
proxyName="jira.example.com" proxyPort="80"/>
apply the changes.
sudo /etc/init.d/jira stop
sudo /etc/init.d/jira start
Step 6: Configure Nginx As Reverse Proxy for JIRA
configure the Nginx as a reverse proxy for JIRA. First install nginx by
sudo apt install nginx -yedit the config file
sudo vim /etc/nginx/sites-available/jira.confpast this in the config file
server {
     listen 8080;
     server_name localhost;
     location / {
         proxy_set_header X-Forwarded-Host $host;
         proxy_set_header X-Forwarded-Server $host;
         proxy_set_header X-Forwarded-For $proxy_add_x_forwarded_for;
         proxy_pass http://localhost:8080;
         client_max_body_size 10M;
     }
 }
Save and exit & link with the command :
sudo ln -s /etc/nginx/sites-available/jira.conf /etc/nginx/sites-enabledVerify that Nginx is working with the command:
sudo nginx -toutput
root@ubuntu:/home/rdgmh# sudo nginx -t
nginx: the configuration file /etc/nginx/nginx.conf syntax is ok
nginx: configuration file /etc/nginx/nginx.conf test is successful
root@ubuntu:/home/rdgmh#
Step 7: Access and Configure JIRA on Linux
To use JIRA’s online interface, navigate to jira.example.com or localhost:8080. I’ll demonstrate on my localhost.

Jira is an agile project management software, we have been able to install and configure it on a Linux device by following the steps above.


