
Learn how to efficiently remove OneDrive from Windows using DISM, applying the same process to Windows 11 and Windows 10 ISO image files. Suppose you want to customize your Windows installation and Remove OneDrive from Windows, especially when deploying on multiple PCs using a Windows ISO file. In that case, making the necessary modifications before proceeding is essential. Please see how to Add Registry Keys via DISM in Windows, and how to Move OneDrive Folder: Relocate in Windows 10.
Microsoft OneDrive offers valuable cloud backup capabilities, allowing data storage, protection, and seamless access across devices. This article discusses “Remove OneDrive from Windows: A DISM Guide”.
However, optimizing the Windows ISO file becomes crucial if you prefer not to have OneDrive preinstalled in your Windows 10 or 11 setup. This proactive approach ensures a tailored Windows experience according to your preferences.
You can modify an ISO file using a tool in Windows called DISM (Deployment Image Servicing and Management), a native Windows program. DISM is a command-line program that can be used to add registry entries and modify the default Windows install image.
To streamline your Windows setup, utilize the DISM command option. This enables you to access the Windows install image and efficiently remove OneDrive from Windows, preventing its auto-installation during setup.
Please see: Cannot uninstall the OneDrive App: The item “OneDrive” can’t be moved to the Bin because it’s open on Mac and How to Disable or Uninstall OneDrive on Windows 10 and 11.
Method 1: Mount ISO to Disable Cloud Storage
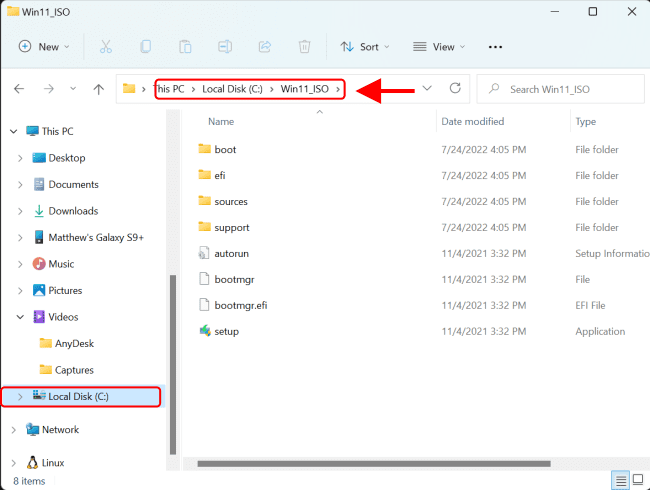
To Remove OneDrive from Windows, mount a Windows ISO image, and double-click the ISO file to open it as a virtual DVD in File Explorer automatically. Open the mounted ISO in Explorer, select all files and directories, and then copy and paste the ISO content into a folder.

In this guide, I created a folder in the root directory on disk C: and name the folder Win11_ISO.
To efficiently Remove OneDrive from Windows, establish a designated folder for the offline image. In this instance, I’ve created a “Mount” folder at the root directory, specifically located at C:\Mount.

Open the Windows Start Menu and search for PowerShell, then run as administrator.

Here are other related guides: Cannot uninstall the OneDrive App: The item “OneDrive” can’t be moved to the Bin because it’s open on Mac, and How to Disable or Uninstall OneDrive on Windows 10 and 11.
Check what editions are included in the disk image
To check what editions are included in the disk image and effectively remove OneDrive from Windows, use the following command:
Dism /Get-WimInfo /WimFile:C:\Win11_ISO\Sources\install.wim
Note the index number of your selected edition. In this example I want to use Windows 11 PRO edition to edit its registry, noting its index number 6.To effectively remove OneDrive from Windows, start by mounting the image of your preferred Windows edition. In this example, we’ll use index number 6.
Dism /Mount-Wim /WimFile:C:\Win11_ISO\Sources\install.wim /index:6 /MountDir:C:\Mount
The mounting image process will take some time to complete. You can check the Mount folder in C: Mount to see the Windows image files.

Please remember that the disk where the Mount folder is situated requires some free space. Utilizing a machine with a disk with more than 15 GB of free space is recommended.
Now go to Windows\SysWOW64, search for OneDriveSetup, and delete it.

Unmount the offline image and commit (save) changes using the following command:
Dism /Unmount-Image /MountDir:C:\mount /Commit
You may want to see “Install Wim: How to Add Packages to Windows image the DISM Tool“, how to Remove Windows 10 Apps with DISM: How to remove pre-provisioned apps from Windows Image, and how to fix DISM errors: Error 183: The specified image is currently being serviced by another DISM operation.
Method 2: Edit ISO Registry in Windows Component Removal Using DISM
To remove OneDrive, we need to edit the offline registry hive by importing it to a temporary hive in the host registry. In this example, I will import the HKLM\Software hive from the offline registry to a temporary hive called Offline in the host registry:

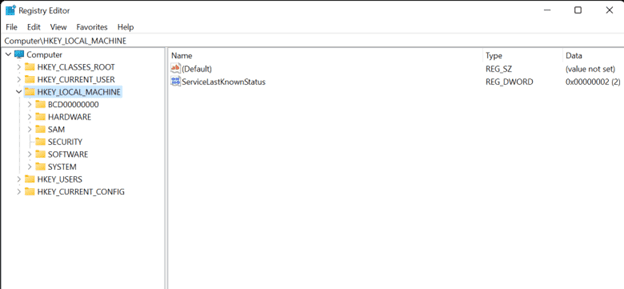
To effectively remove OneDrive from Windows, take a look at the newly created Offline registry hive by opening the Registry Editor and clicking on HKEY_LOCAL_MACHINE to access the hive.
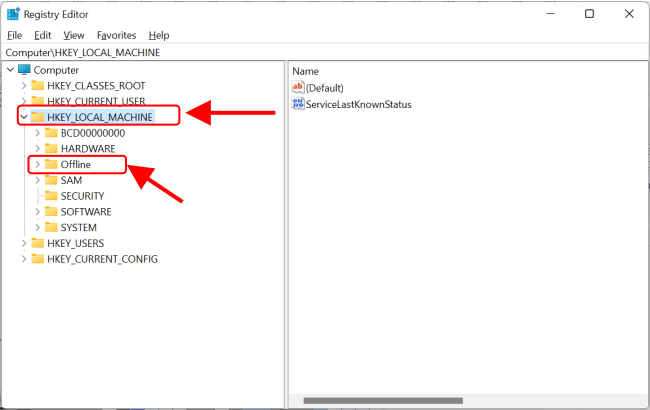
Navigate to the following path:
HKLM\Offline\Software\Microsoft\Windows\CurrentVersion\RunThen delete the Run OneDriveSetup key.

When you’re through with registry changes, use the following command to unload the temporary hive:
reg unload HKLM\Offline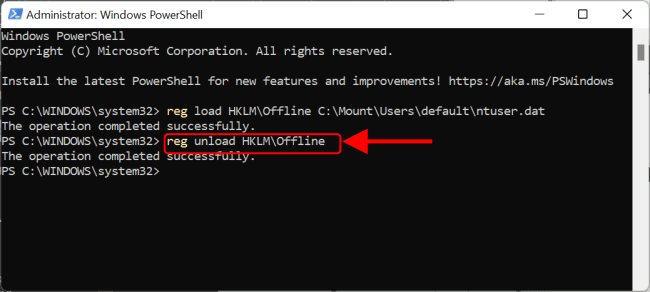
To effectively remove OneDrive from Windows, utilize the “reg unload” command, which cleans up the temporary hive from the host registry.
Unmount the offline image and commit (save) changes using the following command:
Dism /Unmount-Image /MountDir:C:\mount /CommitYou can now install Windows, which includes your modification by default.
If you’re looking to remove OneDrive from Windows, I trust you found this blog post beneficial. Should you have any inquiries, please feel free to share them in the comments section below.


