
In this article, you will learn how to install and configure Jenkins on Windows 11. Jenkins is an open-source automation server and software tool for continuous integration and delivery. It is used to automatically build, test, and deploy software projects. It is one of the leading CI/CD tools used in modern software development. CI (Continuous Integration) and CD (Continuous Delivery/Continuous Deployment) are software development practices that aim to reduce the time it takes to deliver software updates to users by shortening the development lifecycle.
The following post are some related posts you might be interested in reading about How to Set up Jenkins Pipelines Environment for Docker Container Deployment, How to install Java Runtime Environment on Mac OS, How to Install Apache HTTP Server on Ubuntu 20.04 LTS, How to Mount Volume to Docker Container
CI entails regularly merging code changes into a central repository, as well as automatically building and testing code to detect potential bugs or issues early in the development process.
The CD takes it a step further by automating the deployment of code changes to production environments, allowing teams to deliver updates to users more quickly and confidently.
Jenkins is available for Linux, Windows, and macOS users. The majority of users might choose Linux to run Jenkins, while some might choose Windows. If running Jenkins on Windows is your preferred option, this post is for you. If you are a Linux user looking to install Jenkins on your PC, refer to this post on How to Install Jenkins Automation Server on Ubuntu 20.04 LTS.
Install and configure Jenkins
The following steps are a high-level overview of how to install and configure Jenkins on Windows 11:
Step 1 – Step 1 – Start by opening a new browser tab and searching for the Google search engine. After you’ve opened it, type “Jenkins” into the search box and press the “Enter” key on your keyboard.
A list of numerous Jenkins-related websites would appear. You must only use the official “jenkis.io” site, which is listed at the top. Click on it to access it.
Alternatively, you can visit the Jenkins direct download page at Jenkins

After downloading the Jenkins.msi setup file, it’s time to install it. To do so, locate the installation file in the download folder of your PC, double-click on it, and then click on Install as shown below:

Click next to continue

Select the installation path to install Jenkins

Supply the admin username and password and click on the test credentials button. Ensure that you keep the “Run service as local or domain user” checked.

Unfortunately, at this point, it reported an error because we have added the admin01 user to the local group.
It is much safer to install and run Jenkins as an independent Windows service using a local or domain user than to run Jenkins as LocalSystem, which will grant Jenkins full access to your machine and services.

To run Jenkins as a local or domain user, enter the domain user name and password you want to use, click Test Credentials to validate your domain credentials, and then click Next but if it throws in error as shown above, you need to edit the Local Security Policy of your computer  and add the user you wish to grant the administrative permissions to run Jenkins.
Editing the Local Security Policy
If you’re installing a service to run under a domain user account, the account must have the service logon permissions. This logon permission is only valid for the local computer and must be granted through the Local Security Policy.
To define the 'logon as a service' permission on the computer, edit the Local Security Policy as follows:
Step 1 – Search for “Local Security Policy” using the search bar on the taskbar

Step 2 – Expand the Local Policies tab, click on User Rights Assignments and right-click to open Log on as a service properties

Step 3 – Click on Add User or Group, type the admin username and then click check name to call up the name username you want to add.


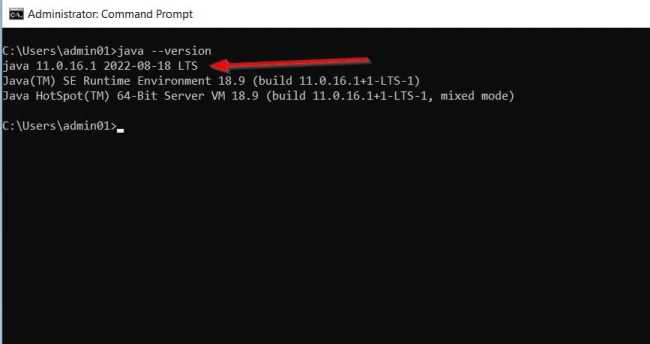
Proceed with the installation, by downloading Java 11 or 17 and installing as Jenkins is dependent on Java to work. You can down Jave here:

You can check the version of Java on your system by running java --version command on your command prompt
Next, proceed to install Jenkins by re-entering the admin username and password and then click on the Test Credentials button to verify the credentials as shown below:

Click on Next from the above screenshot to continue. This takes you to the custom setup screen, click on Next to continue:

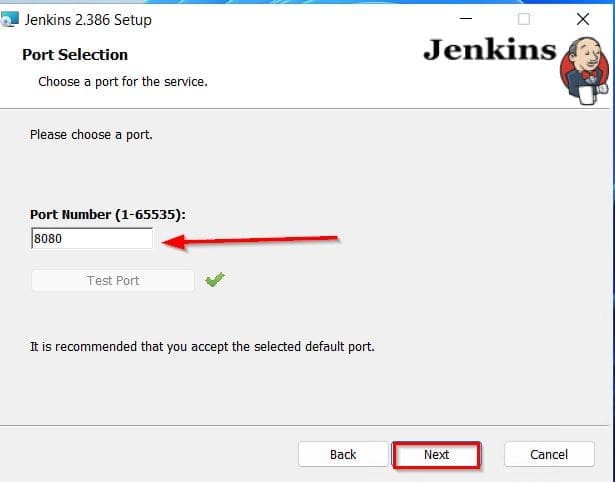
The next thing is to determine the port that Jenkins will run on. Leave the port number at 8080 and click on Test Port to test it.
Click on Next to complete the installation and click on Finish

Please see How to Prevent Standard Users from Changing BitLocker Password, and how to fix Wi-Fi not connecting on Windows 11.
Configuring Jenkins Environment Variable
Start by adding Jenkins to the system path by editing the environment variables.

The Jenkins path on our system is C:\Program Files\Jenkins

Next, copy the path and add it to the system path

Assessing Jenkins web UI
The Jenkins web UI can be assessed on the URL below.
http://localhost:8080
In addition, we have to locate the admin password and open it with a text editor.

Copy the password and paste on a screen similar to the one below and click on continue:

Customize Jenkins Environment
Customize and set up the Jenkins environment after signing in. To have Jenkins automatically install the most frequently used plugins, click the Install suggested plugins button.


Create the first admin User by supplying the required information as shown in the screenshot below and click on Save and continue:

Confirm the port number you want Jenkins to use on the Instance Configuration page, then click Save and Finish to complete the initial customization.

To access the Jenkins dashboard, click the Start using Jenkins button.

Creating your first Jenkins Job
To create your first Jenkins software project, click Create a job on the Jenkins dashboard.

Type the title of your job and select the type of project.

Configure your project by selecting your source as GitHub and typing the URL for your project.

In conclusion, this post gives you a high-level overview, installation steps and how to configure the Jenkins automation server on Windows 11 and get started with creating and running your first project.
I hope you found this article useful on how to install and configure Jenkins on Windows 11. Please feel free to leave a comment below.


