
In recent times, many organisations are transitioning most of their static and monolithic applications to containers and building CI/CD pipelines for them to aid faster deployment to production to deliver the best results for their clients. This is most prevalent when you and your team are transitioning from a traditional static deployment model to using containers. You may hope to implement container orchestration eventually, but right now they want to take the step of running an app in production as a Docker container. This will also make your team want to maintain an automated CI/CD process through this transition. In this article, we shall be discussing How to setup Jenkins Pipelines Environment for Docker Container Deployment. Please see How To Use Azure Key Vault Secrets in Azure Pipelines, and How to Install and Configure Jenkins on Windows 11
To install Jenkins and Docker on your PC, refer to this post on how to Install Jenkins Automation Server on Ubuntu 20.04 LTS and how to install Docker Engine on Ubuntu. If you’re looking for how to pull an image from the Docker Hub, review this post. As part of the preparations for the demonstration we’re going to carry out in this exercise, a Dockerfile has already been created for the app, which can be used to build Docker images for it, and a production server has been set up with Docker installed.
You will need to carry out the initial setup before proceeding with me to the next steps. You can check the following posts to learn more: Elasticsearch, Fluentd, and Kibana: How to Install and Configure the EFK stack on Docker, Import repo to Bitbucket Cloud: How to import your project from Bitbucket Server or Bitbucket Cloud to GitLab,
Prerequisite for Running Jenkins Pipelines
Before you can get started with this lesson, you need to:
- Have Jenkins installed on your PC and Jenkinsfile created.
- Have Docker Installed and Dockerfile created
- Have sign in or sign up for Docker Hub to be able to pull an image from it.
- Have a GitHub account created for yourself.
If you have the above requirements, let’s get started. Also, see Automate Infrastructure Deployments in the Cloud with Ansible and Azure Pipelines, and how to use Command-Line on Git Bash and GitHub Desktop to PUSH local code to GitHub.
Preparing the Environment for Deploying a Docker Container with Jenkins Pipelines
Now, before we can successfully deploy a Docker container with Jenkins Pipelines there is a little bit of setup we need to do within the Jenkins dashboard in order to start using Jenkins. We need to retrieve the Jenkins default admin password and use it to sign into the Jenkins main dashboard.
To do so, we will browse to the Jenkins Server IP by mapping it to the port number 8080.
<your Jenkins public Ip:8080>
Now copy /var/lib/jenkins/secrets/initialAdminPassword and use the cat command to retrieve the default Admin Password for Jenkins Server

Having retrieved the password, we need to use the password to login into Jenkins. Now, highlight and copy the password and paste it into the password column of the default login page:

After you logged in to Jenkins with the default admin password, you will be prompted to create the first admin user immediately as shown below:
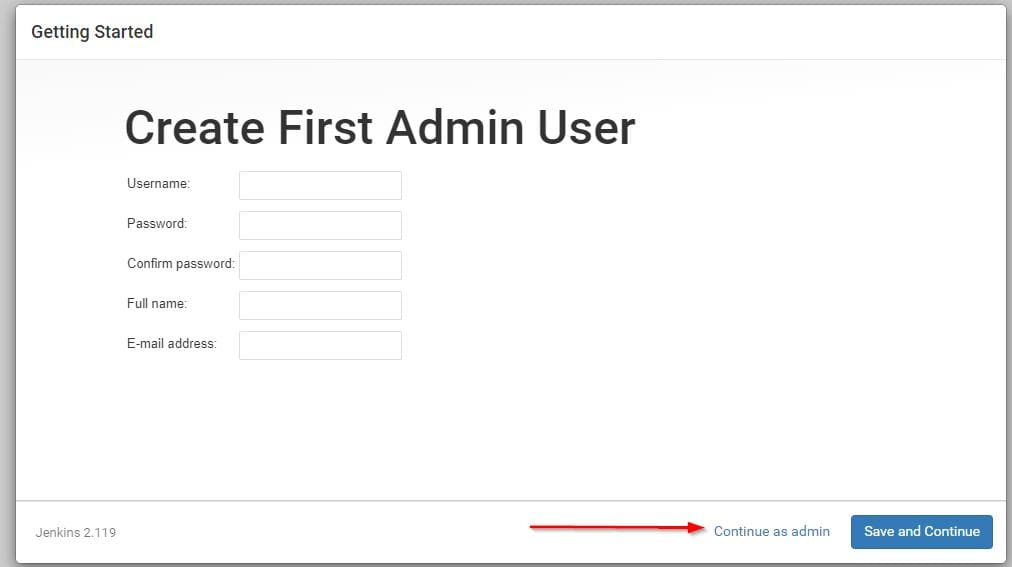
You can choose to continue as Admin but for best practice, it is recommended that you create an admin user. Go ahead and supply the first admin user credentials with the information you can easily remember as shown below:

After you click on save and continue, you will be taken to the Jenkins is ready page:

Now, click on Start using Jenkins to head to the Jenkins main dashboard.

Create Global Credentials in Jenkins
We need to add a couple of credentials. The credentials that we’re going to add to the Jenkins server are the Webserver and the Docker Hub Credentials.
The first credential to add is the webserver credential. To do so, click on Credentials -> global -> Add credentials
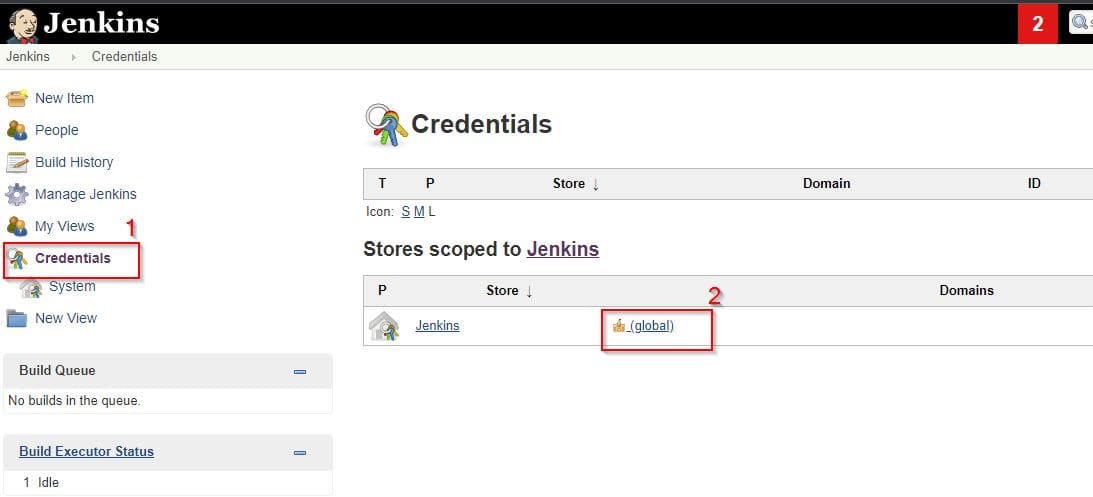
Click on global and proceed to the add credential page.

The webserver_login is the most important value that you must remember here. Go ahead and click on Ok. Now the next credential to add to the Jenkins Server is the Docker Hub credential.
Note you have to sign up on Docker hub in order to use the free Docker Hub public
images.
Head to Docker Hub to sign in or sign up if you’re a new user.

Now, enter your Docker Hub credentials into the Add Credentials details page following the steps we used while adding the webserver credentials.

Again the detail in the ID column is important as you will need to reference it later in your build pipeline. The description doesn’t really matter. It just needs to be something that’s human-readable. So here I’m just going to call it Docker Hub Login and click on Ok to save the credentials.
Note: The information (username and password) you supplied while adding Docker Hub credentials must be the exact same login details to your Docker Hub accountNow we have two global credentials added to Jenkins that’s the Webserver and the Docker Hub credentials.

Setup Global Property
The next thing to do is to set up a global property in Jenkins for the production server. Remember, we mentioned that we have our production server set up already. We will do that by adding the IP to our production server to the Jenkins Server.
To do so, from Jenkins main dashboard -> Manage Jenkins -> configure system -> global properties -> environment variables -> Add

Head to the configure system tab

Then, check the environment variables box. Enter some information into the name and value fields. As shown above, in the name field I’m enteringprod_ip and the IP address of my production server into the value field. When you’re done entering the information, click on Save to save the property information.
Note the name is important as you will be using it to reference the value in your Jenkins file. Set up GitHub Page
Next, we will need to set up things on the GitHub page. Click on this link to open a personal fork of the file.

You can change the description of the repository but we’re going to work with the default description.

Creating a Personal Access Token (PAT)
You will need to create an API key (PAT) that will allow Jenkins to have access to this repository in your GitHub account. To do so go into your GitHub profile by clicking on your avatar, then Settings -> Developer Settings -> Personal access tokens-> Generate new token.

Next, click on Developer Settings.
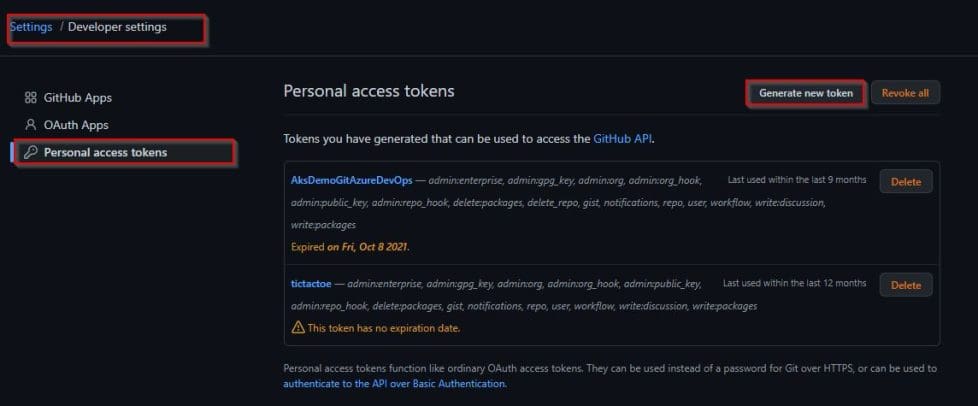
As shown in the image above, click on Personal access token, then click on Generate a New Token and supply the token name. Here I named mine Jenkins Access. You can give yours any name you think is suitable for you.

Ensure you check the admin:repo_hook option.

Click “generate token” to generate a token.

Confirm the ownership to generate the token by re-entering your GitHub password and clicking on “confirm password” to generate the token.

The token is now generated and looks exactly like this:
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Now copy the token into a text editor and save it there for future use.
Create a New Item for GitHub Credentials
Copy the GitHub Token you saved from the text editor, head back to the Jenkins main page and use that to configure your project by adding the GitHub credential to the Jenkins Server. To do so, click on new item.

Now proceed to create a new project. For this demonstration, I am going to create a Jenkins project called train-schedule and make it a multibranch pipeline project type and then click on Ok.

I am going to set the project up to pull from my GitHub repository. So, under branch sources, I will click on Add and select GitHub.

Under Credentials, click on Add to and select Jenkins to add my GitHub credentials. Recall the first admin username is Jenkins.

Now supply your GitHub credentials

For my username, I’m going to enter my GitHub username and for the password, I will enter the Personal Access Token I created on Github and click on Add.
Next, I need to select my GitHub key from the dropdown menu:

The next page will show up where to supply other details like the owner which is the same GitHub username.

As soon as the owner’s name is entered, the list of GitHub repositories will populate from the repository dropdown as shown above. I’m going to scroll to the repository that I want my project to pull from which is cicd-pipeline-train-schedule-dockerdeploy and click on save.
Repository Scanning begins
After clicking save, there will be some initial repository scanning as well as some initial build that’s going to occur.
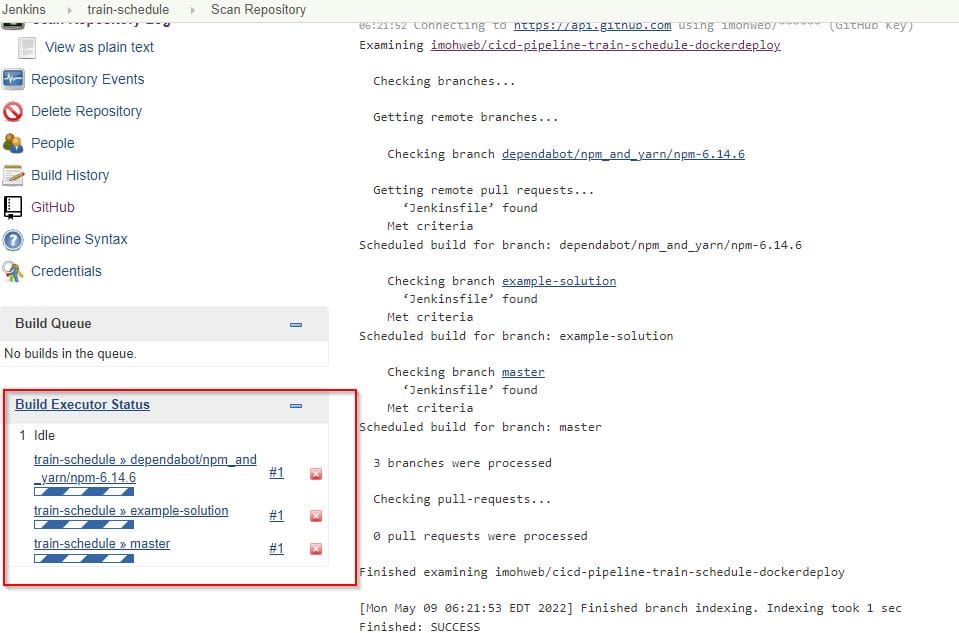
From the above, you can go ahead and click on the name of your Jenkins project. Here the name of our project is train-schedule. So I’m going to click on it and select the master branch to see what’s going on in there.

In the master branch, you will see that it is currently executing an initial build.

So now that we have everything set up in the Jenkins environment the next step is to go ahead and start implementing our automated deployment logic that uses Docker. To do that, we will go back to GitHub and edit the Jenkins File to add an extra build stage and resave it and that’s all you need to deploy your Docker container.

You have learned how to create and set up the first Jenkins admin user, how to add credentials, how to create and set up a personal access token to enable authentication and authorization between Jenkins and GitHub, and how to create and set up a Jenkins project to prepare the built environment for deploying Docker containers with Jenkins Pipelines.
I hope you found this post helpful on how to Setup Jenkins Pipelines Environment for Docker Container Deployment. Please let me know in the comment section if you have any questions.


Wow, this blog post on Docker containers is incredibly informative! As someone who is relatively new to Docker, I found this article to be a fantastic resource for understanding the fundamentals.
I’m looking forward to exploring more Docker-related content on this blog. Keep up the fantastic work!
We appreciate your kind words. Thank you.