JIRA is a bug-tracking tool that a software development team can use to plan, track, and work faster in an agile environment. TestRail is a test case management tool that the quality assurance team can use to manage test cases and can also be integrated into other tools used for collaborating. I will be setting up and integrating TestRail and Jira to fit into any development team. Please see how to force immediate MBAM Encryption, How to Integrate Jira Software with GitHub Cloud, and Jira: What is Jira re-indexing.
We shall be looking into how to easily link test cases in TestRail to Jira issues and push bug reports so that we can confirm that all user stories in Jira are being tested which supports traceability and coverage.
A TestRail can be used to manage your Test Cases, Tests, Test Runs, and Test Plans while Jira Software manages your User Stories, Bugs, Epics, and Sprints. Continue reading this guide as I will be showing you How to integrate TestRail with Jira.

You can further read the Complete Guide on TestRail as a Test Management Tool, How to Integrate TestRail with Cypress, and How to install and use Burp Suite for Web Application Security Testing
Who benefits from this integration?
The Testers, Test lead, Test Managers, Product Managers, Developers and Tech Leads will benefit from the integration of TestRail to Jira.

How to integrate TestRail with Jira
The TestRail integration with Jira is like a plugin that extends the functionality of your TestRail and Jira when it’s enabled. You can set up these two in a few minutes but there are just a couple of things that need to be done first.
1. Admin Role
You must be an administrative user for both TestRail and Jira.

2. Create an API Token.
You must Create an API token in Jira. Navigate to manage-profile > security > api-tokens and click on Create API token.

3. Provide a Label name
Supply what you like as the desired label. Then, click on Create.

After Creating an API token in Jira, copy or save your token securely as you will need this to configure the integration. Afterwards, proceed with selecting Close.

4. Configure your TestRail settings
Enter your Jira username, password, email address and the API Token generated earlier.

Also, see how to install and configure JIRA on Linux, Turn off Automatic Updates in Windows via Windows Registry and Group Policy, and how to correctly disable BitLocker on Windows Server.
Configure User Variables for Jira
5. What are User Variables?
Please note that if you set up your integration with a generic email and password, all bug reports and changes will also be created under the same generic user in Jira.
User variables allow TestRail users to use their own Jira account, instead of a generic account. They can securely enter their Jira login details in TestRail, making it easier to map users between both systems.
To add your Jira account, click on the drop-down icon beside the user’s name in the top right corner and then click on My Settings.

You can also customize or configure user variables manually by navigating to the Administration area and clicking Integration.
Navigate to the USER VARIABLES tab. Then, click on the Add User Variable.

Configuring the Username
Label: enter your Jira User
Description: “Your Jira Username”
System name: “jira_user”
Type: select String.
Optional: Under the Fallback box you can enter a generic name like “testrail” user you set up in Jira. This will be used for users who haven’t entered their Jira login details.
But if you don’t specify the Fallback, TestRail will show a message box asking users to enter their details before they can push bug reports.
Click on OK to save

Configuring the Password
You have added the first variable. Now, let’s add the second variable by clicking on Add User Variable.

Label: Jira Password.
Description: “Your Jira Password”
System name: “jira_password”
Type: select password.

Please, make sure to click the Save settings button and also make sure the Password field type is selected.
This ensures that passwords are not displayed in plain text in TestRail’s user interface.

Please, see Why Software KVMs such as Synergy is replacing Hardware KVMs, and Migrate Veeam One Database from SQL Server 2017 to 2025.
6. Adding User variables in your Defect and Reference plugin configuration.
The next step is to add the user variables in your Defect and Reference plugin configuration. To do this, navigate to the Defects tab.

In the plugin configuration box, specify the system name in percent characters, like %jira_user% and %jira_password% which we earlier set up.

Navigate to the Reference tab and do the same configuration.

7. Install the TestRail App for Jira
In other to complete the integration between TestRail and Jira, Navigate to Apps > Explore more apps. On the Discover apps and integration page search for testrail and click on it.

Click on Get app and after click on Configuration.

Click on Get it now

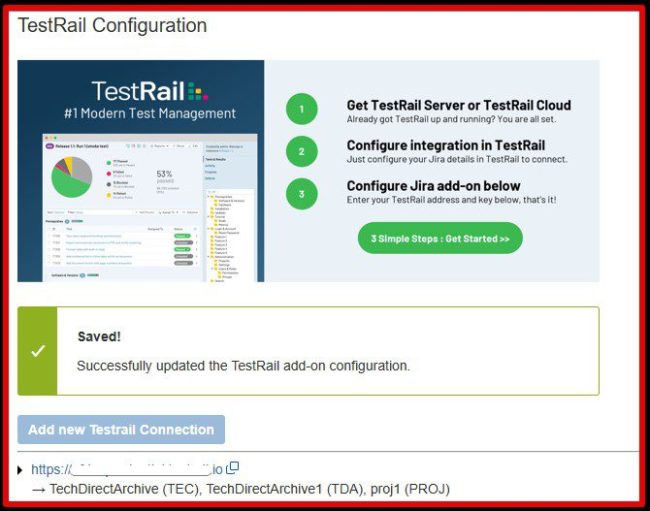
Next click Add new Testrail Connection

Enter your TestRail Address, Click on the Generate key in TestRail and this will generate the Integration Key.
Select Show a login button option and you can decide to check the Enable the add-on box to apply the settings on all projects or you can select a specific project.

To confirm the integration click on Generate Key.

Click Save to complete the setup. If all the settings are correct you will get this message “Successfully updated the TestRail add-on configuration”
Also, see “how to set up Windows Admin Center on a Windows Server“, how to Upgrade Windows Admin Center Manually, and how to Install Windows Admin Center on Windows 10 and Windows 11.
8. Enable JIRA Integration
Navigate to the Integrations page and click on the Configure Integration button.

Enter the JIRA Address, select your JIRA Version, enter your JIRA email and the API Token you generated earlier.
Click Enable JIRA Integration and click Save settings.

9. Adding References to Test Cases
After successfully integrating TestRail into Jira, you can start referencing your Test Cases to your Jira tickets.

All you need to do is to open your Test Case in TestRail and under the References box. You will enter the Jira Ticket number, in this instance TEC-2.

When you put your cursor on the reference number. You will see the Jira Project the Test Case is linked to and when any details is changed on Jira you will always see the update on TestRail.

10. Creating Test Cases from Jira
Open your Jira ticket and below the page click Open TestRail: Cases

Click Add Test Case

This will redirect you to TestRail where you can Add the Test Case

Please, see “how to Apply and Enable Automatic Windows Admin Center Update“. Here is “how to schedule and run update via Windows Admin Center“.
FAQs on how to integrate TestRail with Jira
When the defect plugin has been configured. A new Push link is shown next to the Defects field in the Add Test Result dialog. When you click the link it will open a popup dialog that enables you to push a bug report to Jira without leaving TestRail environment.
You can integrate TestRail with Jira and you can start linking test cases to user stories, epics, or any other kind of Jira issue to make it clear exactly which requirement is being tested. If multiple test cases cover the same user story. You can link all of them at once through the bulk editing test cases in TestRail.
I hope you found this blog post on how to integrate TestRail with Jira Interesting and helpful. In case you have any questions do not hesitate to ask in the comment section.