
Burp Suite is a security tool designed to save time spent by every organization’s Application security team in trying to secure their application by providing a fast approach to software security through automated scanning. In this article, you will learn how to install and use Burp Suite for Web Application Security Testing. Please see How to Disable the Command Prompt on Windows 11, how to Install and Uninstall RSAT on Windows 11, and how to fix ENOENT: No such file or directory Error in Docker build.
If you have a very large software team and will need super-fast feedback and want to achieve DevSecOps. Then your right choice will be the Burp Suite enterprise edition.
Kindly refer to the following YouTube video for more information on how to install and use Burp Suite for Web Application Security Testing.
Burp Suite is a tool designed to support and speed up efficiency in penetration testing, CI/CD integration in DevOps with a proper reporting system that captures all issues with appropriate remediation for all issues. If you want to always test, find and exploit vulnerabilities in your application then Burp Suite professional edition. If it is a limited set of manual tools just for exploring web security and Intercepting web traffic for penetration tasks. Then the Burp Suite community edition will be your pick.
1: Installing Burp Suite for Web Application Testing
I will recommend you meet the System Requirements for Installing Burp Suite. These are at least 8 GB RAM and 2 CPUs. But if you will be performing very large amounts of web applications such as penetration testing. Then you may need more memory to handle the task.
Installing Burp Suite is very easy and can be downloaded from the links below: Download Burp Suite Community Edition. You can download the Professional Edition and Enterprise Edition as well,
2. Selecting your Burp Suite Project
After completing the installation. The next thing is to follow the wizard on selecting or creating a Burp Suite project to work with. Select one of the following options:
- Temporary project – Select this option if you want everything clear out after you close Burp Suite.
- New project on disk – Select this option if you want to start a new project. The project file data will increase as the work progresses.
- Open existing project – Select this option if you want to open an existing Burp Suite project file.

You can read more on security on How to Find a User’s Security Identifier (SID) in Windows. What Is SID (Security Identifier) and How to Find It on Windows, and Fix for security vulnerabilities in the BIOS firmware for some Intel Processors. Also, see how to use the Windows Sandbox as a security feature in Windows 10 and 11.
3. Confirm that your Burp Suite’s proxy listener is Active and Running
What the Burp Suite proxy listener does is intercept any incoming traffic from your web browser only if it’s properly configured.
Click the Proxy tab and then click on the Options tab. The default local IP and port number is 127.0.0.1:8080 and you can Add, Edit, or Remove. When the Running check box is selected it confirms the listener is running.

4. Proxy Setting Configuration
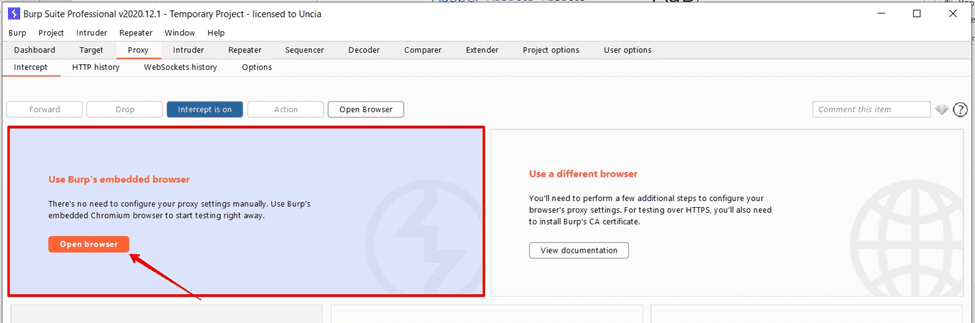
You can use Burp Suite embedded browser which is already preconfigured to work with Burp Suite Proxy.
Click the Proxy tab and click the Intercept tab, on the Use Burp’s embedded browser section click Open Browser.
5. Configuring Burp Suite with Firefox on Windows 10
Open Firefox browser and on the menu click Settings.
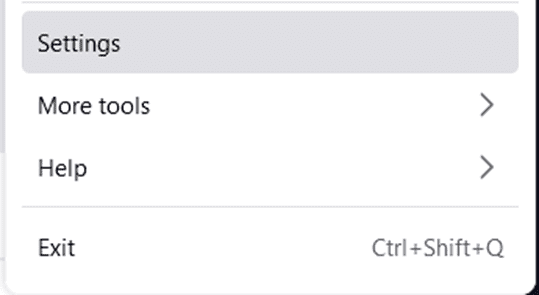
Click on General menu and go to the Network Settings section and click the Settings button.

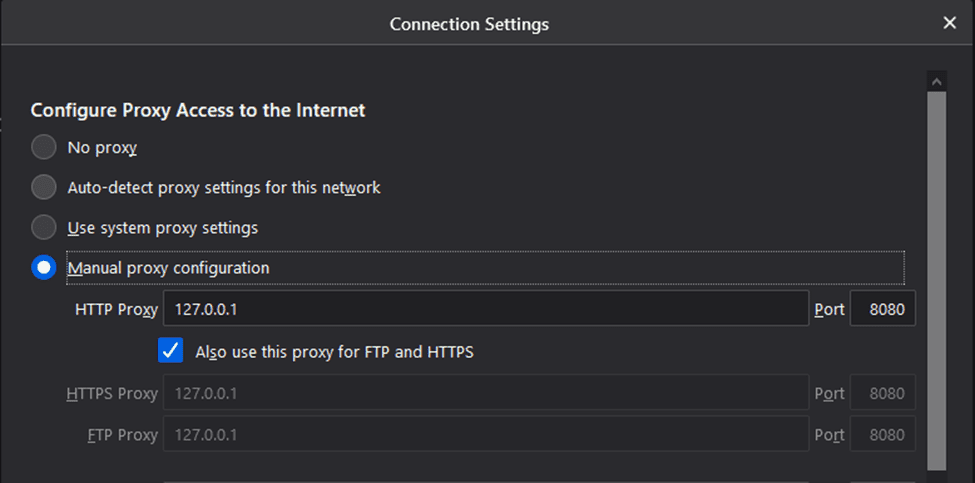
In the connection settings, select the Manual proxy configuration. Enter the Burp Suite Proxy listener address which has the default 127.0.0.1 into the HTTP Proxy field.
The port has a default port 8080 and check the Also use this proxy for FTP and HTTPS check box.
6. Configuring Burp Suite with Chrome on Windows 10
Open the Chrome browser and on the menu, select Settings, scroll down click on Advance and click on Open your computer’s proxy settings.

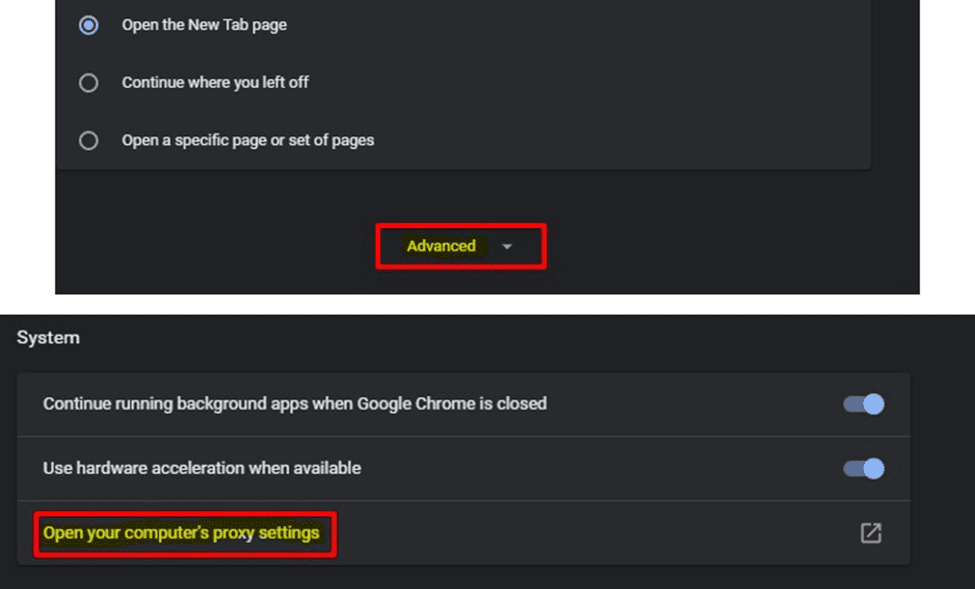
The default address is 127.0.0.1 and the default port is 8080. Turn the Use a Proxy Server to ON.

7. Configuring FoxyProxy with Burp Suite
With a FoxyProxy you don’t need to configure the proxy settings on your browsers. And keep going into the setting each time and setting it to ON. But with FoxyProxy you will have the settings done once and you only turn ON or OFF. Install this extension and activate it.

With this configuration, I can accept an HTTP request but not an HTTPS request. Before you can intercept HTTPS requests you will need to install the Burp Suite CA certificate first. Follow the steps below on how to install the Burp Suite CA certificate.
8. Installing Burp Suite CA certificate
The Burp Suite CA certificate is used to authenticate the source sending traffic to your web server and prevent any unsecured website from communicating with your browser and web server. I will be showing you how to install the Burp Suite CA certificate on the Firefox and Chrome browsers.
Launch Burp Suite and visit this webpage on your Firefox and Chrome then click CA Certificate at the top right corner and start downloading the certificate authority into your system.
Please note that without a Burp Suite certificate, it will be difficult to get a request or intercept an HTTPS request

Next, in Firefox, open the menu and click Settings.

In the left menu section select the Privacy and Security settings and in the Certificates section. Now, click the View certificates button.

In the next dialog box that opens click on the Authorities tab and click the Import button. Now browse to the location where you downloaded the Burp Suite Certificate Authority and click Open.

On the next page, you will see the message “You have been asked to trust a new Certificate Authority (CA)”. Select the “Trust this CA to identify websites” check box. After setting this up you will be able to intercept HTTPS requests.

Installing the same on Chrome just open the menu and click Settings > Privacy and security > Security > Manage device certificate.

On the Certificates box click on the Trusted Root Certification Authorities tab, and click the Import button.

Browse to where you downloaded the certificate cacert.der and click Next button.

You will see two options select the option Place all certificates in the following store and click on browse to Trusted Root Certification Authorities.

Click on the Next button and you will see a message asking if you want to install this certificate please click Yes. You will get import was successful message.

The Import was successful.

9. Setting Target Scope
If you don’t set your target Burp will be getting every request going through your browser and this can be frustrating when you try to fetch out the correct request. When you send a request click on the HTTP history tab and right-click on the correct host and select Add to scope.

Click Yes to avoid accumulating project data for out-of-scope items.

Here are some exciting articles: Sysinternals: Installing from the Microsoft Store, how to Download and use Windows Sysinternals Tools locally, and How to Integrate TestRail with Cypress.
10. Burp Suite Intruder tab
This is one tool that can be used to carry out different attacks on web applications. It can be used to carry out a brute-force attack and also blind SQL injection operations. You can use this feature for the analysis of the application responses to requests.
You will specify payloads on every attack and the exact location in the base request where the payloads are to be released or placed. The payload can be in the form of a simple list, username generator, numbers, brute forcer, runtime file, bit flipper, etc.
Follow these steps to carry out a successful attack using Burp suite Intruder.
- Search for the identifier that is highlighted inside the request which is usually username and password. Click on the Clear § button and highlight the identifier again and click Add §
- You can configure a single or double payload position to carry out the attack by choosing Sniper or Cluster bomb respectively.

With the Payload set and Payload type you can determine the amount of payload set that is needed for a single attack and also the type of payload needed.

You can either load a simple list of numbers, text, or alphanumeric and save it as a text file on your computer or you can add the payload one after the other. After setting this up click the Start attack button. Once the attack finishes you will see the result page which you will need to analyze.
Once you see one of the identifiers returning a different HTTP status code or response length from others means is actually the correct username or password to log in with.

Alao, see Understanding the different types of Proxy Servers, and Differences between vSphere and ESXi and vCenter.
11. Burp Suite Repeater tab
Burp Suite Repeater is designed for the purpose of helping you to manually manipulate and re-send individual HTTP requests, and the response can further be analyzed.
It is a multi-task tool for adjusting parameter details to test for input-based issues, this tool issue requests in a manner to test for business logic flaws. With Burp Suite Repeater you can work on several different requests at the same time with different request tabs. You will observe that each request is opened on a separate numbered tab.
Using Burp Repeater with HTTP request: Right-click on the request and select Send to Repeater. You will see the new request created and you will also see all the relevant details on the message editor for further manipulation.

12. Sending HTTP requests: After manipulating the request click the Send button and you will see the response displayed on the response panel by the right-hand side. The response message is not editable.

13. Burp Suite Scanning
Burp Suite Scanner is another tool you can use to perform automated scanning of websites and web applications to discover vulnerabilities and also show you how to remediate it. You can scan for these:
- Crawling for contents – The scanner navigates the whole application, the links, submission of forms, and logs in with supplied login credentials.
- Auditing for vulnerabilities – This involves sending of many requests to the application and analyzing the application’s traffic, and behaviour, and using it to identify any vulnerabilities within the application.
You can just right-click the URL and select either passive or active scanning or Click the New scan button. The New scan page opens, this is where you configure all the necessary details needed for the scan.

14. How to generate a report in HTML and XML format
After completing the scanning of your application, you can generate reports of the scan result in HTML or XML format.


I hope you found this blog post on how to install and use Burp Suite for Web Application Security Testing Interesting and helpful. In case you have any questions do not hesitate to ask in the comment section.


