Enable Secure Boot: Fix Secure Boot certificates expiration [Part 1]

In this article, we shall discuss how to “Enable Secure Boot: Fix Secure Boot certificates expiration [Part 1] in June 2026”. That is, after 15 years, the Secure Boot certificates that are part of Windows systems will start expiring. Windows devices will need new certificates to maintain continuity and protection. These certificates are the basics of trust for the operating Systems (OS). Please, see “Service Principal Name: How to add, reset and delete SPNs‘, and What are the Differences between UEFI and BIOS.
Microsoft recommends automatic management of your Windows Updates in order to get these updates in a timely manner. Also, Microsoft highlighted that they are closely working with original equipment manufacturers (OEMs) who provide Secure Boot firmware updates. These updates are already provided and can be managed by various utilities such as the Dell Update Manager or the Fujitsu DeskUpdate (for client devices) or Fujitsu ServerView Update Manager (for servers) etc.
Note: These automatic updates channel includes Microsoft’s cloud-managed update channels such as “Windows Update” or “Windows Update for Business”. This does not mean Windows Server Update Services (WSUS), Microsoft Endpoint Configuration Manager (MECM) formerly SCCM, and Microsoft Endpoint Manager (Intune) cannot manage these updates.
But, it will not be automatic as it requires manual approvals. Most firms do not have adequate man-power to manage (publish) these updates (firmware/UEFI updates or certain out-of-band updates) in a timely manner and this is the concern.
Please, see how to update the BIOS on your Dell system, and “BitLocker Protection off: Update UEFI/BIOS to fix issues“. Also, see download and install Fujitsu DeskUpdate & DeskUpdate Manager, and how to check the BIOS version on Windows.
What Is Secure Boot?
Secure Boot actively blocks malware from executing early in the Windows startup process. It works with the Unified Extensible Firmware Interface (UEFI) by using cryptographic keys called certificate authorities (CAs) to verify that each firmware module originates from a trusted and signed source.
Secure Boot implements a certificate-based trust hierarchy to ensure that only authorized software loads during system startup as described above. At the top of this hierarchy sits the Platform Key (PK), which the OEM or its delegate controls.
The PK serves as the root of trust and authorizes updates to the Key Enrollment Key (KEK) database. The KEK in turn, authorizes changes to two essential signature databases: “the Allowed Signature Database (DB)” and the “Forbidden Signature Database (DBX)”. The below image shows the Secure Boot certificate-based trust hierarchy.

which code can run in the UEFI environment before the OS starts. The DB includes certificates managed by Microsoft and the OEM While the DBX is updated by Microsoft with the latest revocations. Any entity with a KEK can update the DB and DBX.
This layered model enforces a controlled update path that is properly signed and validated updates can modify boot policies. This thereby preserves the integrity of the Secure Boot environment.
Affected Devices
Below is a table showing the affected Windows OS. Note that other platforms beyond Windows are affected, Linux (dual boot with Windows), and Mac are not left out but they are not the focus of this guide.
| Status | Systems |
|---|---|
| Affected | Physical and virtual machines on: • Windows 10 • Windows 11 • Windows Server 2025, 2022, 2019, 2016, 2012, 2012 R2 • All LTSC versions since 2012 |
| Not Affected | Copilot+ PCs released in 2025 |
Note: You must ensure these certificates remain valid, because once they expire, systems will no longer receive security updates for the Windows Boot Manager and Secure Boot components.
Expired certificates weaken startup protection, making Windows devices vulnerable to threats like bootkit malware. Bootkits compromise systems at a low level and often evade detection by standard antivirus tools, putting the entire system at risk
Expiring Certificates
The table below lists the certificates that will be expiring, and new certificates will be available in the coming months to maintain UEFI Secure Boot continuity.
| Expiration date | Expiring certificate | Updated certificate | What it does | Storing location |
| June 2026 | Microsoft Corporation KEK CA 2011 | Microsoft Corporation KEK 2K CA 2023 | Signs updates to DB and DBX | KEK |
| June 2026 | Microsoft Corporation UEFI CA 2011 (or third-party UEFI CA)* | a) Microsoft Corporation UEFI CA 2023b) Microsoft Option ROM UEFI CA 2023 | a) Signs third-party OS and hardware driver componentsb) Signs third-party option ROMs | DB |
| Oct 2026 | Microsoft Windows Production PCA 2011 | Windows UEFI CA 2023 | Signs the Windows bootloader and boot components | DB |
Please, see Fast Boot Options: Fix specific Drive issue with BitLocker [MBAM], Learn BitLocker Windows Update Shutdown or Reboot option behavior, and how to fix BitLocker always prompting for Recovery Key
How to Fix “the Secure Boot update failed to update a Secure Boot variable”
You might see in the Windows Event Log that “the Secure Boot update failed to update a Secure Boot variable with error: Secure Boot is not enabled on this machine“. This means, Windows attempted to apply a Secure Boot-related update to the DB, DBX, KEK, or PK (the Secure Boot signature databases and certificates) but failed.

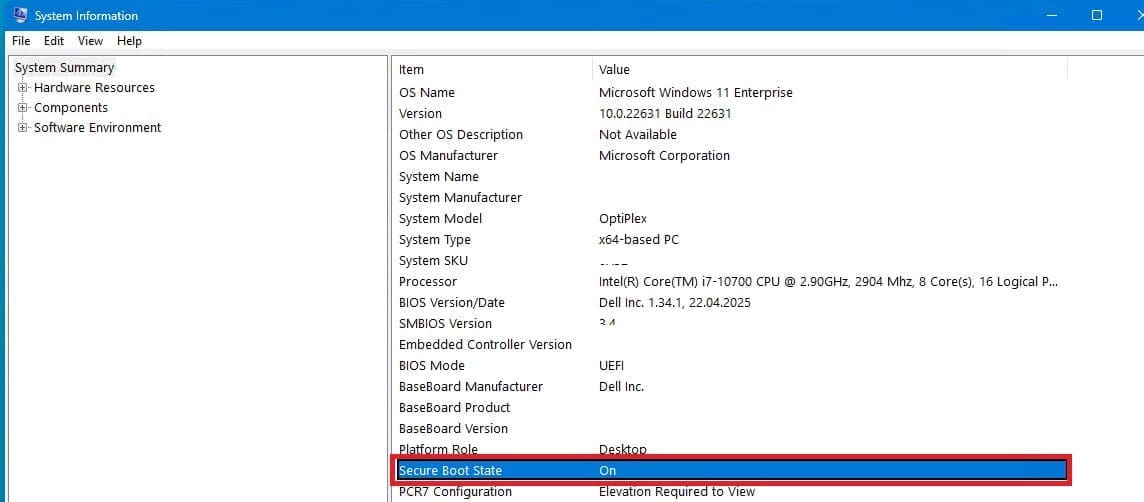
Another way to determine if the secure boot is on is to Press Windows key + R, type msinfo32, and then press Enter. In the System Information window, look for Secure Boot State as shown below.

To fix this, you will have to enable Secure Boot on the device. Please, see how to enable or disable Secure Boot in Windows via UEFI Firmware Settings. Also, see how to correctly disable BitLocker on Windows Server, How to fix a vulnerable Trusted Platform Module [TPM]
Enable Secure Boot via the UEFI Mode
Toggling Secure Boot on or off might erase the updated certificates. If Secure Boot is on, leave it enabled. Turning it off can reset the settings with defaults, which is not desirable
To do this on a DELL PC, fully shut down your Dell system (not restart). A restart will not help in this case. Turn it back on and immediately start tapping the F2 key repeatedly.
This will bring you into the BIOS/UEFI settings screen. Next, locate the boot configuration setting

Enable Secure Boot. Save and Exit BIOS.

Confirm apply settings

Boot back into Windows and allow the update to retry automatically. In my case, no manual intervention was required.
Upon enabling the Secure Boot on the device, and have the device restarted. The event log will change to Secure Boot Dbx was applied successfully as shown below.

You can confirm with PowerShell as well to determine Secure boot is indeed enabled by using the command below. If Secure Boot is off or unsupported, the device may not receive updates or the new CAs as well.
Confirm-SecureBootUEFI
Launch System Information window, look for Secure Boot State as shown below.
Secure boot Variables
Microsoft protects Windows devices by adding known-vulnerable bootloader modules to the Secure Boot DBX revocation list. This is stored in the system’s UEFI firmware. When a device receives an updated DBX, Windows checks if the system is ready to apply the update.
If it detects a problem such as Secure Boot being disabled. It logs an error in the Event Viewer to alert administrators that the update could not be applied. Look for event IDs such 103, 105, or 1036 etc as discussed in this guide for more information.
If you want, you can inspect the Secure Boot variables by using the below script. Note that the output may be in binary or unreadable format.
$vars = @("PK","KEK","db","dbx")foreach ($var in $vars) { Write-Output "`n-- $var --" $data = Get-SecureBootUEFI -Name $var [System.Text.Encoding]::ASCII.GetString($data.Bytes)}Please, see how to Install and configure Active Directory Certificate Services, How to enable Secure Boot on PC to install Windows 11, and how to Import certificates into Trusted Root and Personal certificate store.
Preparing rollout of updated certificates
Important: You need two new certificates for Microsoft Corporation UEFI CA 2011 which enables more granular control. It is worth nothing that, Microsoft and partner OEMs will be rolling out certificates to add trust for the new DB and KEK certificates in the coming months through firmware and Windows Update channels. Manual action is required when your update environment is tightly controlled, air-gapped (disconnected), or non-standard as described above. In few months, Microsoft will update the Secure Boot certificates as part of our latest cumulative update cycle.
Since every Windows system with Secure Boot enabled uses the same three certificates to support third-party hardware and the broader Windows ecosystem. Physical PCs and virtual machines will stop receiving the below protections unless you take action now.
- Lose the ability to install Secure Boot security updates after June 2026.
- Not trust third-party software signed with new certificates after June 2026.
- Not receive security fixes for Windows Boot Manager by October 2026.
Before proceeding with the rest of this guide, it is advisable to apply any available firmware updates promptly to your Windows PCs before applying the new certificates. This is because, in the Secure Boot flow, firmware updates from OEMs are the foundation for Windows Secure Boot updates to apply correctly.
Enterprise IT-managed systems that send diagnostic data
If your organization’s Windows systems receive updates directly from Microsoft and send diagnostic data, you don’t need to take additional action. This applies to devices managed through Windows Autopatch, Microsoft Configuration Manager, or third-party update solutions. Just make sure your firewall allows diagnostic data to reach Microsoft.
Microsoft uses diagnostic data and OEM feedback to group devices by similar hardware and firmware profiles. This allows Microsoft to gradually roll out Secure Boot updates, monitor deployment in real time, detect and address issues proactively, and resume the rollout when safe. To stay protected, simply keep your devices updated with the latest Windows updates.
Optional – Enable sending of diagnostic data
If you would like Microsoft to manage your updates, and do not have issues enabling Diagnostic, please follow these steps. To do this, configure your organizational policies to allow at least the “required” level of diagnostic data.
Please, see How to Delete Diagnostic Data in Windows 10 and Windows 11, and How to enable and use Diagnostic Data Viewer on Windows. Here is “How to restrict additional Microsoft Support Diagnostic Tool Downloads on Windows“.
Enable Diagnostic Data via Group Policy
This can be done using the Group Policy or mobile device management (MDM) or Windows registry. To do this via GPO. Please navigate to to Computer Configuration, Administrative Templates, Windows Components, Data Collection and Preview Builds.
Note that I’m using the Local Group Policy Editor, not the Group Policy Management Console (GPMC) used for domain-based policies. Both editors provide the same policy settings; however, the key difference is that Local Group Policy applies only to the individual machine, while GPMC allows you to define and link Group Policy Objects (GPOs) to specific Active Directory domains, sites, or organizational units (OUs) for centralized management across multiple systems.
Double-click the Allow Diagnostic Data policy, and Select Enabled, and then select the Send optional diagnostic data option from the Options drop-down list. Lastly, click Ok.

Allow Windows Diagnostic Data For Secure Boot updates via Windows Registry
To do this, navigate to the following registry path below, and create a key with name: MicrosoftUpdateManagedOptIn.
HKEY_LOCAL_MACHINE\SYSTEM\CurrentControlSet\Control\Secureboot
Create a DWORD type

DWORD creation and enter DWORD value: 0x5944. This means, opt in to Windows Secure Boot updates.

This means, that all certificates should be updated in a manner that preserves the security profile of the existing device. It also updates the boot manager to the one signed by the Windows UEFI CA 2023 certificate. Note: If the DWORD value is 0 or the key doesn’t exist, Windows diagnostic data is disabled.
For organizations that do not want to enable diagnostic data, please take this anonymous readiness survey. This will help Microsoft to assess the needs of environments like yours to create future guidance on managing the update process independently.
Update the DB and KEK with new 2023 certificates
Microsoft recommends that not to wait until June 2026 to update your DB and KEK with the new 2023 certificates to protect your systems against boot-level security vulnerabilities before they become a critical risk. Early action ensures continued Secure Boot integrity and reduces exposure to threats like bootkits.
To continue running Windows and receiving regular updates for your Secure Boot configuration, you will need to update these certificates.
- KEK: Key Enrollment Key
- CA: Certificate Authority
- DB: Secure Boot Signature Database
- DBX: Secure Boot Revoked Signature Database

Note: The Windows UEFI CA 2023 can be downloaded, the “Microsoft UEFI CA 2023 can be downloaded, and the “Microsoft Option ROM UEFI CA 2023 can be downloaded as well”.
Please, see how to prevent OS Reinstallation: Change from legacy BIOS to UEFI, how to perform BitLocker Recovery Password Rotation in Active Directory, and how to Get MBAM BitLocker Recovery Keys from Microsoft SQL Server.
Manual apply DB update: Installing the new certificate
Note: Before performing the manual Db update. If you use BitLocker, or your firm has deployed BitLocker on your device. Make sure to back up the BitLocker recovery keys before applying firmware or Secure Boot updates. Please, see how to delegate permissions for backing up TPM password, and how to encrypt your system with Trellix Data Encryption.
This Safeguard (Risk Control) helps prevent data loss in case the system detects a change in the boot environment and prompts for recovery during startup. Please, see “how and where to find your BitLocker recovery key on Windows“, and Fix no BitLocker Recovery tab in Active Directory. Also, see “Unable to find my BitLocker Recovery Key in AD“.

You can also run the following command from an Administrator command prompt and note the 48-digit numerical password.
manage-bde -protectors -get %systemdrive%Part A: Formal DB update Steps
The DB update is available on February 13, 2024, along with manual steps to allow customers to test for firmware compatibility, especially for organizations with fleets of devices.
I would recommend to manually apply the DB update to validate that your system is compatible. Since, you do not want to enable Diagnostic data, you can also manually apply the Db updates by following the steps below.
1: Ensure that the February 2024 (or later) security update are applied.
2: Next, launch PowerShell console and ensure that PowerShell is running as an administrator

3: Run thnning the following commands below to set the registry key.
Set-ItemProperty -Path “HKLM:\SYSTEM\CurrentControlSet\Control\SecureBoot” -Name “AvailableUpdates” -Value 0x40
This command opts the system into receiving Secure Boot certificate updates specifically the 2023 Microsoft UEFI CA certificate updates. Even if the system wouldn’t automatically qualify (e.g., because it doesn’t send diagnostic data).
4: Run the following scheduled task as
Start-ScheduledTask -TaskName “\Microsoft\Windows\PI\Secure-Boot-Update”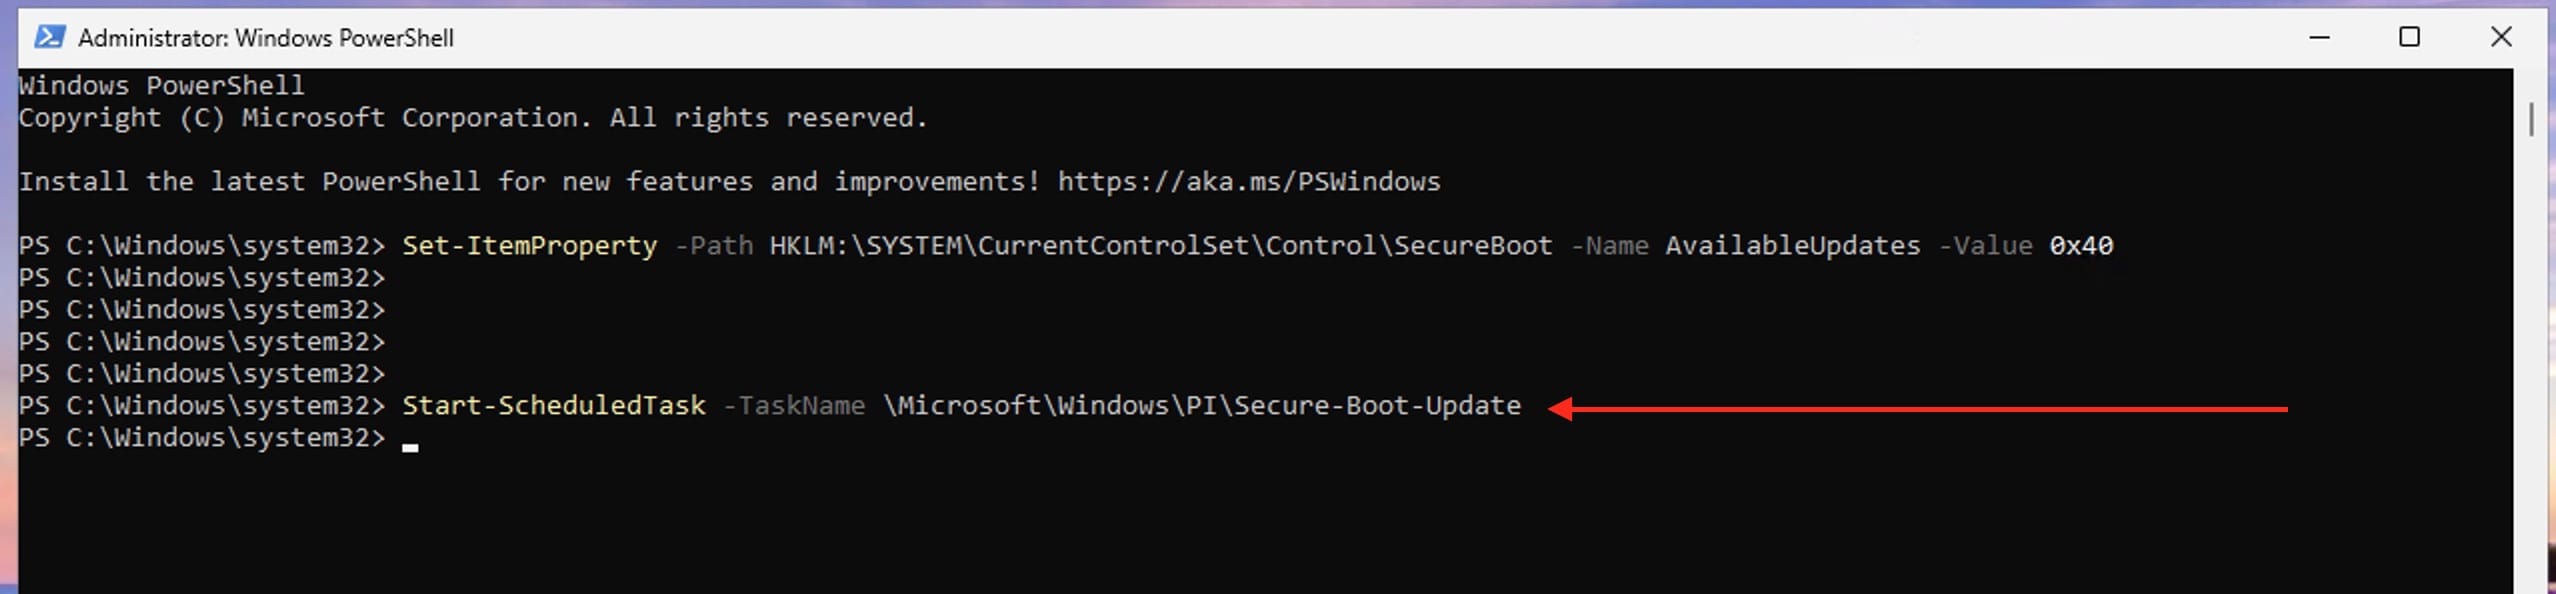
Note: Double check to see if the Scheduled task is already there. Below is the task I have created.

5: Reboot the machine twice after running these commands to confirm that the machine is booting with the updated DB.
6: To verify that the Secure Boot DB update was successful, open a PowerShell console and ensure that PowerShell is running as an administrator before running the following command:
[System.Text.Encoding]::ASCII.GetString((Get-SecureBootUEFI db).bytes) -match "Windows UEFI CA 2023"
If the command returns “True”, the update was successful. Next, you are expected to reboot your PC at least twice to ensure there are no errors during startup.

Device Restart
As you can see below, there were no issues during startup. I am already aware of the BitLocker outcome as documented above. But my next test would be to enable BitLocker on a different device and document the behavior.

Alternatively, you could install it from the BIOS menu and you must download it in a compatible format. There is a Microsoft GitHub site Secure Boot Objects where you can get all the Microsoft updated binaries in a format that you can insert into the firmware using the BIOS menu.
This repository is used to hold the secure boot objects recommended by Microsoft to use as the default KEK, DB, and DBX variables.
Part B: Update the Boot Manager on your device.
This step will install a boot manager application on your device which is signed with the “’Windows UEFI CA 2023” certificate.
1: Set the regkey to install the “’Windows UEFI CA 2023” signed boot manager. To do this, open a Command Prompt window as an Administrator. Type each of the following commands separately, and then press Enter
reg add HKEY_LOCAL_MACHINE\SYSTEM\CurrentControlSet\Control\Secureboot /v AvailableUpdates /t REG_DWORD /d 0x100 /fStart-ScheduledTask -TaskName "\Microsoft\Windows\PI\Secure-Boot-Update"
2: Run as “Administrator”, and mount the EFI partition to get it ready for inspection. You can use another drive letter if S does not work or already in use, but it cannot be opened in Explorer, only in the PowerShell.

3: Validate that “s:\efi\microsoft\boot\bootmgfw.efi” file is signed by the “Windows UEFI CA 2023” certificate. To do this, follow these steps
Click Start, type command prompt in the Search box, and then click Command Prompt. In the Command Prompt window, type the following command and then press Enter
copy S:\EFI\Microsoft\Boot\bootmgfw.efi c:\bootmgfw_2023.efiThis command copies the bootmgfw.efi bootloader file from the EFI system partition (S:) to the root of the C: drive and renames it to bootmgfw_2023.efi for backup or analysis

4: In the Signature list, confirm that the certificate chain includes Windows UEFI CA 2023.


The certificate chain should match the following below.

Part 3 (Optional): Enable the revocation
The UEFI Forbidden List (DBX) mitigation is used to block untrusted UEFI modules from loading. In this step, updating the DBX will add the “Windows Production CA 2011” certificate to the DBX. This will cause all boot managers signed by this certificate to no longer be trusted.
I am not actually interested in performing this step. Therefore, before applying the third mitigation, you will have to create a recovery flash drive that can be used to boot the system. Please take a look at this guide for the needed steps.
Part 4 (Optional): Apply the SVN update to the firmware
The Boot Manager deployed in Step 2 includes a built-in self-revocation feature. When it runs, the Boot Manager checks its own Secure Version Number (SVN) against the SVN stored in the system firmware. If its SVN is lower than the one in firmware, the Boot Manager refuses to execute. This mechanism prevents attackers from rolling back to older, unpatched versions of the Boot Manager.
Going forward, whenever Microsoft fixes a significant security issue in the Boot Manager, it will increment the SVN in both the Boot Manager and the firmware. Microsoft will release both updates together in a single cumulative update to ensure full protection. After each SVN update, administrators must also update any bootable media to stay compliant.
Starting with the July 9, 2024, updates, Microsoft has incremented the SVN in both the Boot Manager and the firmware. While applying the firmware update remains optional, you can install it by following the recommended steps below.
reg add HKEY_LOCAL_MACHINE\SYSTEM\CurrentControlSet\Control\Secureboot /v AvailableUpdates /t REG_DWORD /d 0x200 /fStart-ScheduledTask -TaskName "\Microsoft\Windows\PI\Secure-Boot-Update"
Please, see how to “Prevent Microsoft Teams from starting automatically on Windows“, and “how to “Migrate Veeam MSSQL Database to a new Microsoft SQL Server“.
Conclusion
Before deploying the Secure Boot DB update broadly, organizations should begin by testing the update on a small set of devices with identical firmware and specifications. This cautious approach helps mitigate the risk of device issues caused by firmware incompatibility. Once testing is successful, administrators can use Group Policy (GPO) to automate the rollout of the required commands and registry keys across their environment.
While Microsoft is managing this update automatically for a large number of Windows devices, enterprises that handle updates manually should follow Microsoft’s detailed guidance to ensure secure and stable deployment.
The DB update, released on February 13, 2024, includes manual testing steps that allow IT teams to verify firmware compatibility before mass deployment. Organizations are encouraged to use these steps to validate compatibility and avoid unexpected issues, especially when managing diverse device fleets.
Staying proactive and methodical with testing and staged deployment will help ensure a smooth transition to the new Secure Boot certificate infrastructure and maintain device security
I hope you found this article very useful on “Enable Secure Boot: Fix Secure Boot certificates expiration [Part 1]”.