Veeam Data Platform v13 shifts toward a “security-first” architecture. It offers enhanced protection for backup infrastructure against modern threats. In addition to introducing a new Linux-based Virtual Software Appliance (VSA) and Veeam Infrastructure Appliance (VIA) with built-in hardening. In this article, we shall discuss the Building VIHR: A Ransomware-Proof Repository with Veeam JeOS. Please, see how to set up Devolusion Remote Desktop Manager on Windows, and Unable to Remove Orphaned VHR Repository v2 from VBR v13.
As ransomware continues to evolve, it increasingly targets not only production workloads but also backup repositories and recovery infrastructure. If an attacker can tamper with, encrypt, or delete your backups, they no longer represent a reliable recovery mechanism. They become just another compromised asset. Please see “Ransomware Backup Protection Strategy: Why Most Fail and What Actually Works“
With Veeam Data Platform v13, deploying immutable storage is now simpler and more secure. Veeam introduced a new JeOS (Just enough OS) deployment method for the Hardened Repository (VHR) using a pre-configured Rocky Linux appliance. This appliance approach removes the complexity of manually hardening a generic Linux OS.
Building a Lab in Proxmox VE
Note: For the XCP-ng section, I will be using the latest ISO image at the time of writing this guide, which is v13.0.2.1017. See how to create a bootable USB on Mac: Proxmox VE Setup.
By the way, I will delete this Lab and create it permanently in XCP-ng. Therefore, follow along to see how this is done. For the steps to create a VM on Proxmox, please, see how to set up the OOTBI Virtual Appliance on Proxmox VE
Boot the ISO, and the below splash screen will appear. Select “Fresh Install, wipes everything (including local backup”.

Choose the Yes button to wipe your system.

Installation of Veeam Infrastructure Hardened Repository is in progress.

When the installation is complete, do not forget to move the boot order or uncheck if you wish to leave it in the first position. For me, I will uncheck and move downwards as shown below.

Click on start to “Turn on the VM”.

Please, see How to create a backup job for Proxmox VMs using VBR, How to delete a VM and Storage in Proxmox, and how to Add Synology NFS Storage to Proxmox VE for VMs and Backups.
VIHR Initial Configuration
Review and accept the terms of the EULA, Veeam licensing policy, license agreements for third party components and, third-party.

Set a hostname and click on next

o not forget to set the static IP and DNS address by using the “Advanced” option. These steps are similar to the steps discussed on how to setup Veeam Software Appliance v13.

For the NTP server, you can change the Time Zone

I will choose “Europe Berlin” as shown below.

Next to proceed

Host Administrator Account Setup
At the Host Administrator step of the Initial Configuration wizard, configure the default host administrator account to perform administrative activities in the Host Management console. The username is “veeamadmin“, and do not forget to set the password.

Click on show QR code or type the following code into your app.

Scan the QR code with your mobile device

Enter the code from your Authentication App as shown below.

Hit the Next button to proceed

For the Security Officer (vveamso), set the password as well and click next.

On the summary page, click on Finish.

We are being reminded to activate our security officer account. Please, see How to fix Failed to connect to Deployer Service Error for how this can be done.

Services are bing started as well.

After installation and initialization complete, the appliance displays links to the Host Management web UI on port 10443 on the splash screen.

Please, see What to know about “Failed to perform Veeam Worker Upgrade”, Performing Enhanced Proactive Monitoring with Veeam ONE, and Understanding User Roles & Access Control in Object First OOTBI.
Access the Veeam Host Management Interface
You can also use the Web UI following by the port 10443 to access the Veeam Host Management interface.

Use the veeamadmin account for this.

Please, see how to deploy a function app from Visual Studio to Azure Platform, how to deploy and integrate VHR with VBR, and Ensuring Backup Integrity and Reliable Recovery with SureBackup.
Building a Lab in XCP-ng
If you do not have a Hyper-V, VMware or Proxmox environment. Then you have to use XCP-ng if you have one. These steps are similar to what we have discussed in this guide ” A-Z of XCP-ng and Xen Orchestra setup and VM Creation,”.
First, you will have to import your VIHR (Veeam Infrastructure Hardened Repo ISO) into XCP-ng storage repository.

The VIHR ISO has been imported

Create a VIHR VM
The steps to create a VM on XCP-ng is simple. Click on “New VM ” and populate the field as shown below.

Boot the ISO and from the splash screen, select Veeam Hardened Repository

Please, see How to Create a Snapshot on vSphere Web Client, how to Create or delete snapshots on VMware Workstation, and How to upgrade VMware Tools in vSphere.
Install a fresh Veeam Hardened Repository
Select the first option to proceed with a fresh installation of the VIHR

The system boots from the ISO image, which is loaded into memory to start the installation environment.

Click Yes to proceed with the installation

Shortly, you will see a customized version of Rocky Linux provided by Veeam a shown below

Also, I have decided to assign a new hostname to reflect the new generation of Veeam Infrastructure Hardened Repository.

I will modify the network parameters by using the Advanced options. Click on the Network interface as shown below.

Set the IP and DNS servers as required by your environment.

Click next to proceed

Kindly take a look at the Proxmox section for the rest configuration for the Veeamadmin and veeamso setup for VHR. Do not forget to activate the Security Officer by logging into the Host Management Web UI and assign a password and enable MFA.

The services are being started as well.

After installation and initialization complete, the appliance displays links to the Host Management web UI on port 10443.

Veeam Host Management Access
Host Management is a lightweight, highly secure Cockpit-based UI that allows administrators to perform system operations safely. Log in using the administrator account you created during setup. if you run into the following issue “unable to access”. Here is the Fix Authentication failed: Invalid credential after installing VSA.

Below are the Logs and Services from the Veeam Host Management console.

Create a User Account and Roles
From the ‘Host Management Console”, navigate to Users and Computers. Create a new user called “Christian” for example and enable MFA as shown below.
Note: I have decided to disable the MFA at this time. This way, we are forced to enable MFA during login.

Enter the code from your authenticator and click on OK.

As you can see, we have successfully created a new account for the Host Management.

You can login with this new account

You will be required to change your password. Enter the password and click on confirm as shown below.

As shown below, the password has been changed.

Since we disabled MFA above, we will have to re-enable MFA again.

As you can see, have now have gained access to the host management.

Please, see Security Best Practice to secure your Cisco Router and Switches, and how to Configure a username and secret on a Cisco Switch and Router.
Deploying and Configuring the Immutable Repository
Let’s access the VBR console. You can also do this via the VBR Web UI.

Please, see SSH and Telnet on Cisco ASA 5505: Quick Setup Guide, AnyConnect SSL VPN Client Configuration Guide, and How to enable ssh via ASDM on Cisco ASA.
Add a Backup Server
Navigate to the “Backup Infrastructure”, and then to Managed Servers and from the ribbon or working area, right click and select “Add Server”.

Select Linux

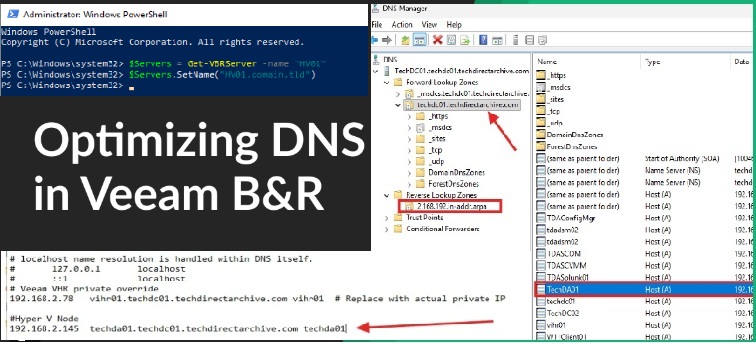
As mentioned before, if you do not create a FQDN, and perhaps adjust the Host file record, you can run into the following issues “How to fix Failed to connect to Deployer Service Error“, and Upgrade legacy VHR to Veeam Infrastructure Hardened Repository
FQDN works reliably in VBR/VSA v13 due to strict reverse DNS requirements for certificate authentication, SSH, and agent deployment on Linux. IPs skip PTR lookups and often fail validation

We have successfully created a DNS record as shown below.

Note: If your DNS record ignored because Windows DNS cache/NSCD priority bypassed it. The hosts file has higher precedence (files is greater (>) dns in nsswitch equivalent). Therefore, forcing private IP resolution.
To do this, we will have to edit the hosts file on the VBR server to override DNS resolution, forcing FQDN “vihr01.techdc01.techdirectarchive.com” to resolve to the private IP. Below is the location of the host file in Windows to allow “Veeam VHR private override”. In my case, I will add the below entry
C:\Windows\System32\drivers\etc\hosts

Now, proceed to enter the FQDN for the VIHR

Select the first option for certificate based authentication and click on next.

As we can see, it is currently connecting to the Veeam Installer Service

Trust the server by clicking on “yes”.

The following will be installed on the target host.

Operation performed successfully

On the Summary page, click on Finish.

The VIHR has been created successfully.

If you are still on the older Veeam Hardened Repository, please see Veeam Host Components: Unable to reinstall Deploy Service SSH. Also, see Upgrade PowerShell Core Windows or Mac and Linux System, and How to create a two-way Active Directory Trust.
Create a Backup Repository
Launch the Backup Infrastructure view. From the inventory pane, right-click the Backup Repositories node and select Add Backup Repository.
Alternatively, you can click Add Repository on the ribbon. Next, select Direct Attached Storage.

Next, select “Linux (Hardened Repository)”.

Enter the Linux (Hardened Repository) name, and description

From the Repository server list, select the Linux server that you want to use as a hardened repository.
Note: If the server is not added to the backup infrastructure yet, you can click Add New on the right to open the New Linux Server wizard.
Click Populate to see a list of disks connected to the server, their capacity and free space.

Specify the repository folder and click on OK.

Here, you can specify the immutability period, load control, and advanced repository settings as shown below. You learn more from the official VBR v13 Help Center Guides.

Confirm or change the mount server settings as applicable to your environment and click next.

Review the settings and confirm by clicking Apply. If you’re adding a repository with existing backups, flag the setting to import them automatically.

Operations performed successfully and click next

At the Summary window, click on Finish.

As you can see below, we have successfully created our Linux Hardened Repository.

Please, see How to install and configure Rancid, Differences between Directory Services and Databases, how to uninstall AWS CLI in Windows, and how to add a device to your Microsoft Account.
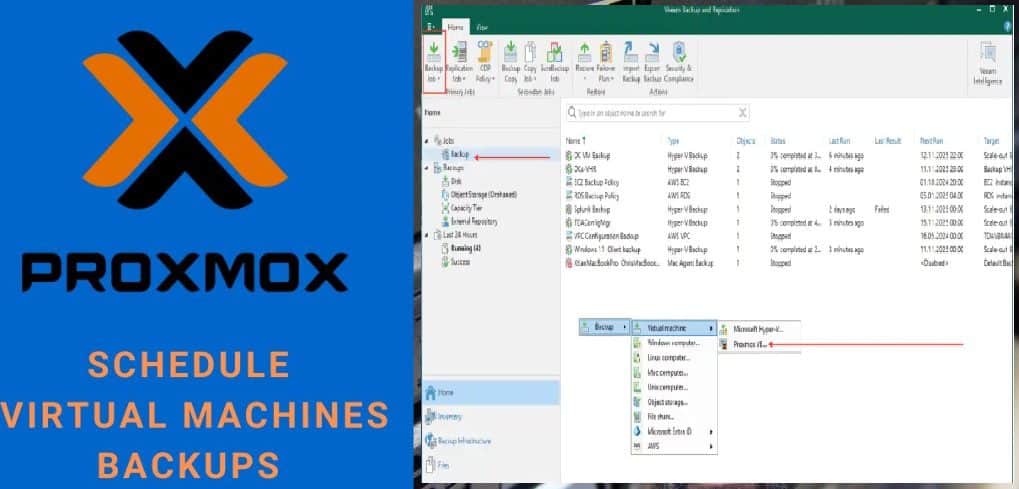
Create a Backup Job
To do this, navigate to Home and then Backup Job. In the new Backup job, enter the job name and description as shown below, and click on Next.

Select the workloads to protect and click OK.

Below are the two workloads to protect and click on Next.

Ensure the right repository is created here. Specify the retention policy and other parameters as it is applicable to you and click Next. Note that the retention policy should align with immutability period.

Since these are DCs’, I will enable “Application-aware processing” and “Guest file indexing and malware detection”.
You can verify the Guest OS credentials for individual machines and verify connectivity as shown below if you wish.

Test Connection in progress

If there are errors, it will be prompted, kindly wait for the test to complete as this is vital for the success of your backup job.

Since this is a Lab environment, I will define the schedule as shown below.

Click on “Run the job when I click on Finish” if you wish to run the job immediately outside the configured schedule and click on Finish.

Below is the job progress.

The below is my VBR Dashboard post-VIHR setup: 91% Infrastructure Health (4 servers, 1 update pending), 100% Protection Overview, 1 successful/2 cleaned backups, 1 failed job.

I hope you found this post on “Building VIHR: Ransomware-Proof Repository with Veeam JeOS” very useful. Feel free to leave a comment below.