In this article, we shall discuss the steps on how to fix failed to connect to Deployer Service Error. Please, see How to configure Network Unlock in Windows, how to Configure a username and secret on a Cisco Switch and Router, and Upgrade Path and In-Place Upgrade for VBR v13 and Known Fixes. The Veeam Deployer Service is a host-resident management component used by Veeam Backup & Replication to control lifecycle operations of Linux-based backup infrastructure.
After being bootstrapped via SSH, it handles secure package validation and coordinated deployment of Veeam Linux services, including Data Movers and Transport components, required for backup, restore, and repository operations.
Note: These steps are not needed when you have a proper DNS resolution in place. This is because, new VIHR servers etc auto-connect, because VBR pre-opens required ports (6160/6162/22) via initial SSH during deploy rules enabled that bootstrap.
Note: FQDN works reliably in VBR/VSA v13 due to strict reverse DNS requirements for certificate authentication, SSH, and agent deployment on Linux. IPs skip PTR lookups and often fail validation. Please, see a similar issue resoled here.
Because of this, launch DNS Manager and create an A Record as shown below for the new VIHR server. If you do not do this, you will have a painful deployment. will work you through this and also, the recreation of a DNS name for the VIHR is inevitable.

Please, see how to set up Devolusion Remote Desktop Manager on Windows, Hardening Your Infrastructure: A Guide to VMware VBS and MS GPO Credential Guard in VBR v13, and How to fix the Filesystem root is running low on Disk space.
Why was this error “Failed to connect to Deployer Service” prompted?
At this point, I am just experimenting to see the behavior of using an IP Address against a FQDN. If you do not have this time in your lab. Please, proceed and create a FQDN.
The “Failed to deploy management agent port” error occurs because VBR can’t connect to the newly deployed VIHR (192.168.2.78) on port 6160 for the Veeam Installer Service. After upgrade, I deleted this old VIHR just to demonstrate the steps to setup a new VIHR in my lab. Please, see “Unable to Remove Orphaned VHR Repository v2 from VBR v13“.

As you can see below, the “Failed to connect” timeout during SSH connection setup is due to firewall. As such, the cert auth can’t proceed.

Please, see how to upgrade legacy VHR to Veeam Infrastructure Hardened Repository, How to update Veeam Backup and Replication [VBR], and how to Install Veeam ONE and Add VBR: Fix failed to connect to VBR.
Test Connectivity from VBR server
To do this, we will have to run the command below. Some Linux distributions also require firewall and security rules to be created manually as documented here.
Test-NetConnection vihr01.techdc01.techdirectarchive.com -Port 22

Note that “Telnet” is disabled by default on Windows (VBR server). You will have to enable the Telnet Client feature first. Please, see how to Download and Use KiTTY SSH Client on Windows, and How to enable Telnet in Windows 10 and Windows Server.
telnet vihr01.techdc01.techdirectarchive.com 22

You can use the below command to enable Telnet.
dism /online /Enable-Feature /FeatureName:TelnetClient
Even when you access the VIHR via the “Host Management Shell Access”, the VBR server requires port 22 open regardless. The firewall/proxy can’t bypass it, even with shell granted.
Please, see How to use the Azure Cloud Shell or Azure CLI and Azure PowerShell, and how to Fix Error 1069: Windows could not start the Veeam backup service on local computer.
Request Shell Access on the VIHR
Upon logging in with the veeamso, you are required to change your password. Follow the steps to do this. We are actually access the VIHR Host management Web UI because, we will need to approve the veeamadmin Shell Access request.

You will also be required to enabled MFA for the veeamso account.

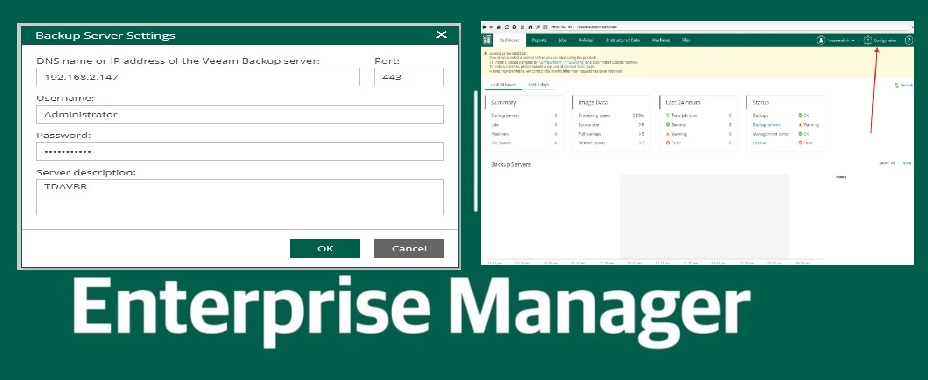
As mentioned above, and confirmed in the “Backup Server Connection” wizard below. The New VIHR should auto-connect because VBR pre-opens required ports (6160/6162/22) via initial SSH during deploy rules enabled that bootstrap. But will not work correctly when IP address is being used as explained above also.

Login with the veeamadmin account and request shell access

Select Enable SSH Access and click Yes.

As you can see, the Shell access request has been sent. We have to wait for the veeamso to approve our request.

Please, see Remote Desktop can not find the computer FQDN and this might mean that FQDN does not belong to the specified network, and A-Z of XCP-ng and Xen Orchestra setup and VM Creation.
Approve Host Management Request by Veeamadmin
As you can see, there is a request.

Select it and click on “Approve”.

Request approved by the veeamso

Please, see how to secure access to your Virtual Machine with Just-in-Time (JIT) VM Access, and Hacker Thinking in Ransomware Attacks: Backup Is the real Target.
Manually create Firewall rules
Access has been granted to the veeamadmin to manage the server. As mentioned previously, with the FQDN, these are not needed. This is like a PoC to see what is obtainable.
Since port 22 unreachable confirms SSH service/firewall blocks on VIHR01 Linux host. No TCP listener at all, we will have to manually create these rules, and then lock it back down after VBR deploys agents.
sudo firewall-cmd --zone=public --permanent --add-port=6160/tcp
sudo firewall-cmd --zone=public --permanent --add-port=6162/tcp
sudo firewall-cmd --reload

As you can see below, the firewall shows ports 6160/tcp and 6162/tcp open in public zone (no blocks). SSH service active, default target ACCEPT rules as correctly applied and active.

Please, see DSM Security: How to Protect Synology DS923+ NAS, Bypassing BitLocker Loop by Unlocking or Disabling or PC Reset, and how to Find Security Identifier on Windows [Part 2].
Integrate VIHR with VBR
You can now access the VBR Web UI or VBR console as the case maybe.

Enter the FQDN. Short names fail reverse DNS lookups (PTR). Regardless of our rules created, IP based connection will still fail. Thereby, blocking cert-based auth and agent deploy on port 6160.
FQDN ensures full resolution as we will see very shortly. Please, see how to “change Managed Server Name/FQDN/IP in VBR” for an already setup server.
The private IP lacked reverse DNS/PTR records required for certificate authentication, causing a resolution mismatch. This made the deployment fail before as the agents could not be pushed to automatically open ports 6160/6162 in firewalld. Whereas with the FQDN on the new host provided full resolution enabling successful SSH deployment and automatic agent firewall rule configuration.
So, enter the FQDN as shown below and click Next

Select the first option for certificate based authentication and click on next.

Timeout persists. But interestingly, I can see it failed while trying to connect to a Public IP address. This is because, “vihr01.techdc01.techdirectarchive.com” tries to resolve to public IP 104.xxx.xx.xxx. So VBR routes externally/NAT instead of direct private connect, causing 6160 deployer timeout.
Why did our AD DNS not work correctly?
AD DNS record ignored because Windows DNS cache/NSCD priority bypassed it. The hosts file has higher precedence (files is greater (>) dns in nsswitch equivalent). Therefore, forcing private IP resolution.

Because, I could see the error in the image above, I knew what the issue was and as such, the above statement.
But, if the above does not apply in your case as there is no one solution fit all. You could try the below steps. The below shows that ports 22, 6160, and 6162 listening on 0.0.0.0 (IPv4) and ::: (IPv6),. Thereby verifying firewall rules successfully opened them for VBR access
ss -tuln & ports

Please, see RPORT the free and open source remote management tool, how to install Telnet via the command line, and Kinit Error: Fix Malformed representation of principal when parsing name.
Create a Host File Record
To do this, we will have to edit the hosts file on the VBR server to override DNS resolution, forcing FQDN “vihr01.techdc01.techdirectarchive.com” to resolve to the private IP. Below is the location of the host file in Windows to allow “Veeam VHR private override”.
C:\Windows\System32\drivers\etc\hosts
In my case, I will add the below entry
192.168.2.78 vihr01.techdc01.techdirectarchive.com vihr01 # Replace with actual private IP

When done, performor run the command below
ipconfig /flushdns

Next run the command below to ping. This should resolve to the private IP address
ping vihr01.techdc01.techdirectarchive.com

Before, proceeding to add the managed server, you can perform a short test with the command below
Test-NetConnection vihr01.techdc01.techdirectarchive.com -Port 6160
Please, see How to install Telnet via the command line, common Cisco ASA Commands, and how to fix could not open a connection to the host, on the port, connect failed,
VIHR Deployment [continuation]
As you can see below. The following will be installed on the target host.

Operation performed successfully

On the Summary page, click on Finish.

We have our Veeam Infrastructure Hardened Server successfully added to VBR and will therefore create a Repository very shortly on it.

Navigate to the Backup repository and create a Repo by selecting a Direct Attached Storage as shown below.

Select Linux (Hardened Repository) and click on Next


As you can see, we have been able to resolve this issue. Added our managed server and created a repo for our backup job

I hope you fund his blogpost on “how to fix Failed to connect to Deployer Service Error” very useful. Please, feel free to leave a comment below.