Skip to content

TechDirectArchive

Hands-on IT, Cloud, Security & DevOps Insights

  • Home
  • About
  • Advertise With US
  • Reviews
  • Contact
  • Toggle search form
Home » AWS/Azure/OpenShift » How to enable Amazon S3 default bucket encryption using S3 Console

How to enable Amazon S3 default bucket encryption using S3 Console

Posted on 20/12/202126/08/2023 Temitope Odemo By Temitope Odemo No Comments on How to enable Amazon S3 default bucket encryption using S3 Console
Amazon S3

In this guide, I will be showing you how to enable default encryption on an Amazon S3 bucket so that all the objects are encrypted when they are stored in the bucket. The objects are encrypted using server-side encryption with either Amazon S3-managed keys (SSE-S3) or AWS Key Management Service (AWS KMS) keys. But our focus in this guide will be on AWS KMS. For other related AWS topics you can read: How to manage cost with AWS Budgets, Creating IAM Users, Adding MFA and Policies on AWS, Hosting Static Website and Versioning on AWS S3, How to Deploy Dynamic Website to AWS EC2, How to Deploy MVC Application to AWS EC2 Using RDP Connection and Web Deploy.

A step-by-step process on how to create an S3 bucket is covered in this guide: How to deploy an Angular App to AWS S3

Furthermore, Log in to the AWS Management Console and open the Amazon S3 console:  https://console.aws.amazon.com/s3/

default bucket encryption
Login Page
  • However, from the Buckets list select the name of the bucket that you want to encrypt.
enable
Bucket List
  • Choose Properties
S3 Console
Bucket Overview
  • Scroll down to Default encryption, click on Edit
Amazon S3
Default Encryption
  • Moreover, In order to enable server-side encryption, select Enable
  • In addition, To enable server-side encryption, you can either choose the Amazon S3 key (SSE-S3) or the AWS Key Management Service key (SSE-KMS) under the Encryption key type. But in this guide, we will use the SSE-KMS Encryption key type.
S3 Console
AWS Key Management Service Key

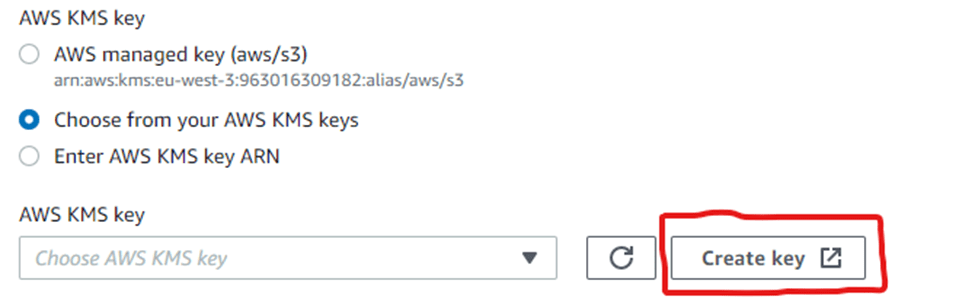
Nonetheless, Under the AWS KMS key section, you can select any of the following:

  • AWS managed key (aws/s3)
  • Choose from your KMS root keys.
  • Enter KMS root key ARN.

Consequently, In this guide, we will select Choose from your AWS KMS Keys, and we will Create Key

image-44
AWS KMS Key

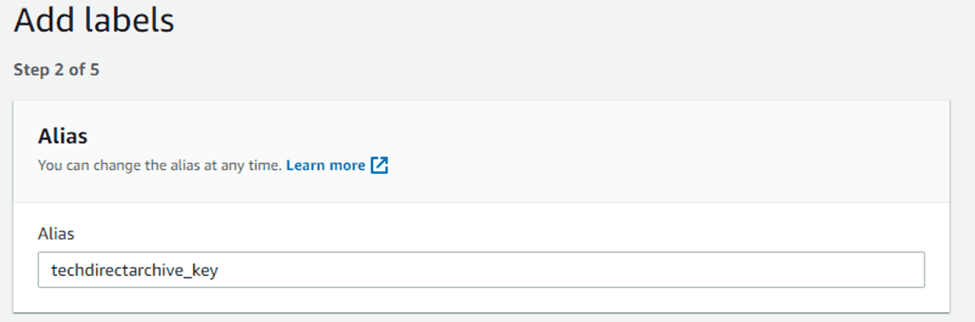
Similarly, Click on the Create key button and select Symmetric, you can leave the Advanced options as it is.

image-45
Configuring the Key

Nevertheless, Enter the Alias and other sections are optional.

image-46
Adding Alias

Therefore, In the next section, you will need to define key administrative permissions like key administrators, and also you will need to define the critical usage permissions.

image-47
Key Configuration

Additionally, The key policy will be created by the time you click on the Finish button.

image-48
Key Policy

Key created below

image-49
Customer Managed Keys

Furthermore, Now select the key you created and under Bucket Key, choose Enable.

image-50
AWS KMS Key

Click Save Changes to Encrypt your S3 Bucket.

image-51
Bucket Overview

I hope you found this blog post on How to enable Amazon S3 default bucket encryption using S3 Console very interesting and helpful. In case you have any questions do not hesitate to ask in the comment section.

Rate this post

Thank you for reading this post. Kindly share it with others.

  • Share on X (Opens in new window) X
  • Share on Reddit (Opens in new window) Reddit
  • Share on LinkedIn (Opens in new window) LinkedIn
  • Share on Facebook (Opens in new window) Facebook
  • Share on Pinterest (Opens in new window) Pinterest
  • Share on Tumblr (Opens in new window) Tumblr
  • Share on Telegram (Opens in new window) Telegram
  • Share on WhatsApp (Opens in new window) WhatsApp
  • Share on Mastodon (Opens in new window) Mastodon
  • Share on Bluesky (Opens in new window) Bluesky
  • Share on Threads (Opens in new window) Threads
  • Share on Nextdoor (Opens in new window) Nextdoor
AWS/Azure/OpenShift Tags:AWS, AWS CLI, AWS s3, Encryption, s3

Post navigation

Previous Post: How to Fix “Unknown hard error” on Windows Server and Windows 10
Next Post: How to Configure Network Load Balancing on Windows Server

Related Posts

  • Azure AD Logo 1
    How to sync on-premises AD with Azure AD via Azure AD Connect AWS/Azure/OpenShift
  • featuredimage
    Create App Service Resource with Azure CLI AWS/Azure/OpenShift
  • BLOG LOGO
    How to create a static pod in Kubernetes AWS/Azure/OpenShift
  • Continuous Deployment Pipeline Using AWS CodePipeline
    Setup a Continuous Deployment Pipeline with AWS CodePipeline AWS/Azure/OpenShift
  • featureimagepshell 1
    Running PowerShell remotely on Azure VMs AWS/Azure/OpenShift
  • WCD
    Join Bulk Devices using a Provisioning Package to Azure AWS/Azure/OpenShift

More Related Articles

Azure AD Logo 1 How to sync on-premises AD with Azure AD via Azure AD Connect AWS/Azure/OpenShift
featuredimage Create App Service Resource with Azure CLI AWS/Azure/OpenShift
BLOG LOGO How to create a static pod in Kubernetes AWS/Azure/OpenShift
Continuous Deployment Pipeline Using AWS CodePipeline Setup a Continuous Deployment Pipeline with AWS CodePipeline AWS/Azure/OpenShift
featureimagepshell 1 Running PowerShell remotely on Azure VMs AWS/Azure/OpenShift
WCD Join Bulk Devices using a Provisioning Package to Azure AWS/Azure/OpenShift

Leave a Reply Cancel reply

You must be logged in to post a comment.

Microsoft MVP

VEEAMLEGEND

vexpert-badge-stars-5

Virtual Background

GoogleNews

Categories

veeaam100

Veeam Vanguard

  • screenshot 2020 05 05 at 10.26.12
    How to enable or disable User Account Control Windows
  • Enable TPM and ecure boot on HyperV to run windoows 11
    How to run Windows 11 on HyperV Virtualization
  • Leave Slack
    How to remove a user from a Slack Channel JIRA|Confluence|Apps
  • PXE Boot to Install OS HyperV
    Run Hype-V on Windows 11 and Install Windows OS via PXE Boot Windows
  • Screenshot 2020 05 16 at 15.33.24
    How to install Telnet via the command line Windows Server
  • get computer specific model information
    How to get Windows PC specific Model information Windows
  • adm
    Create and access a hidden share folder on Windows Windows
  • Screenshot 2020 05 24 at 22.40.50
    The security database on the server does not have a computer account for this workstation trust relation [Part 1] Windows Server

Subscribe to Blog via Email

Enter your email address to subscribe to this blog and receive notifications of new posts by email.

Join 1,819 other subscribers
  • RSS - Posts
  • RSS - Comments
  • About
  • Authors
  • Write for us
  • Advertise with us
  • General Terms and Conditions
  • Privacy policy
  • Feedly
  • Telegram
  • Youtube
  • Facebook
  • Instagram
  • LinkedIn
  • Tumblr
  • Pinterest
  • Twitter
  • mastodon

Tags

Active Directory Azure Bitlocker Microsoft Windows PowerShell WDS Windows 10 Windows 11 Windows Deployment Services Windows Server 2016

Copyright © 2025 TechDirectArchive


Loading Comments...
 

You must be logged in to post a comment.