
Azure App Services is a platform-as-a-service (PaaS) offering by Azure designed for web applications. It empowers developers to concentrate on their core expertise while Azure manages the underlying infrastructure required to run the code. Now, if Azure handles the infrastructure, the question arises: how do we deploy our code to Azure? This article will primarily focus on how to create App Service Resource with Azure CLI. Please see how to Fix 0x800f0831 Error when installing Windows update, and Relating Due Diligence and Due Care to Veeam Backup and Replication.
What is required for App Services resource
We must create a resource group for housing the App services project. There is a need to create an App Services Plan. We need to create a web application. Lastly, we also need to push code to the web application from a version control system like GitHub to the web app in the previous step.
Please see Azure CLI commands: How to use Azure Command-line Interface, How to uninstall AWS CLI in Windows, Create an App Service Plan with Continuous Deployment to deploy a .NET Application from GitHub, and How to use the Azure Cloud Shell or Azure CLI and Azure PowerShell.
Create a resource group with Azure CLI for Azure App Service
To initiate any project, the initial step is to create a resource group. A resource group serves as a logical container that encompasses all the resources associated with our application. We can create this resource group using the following command:
az group create --name techdirectg --location eastus
Please see How to delete a Virtual Machine via the Azure Portal, AWS CLI Error: All commands return Unknown output type [None], and how to Move Azure Resources between Subscriptions.
Create an app service plan with Azure CLI for Azure App Service.
Creating an app service plan is essential when establishing a scalable and efficient environment for hosting web applications in Azure. An app service plan serves as the foundation, dictating the available resources, capabilities, and scaling options for your applications.
Through the meticulous configuration of the app service plan, you can ensure optimal performance, cost management, and flexibility that align with your application’s specific requirements.
In this guide, we will delve into the process of creating an app service plan in Azure.. To create the plan, you can utilize the following command:
az appservice plan create --name techdAppServicePlan --resource-group techdirectgThe az appservice plan create It is the main command that initiates the plan creation
--name This is the name we wish to call the plan, and we have decided to use the name techdAppServicePlan
--resource-group this is where the project resides, and we have chosen to use the resource group we created earlier called techdirectg

Create a web application with Azure CLI for Azure App Service
You can leverage the Azure CLI to create a web application by executing the command “az webapp create”. This command serves as the starting point for initiating the creation process of a new web app.
By supplying the required parameters, including the name, resource group, and app service plan, you can commence building your application. To begin, follow the provided order of steps below:
# create a webapp
az webapp create --name techdirectappserviceapplication  --resource-group techdirectg --plan techdAppServicePlan

Deploy an Application with Azure CLI for Azure App Service
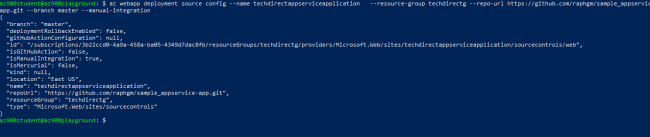
To deploy a sample app, use the Azure CLI command az webapp deployment source config once your credentials have been configured. Using this command, you will be able to configure the deployment source for your web application.
To deploy to a repository, you must specify the URL, local directory paths, and the type of deployment source, such as a local Git repository or a GitHub repository; find the command to use below:
az webapp deployment source config –name techdirectappserviceapplication –resource-group techdirectg –repo-url https://github.com/raphgm/sample_appservice-app.git –branch master –manual-integration
Important points to consider:
--resource-group: Replace this parameter with the name of the resource group that you previously created.--name: Specify the name of the web app you want to make.--repo-URL: This refers to the repository URL where your application code is stored. In this case, it assumes the code is hosted on GitHub. You can use the provided URL in the code snippet above or create your repository.
After the deployment is completed, verify the success of the deployment by accessing the URL of your Azure App Service in a web browser. This will allow you to confirm that your test application is running smoothly.
I hope you found this blog post helpful on how to Create App Service Resource with Azure CLI. Please let me know in the comment section if you have any questions.


