Skip to content

TechDirectArchive

Hands-on IT, Cloud, Security & DevOps Insights

  • Home
  • About
  • Advertise With US
  • Contact
  • Reviews
  • Toggle search form
Home » Windows Server » How to install IIS Web Server on Windows Server

How to install IIS Web Server on Windows Server

Posted on 23/12/202127/03/2024 Christian By Christian No Comments on How to install IIS Web Server on Windows Server
Capture-91

The Web Server (IIS) role in Windows Server 2019 provides a secure, easy-to-manage, modular, and extensible platform for reliably hosting websites, services, and applications. In this article, I will show you how to install IIS Web Server on Windows Server 2019 operating system. Please see How to install and configure an FTP Server on Windows Server, and how to Deploy MVC Application to AWS EC2 Using RDP Connection and Web Deploy.

With IIS 10 you can share information with users on the Internet, intranet, or extranet. IIS 10 is a unified web platform that integrates IIS, ASP.NET, FTP services, PHP, and Windows Communication Foundation (WCF). It supports HTTP, HTTP/2, HTTPS, FTP, FTPS, and SMTP etc.

Kindly refer to the following related contents: Event ID 5059: Application pool has been disabled or Changing identity user for IIS Application Pool, how to install Pleasant Password Server, how to perform redirection from HTTP to HTTPS, and

Install Web Server IIS

After installing your web server. Click on the Windows start menu and then select Server Manager.

Capture-75

Server Manager, Dashboard select Add roles and features

Capture-76

Add roles and features wizard click next.

Capture-77

Install web server IIS installation type, leave “Role-based or feature-based installation” selected, and then click Next.

Capture-78

Server selection, Select a server from the server pool and then click next.

Capture-79

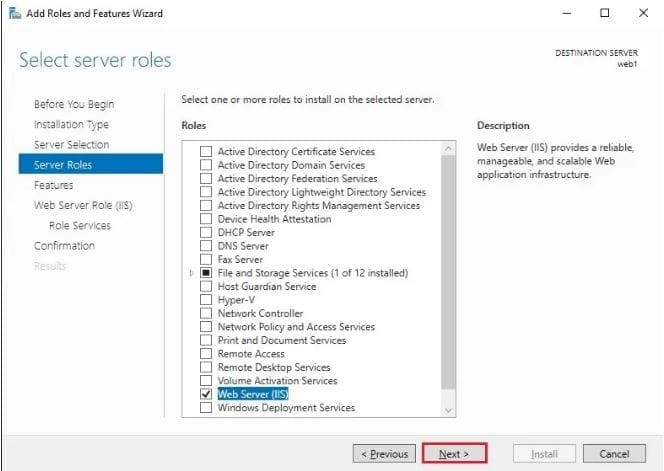
From the Select server roles tab, select the checkbox next to Web Server (IIS).

Capture-80

A new window will popup that additional features are required. Click the Add Features button to install these as well.

Capture-81

Select server roles web server iis selected click next.

Capture-82

Here we’ll not be installing any additional features at this stage click next on the Select features window.

Capture-83

Click next

Capture-84

Enable webserver IIS Select role services, the window you can install additional services for IIS if required. then Click Next.

Capture-85

Confirm installation selections, review the items that are to be installed and then click Install when you are ready to proceed with installing the IIS web server.

Capture-86

No reboot required, the installation has succeeded, then click the close button.

Capture-87

Enable IIS Web Server With PowerShell

Use the Windows PowerShell command line interface (CLI) instead, follow these steps. Open the PowerShell with admin rights and then run the Install-WindowsFeature cmdlet as shown below.

Install-WindowsFeature –name Web-Server -IncludeManagementTools
Capture-88

IIS Web Server start installation progress

Capture-89

The web Server feature successfully enabled, and with this its include the management tools so that we can manage IIS on this server.

Here how to configure SSL between WSUS upstream and downstream servers and how to setup and configure Windows server update services (WSUS), and how to add and remove IIS Web Server on Windows Server 2019 via the Server Manager and PowerShell.

Install IIS with PowerShell

You can automate the IIS role and features installation by using the Powershell cmdlet. Please run the commands below. You can optionally also install additional features by using the “Add Roles and Features” wizard.

Capture-90

I hope you found this blog post helpful on how to install IIS Web Server on Windows Server 2019. Please let me know in the comment session if you have any questions.

Rate this post

Thank you for reading this post. Kindly share it with others.

  • Share on X (Opens in new window) X
  • Share on Reddit (Opens in new window) Reddit
  • Share on LinkedIn (Opens in new window) LinkedIn
  • Share on Facebook (Opens in new window) Facebook
  • Share on Pinterest (Opens in new window) Pinterest
  • Share on Tumblr (Opens in new window) Tumblr
  • Share on Telegram (Opens in new window) Telegram
  • Share on WhatsApp (Opens in new window) WhatsApp
  • Share on Mastodon (Opens in new window) Mastodon
  • Share on Bluesky (Opens in new window) Bluesky
  • Share on Threads (Opens in new window) Threads
  • Share on Nextdoor (Opens in new window) Nextdoor
Web Server, Windows Server Tags:IIS, Internet Information Services, Microsoft Windows

Post navigation

Previous Post: Setup Public Load Balancer in Azure
Next Post: How to install MariaDB on Ubuntu

Related Posts

  • article 1280x720.192a2586 1 2
    Fix error 0x800f0805, run DISM executable (Failure 5627) Windows Server
  • Resolvederror MBAM
    MBAM Policy was detected: Verify the OU used for pre-deployment does not apply MBAM policy Windows Server
  • picture1 101
    Can’t Sign In: Domain Unavailable & 169.254 IP Address Issue Windows Server
  • MSIEXEC returned 1602
    Fix MSIEXEC returned 1602: Trellix Setup cannot use this account Windows Server
  • QueryBitLocker1
    Query Windows BitLocker status remotely Windows
  • Slide4
    How to install Let’s Encrypt on Apache Web Server Linux

More Related Articles

article 1280x720.192a2586 1 2 Fix error 0x800f0805, run DISM executable (Failure 5627) Windows Server
Resolvederror MBAM MBAM Policy was detected: Verify the OU used for pre-deployment does not apply MBAM policy Windows Server
picture1 101 Can’t Sign In: Domain Unavailable & 169.254 IP Address Issue Windows Server
MSIEXEC returned 1602 Fix MSIEXEC returned 1602: Trellix Setup cannot use this account Windows Server
QueryBitLocker1 Query Windows BitLocker status remotely Windows
Slide4 How to install Let’s Encrypt on Apache Web Server Linux

Leave a Reply Cancel reply

You must be logged in to post a comment.

Microsoft MVP

VEEAMLEGEND

vexpert-badge-stars-5

Virtual Background

GoogleNews

Categories

veeaam100

Veeam Vanguard

  • screenshot 2020 04 04 at 01.38.38
    Fix Failed to create scheduled task due to Windows Server Management service issue Windows Server
  • selinux in production
    How to locate directory file context and restore it with SELinux Linux
  • Exchange Admin Centre   EMC
    How to grant Access to User Mailbox Network | Monitoring
  • Fix Network related MSSQL instance error
    Fix a network-related or instance-specific error occurred while establishing a connection to SQL Server [Part 2] Oracle/MSSQL/MySQL
  • Delete VM and Storage in Proxmox
    How to delete a VM and Storage in Proxmox Virtualization
  • How to create a dev drive
    How to create a Dev Drive on Windows 11 Windows
  • lang2
    How to add languages to your Windows PC Windows
  • windows hello la gi
    All you need to know before deploying Windows Hello for Business Key and Certificate Trust Windows

Subscribe to Blog via Email

Enter your email address to subscribe to this blog and receive notifications of new posts by email.

Join 1,813 other subscribers
  • RSS - Posts
  • RSS - Comments
  • About
  • Authors
  • Write for us
  • Advertise with us
  • General Terms and Conditions
  • Privacy policy
  • Feedly
  • Telegram
  • Youtube
  • Facebook
  • Instagram
  • LinkedIn
  • Tumblr
  • Pinterest
  • Twitter
  • mastodon

Tags

Active Directory Azure Bitlocker Microsoft Windows PowerShell WDS Windows 10 Windows 11 Windows Deployment Services Windows Server 2016

Copyright © 2025 TechDirectArchive


Loading Comments...
 

You must be logged in to post a comment.