Skip to content

TechDirectArchive

Hands-on IT, Cloud, Security & DevOps Insights

  • Home
  • About
  • Advertise With US
  • Reviews
  • Contact
  • Toggle search form
Home » Windows » How to modify Windows 11 Taskbar via Intune and GPO
  • Ping 4
    Perform continuous ping on OSes and network Appliances Mac
  • windows 11 desktop 1
    Windows 11 Hardware and Software Requirements: Upgrade to Windows 11 Windows
  • BitLocker Loop fix
    Bypassing BitLocker Loop by Unlocking or Disabling or PC Reset Windows
  • trrdf
    Remote Desktop cannot find the computer this in the specified network: Verify the computer name and domain that you are trying to connect Windows Server
  • f97cd picture1 128
    How to disable Windows Hardware Power Button Windows
  • Join Synology NAS to Active Directory Domain and Create New Users
    Create New Users and Join Synology NAS to Active Directory Reviews
  • original
    Error 0x800710E0: Operator or Administrator has refused request Windows Server
  • Grammarly integration with Word on Mac
    Integrate Grammarly in Microsoft Word on Mac Network | Monitoring

How to modify Windows 11 Taskbar via Intune and GPO

Posted on 14/08/202214/12/2023 Imoh Etuk By Imoh Etuk No Comments on How to modify Windows 11 Taskbar via Intune and GPO
Windows-11-taskbar-features-remove-1
Windows 11 Taskbar and Desktop

In this article, we shall discuss How to modify Windows 11 Taskbar via Intune and GPO. Discover the Windows 11 Taskbar, it has been widely embraced since its release by Microsoft. While similar to Windows 10 customization, a.json file replaces the Start Menu section in XML. This guide demonstrates how to modify the Windows 11 Taskbar with ease using Intune and Group Policy Objects. You can also learn how to Hide or Remove the Search Button from Windows 11 Taskbar, how to Hide or Remove the Search Button from Windows 10 Taskbar.

Before you can modify the Taskbar using GPO, you need to create the start layout XML file with the below code. I have created mine as Taskbar.xml and saved it on the Desktop of my PC.

<?xml version="1.0" encoding="utf-8"?>
<LayoutModificationTemplate
    xmlns="http://schemas.microsoft.com/Start/2014/LayoutModification"
    xmlns:defaultlayout="http://schemas.microsoft.com/Start/2014/FullDefaultLayout"
    xmlns:start="http://schemas.microsoft.com/Start/2014/StartLayout"
    xmlns:taskbar="http://schemas.microsoft.com/Start/2014/TaskbarLayout"
    Version="1">
  <CustomTaskbarLayoutCollection PinListPlacement="Replace">
    <defaultlayout:TaskbarLayout>
      <taskbar:TaskbarPinList>
        <taskbar:DesktopApp DesktopApplicationID="MSEdge"/>
        <taskbar:DesktopApp DesktopApplicationID="Microsoft.Windows.Explorer"/>
      </taskbar:TaskbarPinList>
    </defaultlayout:TaskbarLayout>
 </CustomTaskbarLayoutCollection>
</LayoutModificationTemplate>

Removing "PinListPlacement="Replace" from the XML file will simply add pinned apps to the TaskBar and make it different from the default one.

Also see how to create Task Manager Shortcut: How to add access, pin the Task Manager on Windows 11, Microsoft blocks workaround that enables Windows 11 users to avoid its Edge Browser.

Modify the Windows 11 Taskbar using Intune

With the same Configuration Profile employed for the Windows 10 Start Menu layout, we can install a Custom layout on the Windows 11 Taskbar using Intune. Before the end user logging in for the first time, the policy must be implemented.

To do this, login into your Intune account using this link, and click on All Services->Devices-> Windows

All-Services-Windows
All Services in Intune

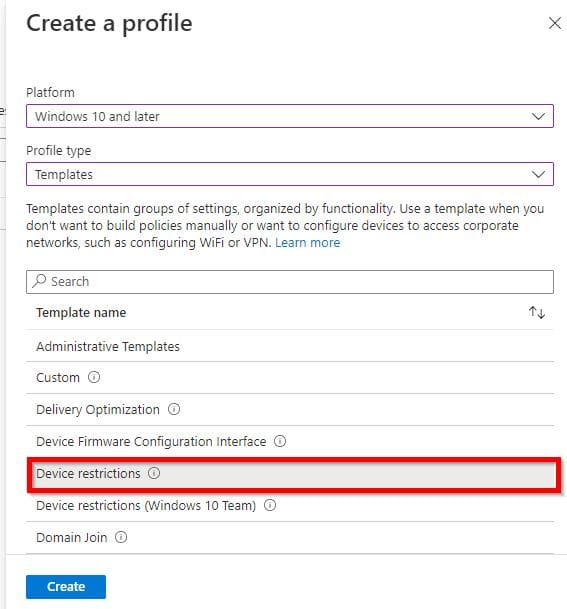
Next, create a configuration profile and select "Device Restriction".

Configuration-Policy
Creating Configuration Profile

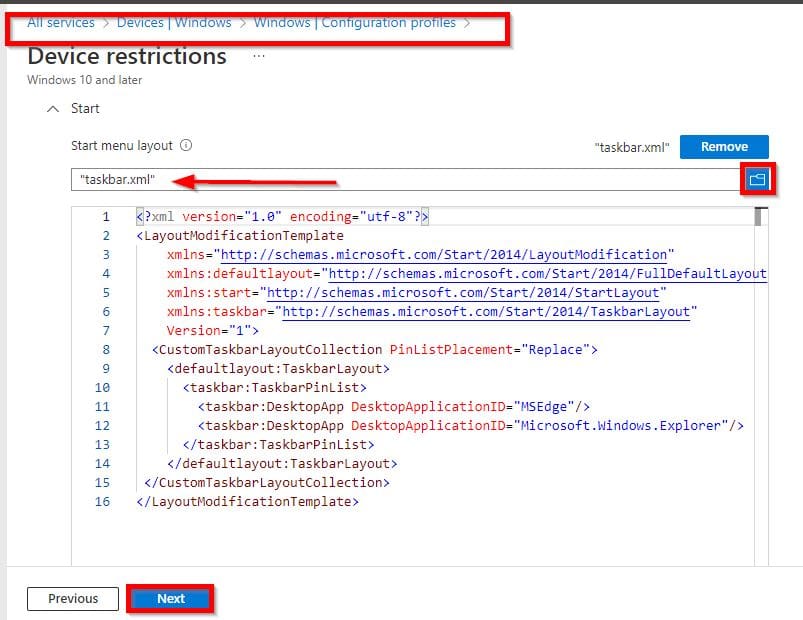
In the Device Restriction tab, click on the "Start" section to import the.xml file to use. I have my XML file saved in a folder named “Custom Taskbar.”

XML-file
Taskbar.xml file

Now import the XML file:

Start-Session-Import-Files
Importing XML File

See how to carry out some other common tasks on Windows 11 in the following guides; how to end a program via the Task Manager in Windows 11, how to enable or disable Screen Saver in Windows 10 or Windows 11 via Windows Settings or Group Policy, and 5 ways to take screenshots on Windows 11.

Enhancing Desktop Navigation with Group Policy

The “Start Layout” policy we utilized for Windows 10 to import the Windows 11 Taskbar and Start Menu layout can also be applied to deploy a personalized Taskbar through Group Policy.

The Taskbar functionality remains unaffected. Place the .xml file on a shared location for client accessibility.

Note: If this approach is utilized, the end user will no longer be able to PIN any apps to the Start Menu. To modify Windows 11 Taskbar using Group Policy, follow the steps below:

1: From the floating on your Windows 11, click on the search for Group Policy

Floating-Taskbar-on-Windows-11
Windows 11 Taskbar

As highlighted in the image below, double-click to open it.

Search-for-GPO
Search for Group Policy

2. In the Local Group Policy window, expand the Computer Configuration tab and navigate to Administrative Templates.

Look for the Start Menu, specifically the Start Menu Layout settings to customize your Windows 11 Taskbar.

Editing-Taskbar-in-Group-Policy
Manage the Taskbar in Windows 11

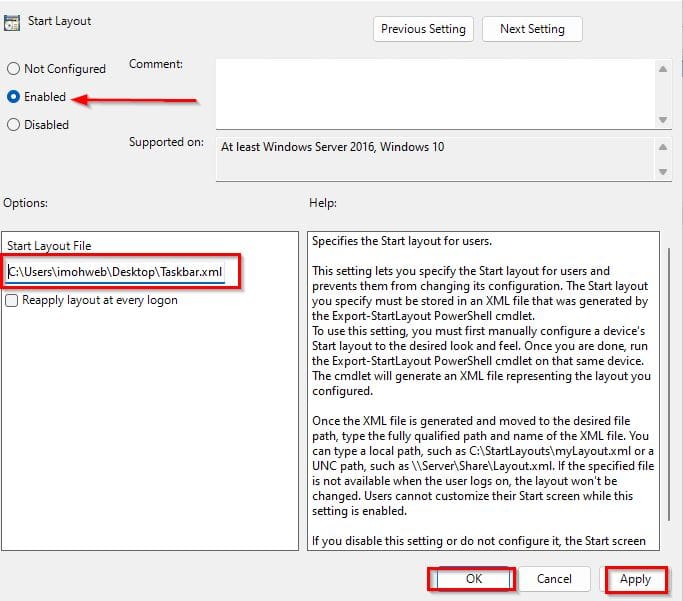
3. Double-click on the Start Layout and select "Enabled". In the Group Policy, you need to point to the “taskbar.xml” file you want the computer to use as shown on the screenshot below.

Modifying-Taskbar
Pointing the Start layout to the Start Layout File

The change the end user made to the Taskbar on the next login will be overwritten if the Group Policy is applied to a computer that has already been deployed.

I hope you found this guide useful on how to modify Windows 11 Taskbar via Intune and GPO. Please feel free to leave a comment below.

Rate this post

Thank you for reading this post. Kindly share it with others.

  • Share on X (Opens in new window) X
  • Share on Reddit (Opens in new window) Reddit
  • Share on LinkedIn (Opens in new window) LinkedIn
  • Share on Facebook (Opens in new window) Facebook
  • Share on Pinterest (Opens in new window) Pinterest
  • Share on Tumblr (Opens in new window) Tumblr
  • Share on Telegram (Opens in new window) Telegram
  • Share on WhatsApp (Opens in new window) WhatsApp
  • Share on Mastodon (Opens in new window) Mastodon
  • Share on Bluesky (Opens in new window) Bluesky
  • Share on Threads (Opens in new window) Threads
  • Share on Nextdoor (Opens in new window) Nextdoor
Windows, Windows Server Tags:Operating System, Windows 11, Windows 11 taskbar

Post navigation

Previous Post: How to fix White Screen in Microsoft Teams
Next Post: Reveal Windows WiFi password of Network you are connected to

Related Posts

  • Featured image new
    How to update the BIOS on your Dell system Security | Vulnerability Scans and Assessment
  • domain14 1
    How To Configure a Domain Password Policy Windows
  • Windows Server 2016 1
    All About Windows Server 2016 Windows Server
  • image 24
    How to Resolve Microsoft RDP Connection Black Screen Windows
  • Groovy
    How to install Groovy on Linux and Windows Configuration Management Tool
  • Slide1 4
    How to create and configure a Shared Folder on Windows Server Windows Server

More Related Articles

Featured image new How to update the BIOS on your Dell system Security | Vulnerability Scans and Assessment
domain14 1 How To Configure a Domain Password Policy Windows
Windows Server 2016 1 All About Windows Server 2016 Windows Server
image 24 How to Resolve Microsoft RDP Connection Black Screen Windows
Groovy How to install Groovy on Linux and Windows Configuration Management Tool
Slide1 4 How to create and configure a Shared Folder on Windows Server Windows Server

Leave a Reply Cancel reply

You must be logged in to post a comment.

Microsoft MVP

VEEAMLEGEND

vexpert-badge-stars-5

Virtual Background

GoogleNews

Categories

veeaam100

sysadmin top30a

  • Ping 4
    Perform continuous ping on OSes and network Appliances Mac
  • windows 11 desktop 1
    Windows 11 Hardware and Software Requirements: Upgrade to Windows 11 Windows
  • BitLocker Loop fix
    Bypassing BitLocker Loop by Unlocking or Disabling or PC Reset Windows
  • trrdf
    Remote Desktop cannot find the computer this in the specified network: Verify the computer name and domain that you are trying to connect Windows Server
  • f97cd picture1 128
    How to disable Windows Hardware Power Button Windows
  • Join Synology NAS to Active Directory Domain and Create New Users
    Create New Users and Join Synology NAS to Active Directory Reviews
  • original
    Error 0x800710E0: Operator or Administrator has refused request Windows Server
  • Grammarly integration with Word on Mac
    Integrate Grammarly in Microsoft Word on Mac Network | Monitoring

Subscribe to Blog via Email

Enter your email address to subscribe to this blog and receive notifications of new posts by email.

Join 1,825 other subscribers
  • RSS - Posts
  • RSS - Comments
  • About
  • Authors
  • Write for us
  • Advertise with us
  • General Terms and Conditions
  • Privacy policy
  • Feedly
  • Telegram
  • Youtube
  • Facebook
  • Instagram
  • LinkedIn
  • Tumblr
  • Pinterest
  • Twitter
  • mastodon

Tags

AWS Azure Bitlocker Microsoft Windows PowerShell WDS Windows 10 Windows 11 Windows Deployment Services Windows Server 2016

Copyright © 2025 TechDirectArchive


Loading Comments...
 

You must be logged in to post a comment.