What you need to know about Microsoft Defender Antivirus

In this article, the emphasis on “What you need to know about Microsoft Defender Antivirus”. Microsoft Defender Antivirus is a next-generation protection component of Microsoft Defender for Endpoint. It combines machine learning, big data analysis, in-depth threat research, and the Microsoft cloud infrastructure to protect endpoints across your organization. Please, see how to Set Microsoft Defender AV to Passive mode on a Windows Server, and how to fix “Unable to run downloaded Programs due to Defender SmartScreen“.
Built into Windows, Microsoft Defender Antivirus works seamlessly with Microsoft Defender for Endpoint to deliver protection both on the device and in the cloud. Microsoft Defender Antivirus can detect and block nearly all malware within milliseconds, even on first encounter. It operates effectively in both online and offline environments. In addition to traditional detection methods, it can stop threats based on suspicious behavior and process patterns, even after execution has begun. This includes advanced threats like fileless malware.
Microsoft Defender Antivirus uses advanced protection techniques to block new and evolving threats almost instantly. By analyzing massive volumes of connected threat data through the Microsoft Intelligent Security Graph. It leverages powerful AI and sophisticated machine learning models to detect and stop attacks in real time.
Note: If you are using non-Microsoft antivirus/antimalware solution. You will also be able to run Microsoft Defender Antivirus alongside the other antivirus solution as shown below if you want.

When enabled, you will be able to perform quick scans, and manage your Virus and threat protection settings as shown below.

Also, see How to set up the OOTBI Virtual Appliance on Proxmox VE, how to Resolve the Update Package Database failure on Proxmox VE, and the Remote Desktop Connection behaviour over UDP and TCP.
Why Choose Microsoft Defender Antivirus?
On Windows devices, Microsoft Defender Antivirus is shipped as part of the OS and enabled by default. However, on endpoints protected with a non-Microsoft antivirus (AV) or antimalware application as we have seen in the image above.
Microsoft Defender Antivirus will automatically disable itself. Identifying the current AV solution in place, and any secondary support, is imperative to understand what level of protection you have. And which solutions are turned on and actively protecting your organization.
Note: On Windows client devices enrolled in Microsoft Defender for Endpoint that use a non-Microsoft antivirus solution as the primary antivirus, Microsoft Defender Antivirus runs in passive mode. In this mode, real-time protection is handled by the primary antivirus solution, and Microsoft Defender Antivirus does not perform active threat remediation or real-time scanning as you can see in the image above.
Note: On Windows Server, Microsoft Defender Antivirus will not automatically enter passive mode if you have also installed a third-party antivirus product. If you install a third-party antivirus product on Windows Server. You must manually set Microsoft Defender Antivirus to passive mode to avoid conflicts between multiple antivirus solutions on the same machine. Please, see how to Set Microsoft Defender Antivirus to Passive or Active Mode. Note: Having multiple antivirus solutions on a system may strain resources and caused performance issues on the system.
Please, see how to analyze group policies applied to a user and computer account. Here is a guide on “What is GPO and how can it be launched in Windows“. Also, see how to Manage Microsoft Defender Antivirus with Argon ACMP.
Cloud Protection with Microsoft Defender Antivirus
Cloud protection enhances Microsoft Defender Antivirus by delivering fast, accurate, and intelligent threat detection. It works in real time with Microsoft’s cloud services and also known as Microsoft Advanced Protection Service (MAPS). This helps strengthen the traditional antivirus defenses as shown in the image below.

When enabled, cloud protection uses distributed computing, machine learning, and the Microsoft Intelligent Security Graph to rapidly detect and block emerging threats before they reach a single device. Unlike protection limited to cloud-stored files, this service actively defends endpoints by processing threat data far faster than traditional definition updates.
By default, cloud protection is turned on as shown below. However, if prior organizational policies disabled it. You may need to manually re-enable it. As shown below, real-time protection is turned off because a third-party antivirus solution is currently active

Tamper protection helps protect against unwanted changes to your organization’s security settings.
Note: If you manage Microsoft Defender Antivirus settings using Group Policy, know that tamper-protected settings ignore any changes you make. When tamper protection blocks your changes on a device, use troubleshooting mode to temporarily disable tamper protection. After troubleshooting mode ends, the device reverts tamper-protected settings to their configured state. To permanently change tamper-protected settings, temporarily disable tamper protection, make your changes, and then turn tamper protection back on.
Please, see Protect Microsoft Defender Settings with Tamper Protection, and a guide on Tamper Protection for Microsoft Defender on Windows 10 [Part 1].
Benefits of Running Microsoft Defender Antivirus in Passive Mode with a Third-Party AV
This section describes the reasons to employ Microsoft Defender Antivirus alongside a 3rd party AV solution such as Trellix, Microsoft defender for Endpoint etc. In this Microsoft guide, you will find 13 reasons to Microsoft Defender Antivirus together with the Microsoft Defender for Endpoint.
Note: Running Microsoft Defender Anti virus with Cloud protection provide near real-time alerts and detections, even if Defender Antivirus isn’t the active AV
Layered Defense and Automatic Failover
Enabling Microsoft Defender Antivirus in passive mode, even when using a third-party antivirus solution, adds an extra layer of security and serves as a failsafe in case the primary AV is compromised or disabled.
If an attacker successfully disables your third-party antivirus, Microsoft Defender Antivirus can automatically switch from passive to active mode and begin providing protection. This automatic behavior helps maintain endpoint security continuity. This is a key advantage in a layered defense strategy.
Active vs Passive Mode
Mote: If the Windows Security Center service is disabled on Windows clients, Microsoft Defender Antivirus will not be able to detect third-party antivirus installations and will remain active. This can cause conflicts between the Microsoft Defender antivirus and the third-party antivirus program, as both try to provide active protection. Ensure this services is running.

If you have a third-party antivirus/antimalware solution on your PC, you will be able to run Microsoft Defender Antivirus in passive mode alongside the non-Microsoft (3rd party) antivirus solution as discussed above.
| Mode | Explanation |
|---|---|
| Active mode | In active mode, Microsoft Defender Antivirus is used as the primary antivirus app on the device. Files are scanned, threats are remediated, and detected threats are listed in your organization’s security reports and in your Windows Security app. |
| Passive mode | In passive mode, Microsoft Defender Antivirus is not used as the primary antivirus app on the device. Files are scanned, and detected threats are reported, but threats are not remediated by Microsoft Defender Antivirus. Microsoft Defender Antivirus can run in passive mode only on endpoints that are onboarded to Microsoft Defender for Endpoint. |
| Disabled or uninstalled | When disabled or uninstalled, Microsoft Defender Antivirus is not used. Files are not scanned, and threats are not remediated. In general, we do not recommend disabling or uninstalling Microsoft Defender Antivirus. |
Note: Note that in Windows 11, when SmartAppControl is enabled, they may notice that Microsoft Defender Antivirus switches to passive mode instead of remaining in disabled mode. However, this isn’t the same scenario as for devices that are onboarded with Microsoft Defender for Endpoint.
Behavior of Windows Server with Microsoft Defender for Endpoint
Starting with platform version 4.18.2208.0 and later, Windows Defender Antivirus on Windows Server 2012 R2 and newer will no longer be completely disabled by the “Disable Windows Defender” Group Policy setting if the server is integrated with Microsoft Defender for Endpoint.
Instead, it enters passive mode. Additionally, tamper protection allows switching to active mode, but it does not allow switching to passive mode.
- If “Disable Windows Defender” is already present in Microsoft Defender for Endpoint before onboarding, no change is made and Defender Antivirus remains disabled.
- To switch Defender Antivirus to passive mode, you can apply the ForceDefenderPassiveMode configuration with the value even if it was disabled before onboarding. To put it in active mode, set this value to instead.
10
Here is a guide on “Remote Server Administration Tools: To install RSAT on Windows Server“, and what is Group Policy Object and how can it be launched in Windows.,
PowerShell cmdlets for Microsoft Defender Antivirus
Windows includes a built-in antimalware solution called Microsoft Defender Antivirus. Although its user interface has evolved over time, you can manage the tool through several other methods, including Group Policy, PowerShell, Windows Security, Microsoft Endpoint Manager, and more.
The Defender PowerShell module, included with Windows, lets administrators manage Microsoft Defender Antivirus without using the graphical user interface (GUI). This approach is especially useful for automation, scripting, and managing systems that lack a GUI, such as Windows Server Core.
You can check the status of Microsoft Defender Antivirus in several ways by using the Windows Security app or running specific PowerShell commands to view its current state on the device.
Below is an image showing an overview of the available PowerShell cmdlets for Microsoft Defender. To get the Defender Cmdlets, launch PowerShell with administrative rights and execute the following below.
Get-Command -Module Defender
Please, see how to fix Missing Windows Defender? Install and manage Microsoft Defender via Windows Security on Windows Server, and Why use RSAT? How to Install RSAT on Windows 10.
State of Microsoft defender via Powershell
Before using any of the cmdlets available in the “Defender” module, you probably would be sure that all the Microsoft Defender-related services are up and running: this can be easily checked by using the Get-Service cmdlet. Let’s perform some filtering of its output as shown below.
Get-Service | Where-Object { $_.DisplayName -like "*Defender*" } | Select-Object Status, DisplayName
To get the status of the antimalware protection software installed on the computer. Simply type the command below and press ENTER. This will display a bunch of properties related to the status of Microsoft Defender
Get-MpComputerStatus
Antimalware Protection Status Properties
Each of these properties provides you with information about the status of Microsoft Defender. Let’s take a look at some of them:
- AMEngineVersion: version of the antimalware engine
- NISEngineVersion: version of the network inspection system engine
- AMServiceEnabled: activation of the antimalware service
- AMProductVersion: antimalware client version
- AMServiceVersion: antimalware service version
- AntispywareEnabled: antispyware protection activation status
- AntispywareSignatureLastUpdated: threat definitions’ creation date
- AntispywareSignatureVersion: antivirus signatures version
- AntivirusSignatureVersion: antispyware signatures version
- NISSignatureVersion: network inspection system signatures version
- AntivirusEnabled: antivirus protection activation status
- AntivirusSignatureLastUpdated: date and time of last update for the antivirus signatures
- FullScanAge: number of days since the last system’s full scan
- FullScanEndTime: end date and time of the last full scan of the system
- FullScanStartTime: start date and time of the last full scan of the system
- NISEnabled: network inspection system activation status
- NISSignatureLastUpdated: date and time of the last update for the network inspection system’s signatures
- QuickScanAge: number of days since the last quick scan of the system
- QuickScanEndTime: end date and time of the last quick scan of the system
- QuickScanStartTime: start date and time of the last quick scan of the system
- RealTimeProtectionEnabled: real-time protection activation status
In the list of results above, look at the AMRunningMode row. Normal means Microsoft Defender Antivirus is running in active mode. Passive mode means Microsoft Defender Antivirus running, but is not the primary antivirus/antimalware product on your device.
Working with Defender Preferences
The Windows Defender preferences can be viewed or manipulated by using a group of four cmdlets: Get-MpPreference, Set-MpPreference, Add-MpPreference, and Remove-MpPreference.
The Get-MpPreference cdmlet gets and displays the current preferences for Windows Defender scans and updates.
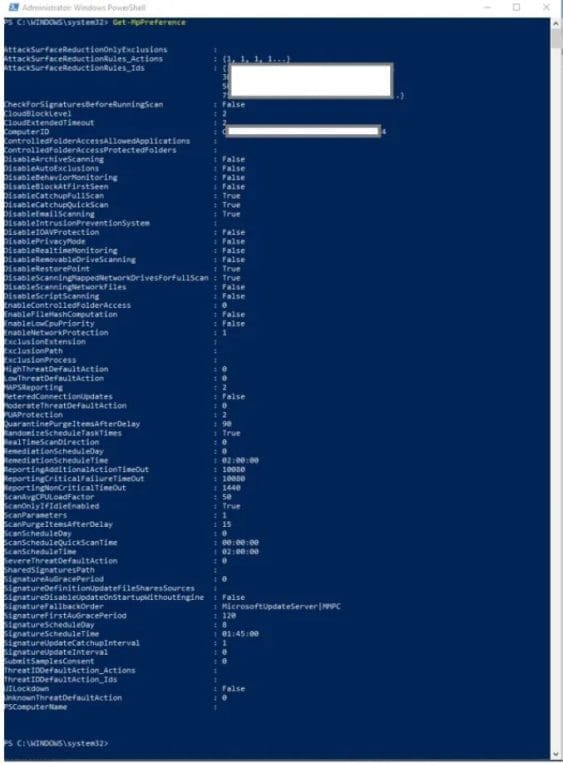
The cmdlet’s execution displays a huge set of properties, such as:
- CheckForSignaturesBeforeRunningScan: if $True, Windows Defender will check for new virus and spyware definitions before running a scan
- DisableArchiveScanning: if set to either 0 or $False or not specified, Windows Defender scans archive files
- ExclusionExtension: specifies an array of file name extensions to exclude from scheduled, custom and real-time scanning.
- ExclusionPath: specifies an array of file paths to exclude from scheduled and real-time scanning; specifying a folder will exclude all the files under the folder.
- ExclusionProcess: specifies an array of paths to process images; any files opened by the specified processes will be excluded from scheduled and real-time scanning (the processes themselves will not be excluded).
The -CimSession parameter can be used to run the cmdlet in a remote session or on a remote computer.
Adding and Removing Windows Defender Preferences
The Set-MpPreference cmdlet configures preferences for Windows Defender scans and updates. The Add-MpPreference cmdlet modifies settings for Windows Defender. The parameters for this cmdlet allows the user to
- ExclusionPath: add exclusions for file name paths
- ExclusionExtension: add exclusions for file name extensions
- ExclusionProcess: add exclusions for file name processes
- ThreatIDDefaultAction_Actions: specify an array of the actions to take for the IDs specified by using the ThreatIDDefaultAction_Ids parameter; the acceptable values for this parameter are
- 1: Clean
- 2: Quarantine
- 3: Remove
- 4: Allow
- 8: UserDefined
- 9: NoAction
- 10: Block
- ThreatIDDefaultAction_Ids specify an array of threat IDs to apply the dafult action to
Removing Windows Defender Preferences
The Remove-MpPreference cmdlet removes exclusions or default actions; it can be used to remove exclusions for file name extensions, paths and processes, or default actions for high, moderate and low threats. The parameters for this cmdlet allows the user to
- Force: force the cmdlet’s execution without user confirmation
- HighThreatDefaultAction: remove the automatic remediation action specified for the high threat alert level
- LowThreatDefaultAction: remove the automatic remediation action specified for the low threat alert level
- ModerateThreatDefaultAction: remove the automatic remediation action specified for the moderate threat alert level
- SevereThreatDefaultAction: remove the automatic remediation action specified for the severe threat alert level
- ThreatIDDefaultAction_Ids: array of threat IDs for which the default action must be removed
- ThrottleLimit: maximum number of concurrent operations that can be established to run the cmdlet; if 0 or omitted, an optimum throttle limit for the cmdlet based on the number of CIM cmdlets that are running on the computer is calculated
- UnknownThreatDefaultAction: remove the automatic remediation action specified for the severe threat alert level
Updating Antimalware Definitions
To update antimalware definitions with the latest definitions available simply execute the Update-MpSignature cmdlet.

Perform Scans
To Perform Scans via the Windows Security App and PowerShell. Kindly take a look at this guide “Ways to perform Microsoft Defender scans: How to find and remove Malware with Microsoft Defender Offline“.
The -ScanType parameter allows the user to specify the type of scan to be performed: the acceptable values for this parameter are: FullScan, QuickScan, and CustomScan.

Via the Windows Security

Removing Threats from the System
If one or more threats have been detected in the system, removal is a very simple action. All you need to do is execute the “Remove-MpThreat Jump” cmdlet to remove all of them.
Remove-MpThreat JumpGetting Threats information
Note: There are three cmdlets aimed at getting and displaying information about threats: Get-MpThreats, Get-MpThreatDetection, and Get-MpThreatCatalog.
The Get-MpThreat cmdlet gets the history of threats that Windows Defender detected on the computer; if you want information about a specific threat, use the -ThreatID parameter and pass an array of threat IDs.
Getting active and past malware threats
The Get-MpThreatDetection cmdlet gets active and past malware threats that Windows Defender detected in the system; if you want information about a specific threat, use the -ThreatID parameter and pass an array of threat IDs.
Getting known threats from the definitions catalog. The
Get-MpThreatCatalogcmdlet displays information about known threats from the definitions catalog; as per the previous two cmdlets.
If you want information about a specific threat, use the -ThreatID parameter and pass an array of threat IDs.

Microsoft Defender for Business
Expressly designed for business security, this includes Microsoft Defender Antivirus, plus a full Endpoint Detection and Response (EDR) suite and ideal for Small to mid-sized businesses (up to 300 users)..
With this, you can discover, prioritize, and remediate software vulnerabilities and misconfigurations that pose the most urgent and highest risk to your business. You can read more here.


Microsoft Defender for Endpoint
Microsoft Defender for Endpoint secures enterprise networks by helping them prevent, detect, investigate, and respond to advanced threats. It protects a wide range of endpoints, including laptops, phones, tablets, PCs, access points, routers, and firewalls.
Note: This solution is ideal for enterprise -grade solution for larger organizations or businesses with complex environments. This comes in two plan, Plan 1 ( similar to Microsoft Defender for Business), and Plan 2, adds advanced hunting, sandboxing, custom detection rules, and integration with Microsoft Sentinel etc. Kindly refer to the following link and image below for more information on Microsoft Defender for Endpoint.

Microsoft Defender
The family or personal version of Microsoft Defender, included with Microsoft 365 Family and Microsoft 365 Personal (formerly Office 365), provides real-time malware protection across multiple platforms such as Windows, macOS, iOS, and Android.
It lets individuals and families monitor all their devices through a centralized security dashboard. Please, here is a link for more information on Microsoft Defender.
For a list of other Microsoft suite of security products not discussed in this guide, kindly take a look at this link.
FAQs
Can Tamper Protection be disabled by attackers?
When you turn on tamper protection, it blocks changes to tamper-protected settings. To avoid breaking management experiences, including Intune and Configuration Manager. Please, remember that changes you make to tamper-protected settings might seem to succeed but the tamper protection actually blocks them. Tamper protection allows you to view your security settings. Tamper protection does not affect how non-Microsoft antivirus apps register with the Windows Security app.
How can I use PowerShell to determine whether tamper protection and real-time protection are turned on?
Open the Windows PowerShell app. Use the Get-MpComputerStatus PowerShell cmdlet.
In the list of results, look for IsTamperProtected and RealTimeProtectionEnabled. The value of true means tamper protection is enabled.
Why do I see the Microsoft Defender app installed after installing Microsoft 365 apps on my Windows device?
When you install Microsoft 365 apps (like Word, Excel, etc.) on your Windows device, the Microsoft Defender app is automatically included. If you installed Microsoft 365 before the Defender app was released but still have an active Microsoft 365 Family or Personal subscription, the Defender app was added later through an update. This app provides an extra layer of security and centralized threat monitoring across your devices.
Am I running in Passive mode?
You can determine if Microsoft Defender Antivirus is running in Passive Mode on a Windows Server, especially when another antivirus or endpoint protection platform like Trellix, Symantec, or CrowdStrike is installed. To check this, use PowerShell as shown below.Get-MpComputerStatus | Select-Object AMRunningMode
You could use Windows Registry as well, where a value of 0 means Passive Mode is disabled, while a value of 1 means Passive Mode is enabled.HKEY_LOCAL_MACHINE\SOFTWARE\Microsoft\Windows Defender
I hope you fund this post on “What you need to know about Microsoft Defender Antivirus” vey useful. Please, feel free to leave a comment below.