
In this article, we shall discuss “Azure Application Gateway: Practical Configuration Guide”. This post provides a practical, real-world inspired walkthrough for configuring an Azure Application Gateway. The goal is to help engineers quickly understand how to design, name, and connect all required components for a production-ready setup. Please see Azure Managing Subscriptions with PowerShell: From Login-AzAccount to Resource Control and Private Endpoint Verification for Azure File Share”, and how to Assign a Public IP to Azure Virtual Machine (VM).
Architecture Overview
An Azure Application Gateway acts as a Layer 7 load balancer that routes traffic based on URL, host, or headers. Key components include:
- Listener (entry point)
- Backend Pool (target services)
- Backend Settings (protocol, port, timeout)
- Health Probe (availability check), and
- Routing Rule (binding logic) Sample Request

Naming Convention Strategy
A consistent naming convention is critical for maintainability.
Standard format:
<service>.<project>.<country>.<suffix>

Examples:
- svc-alpha-resubmit.prjx.eu.listener
- svc-alpha-resubmit.prjx.eu.probe
- svc-alpha-resubmit.prjx.eu.rule
Step 0 – Choose the Application Gateway
Select the correct gateway instance where the configuration will be applied (e.g., AppGw-Main).
Tip: avoid duplicating gateways unless required for isolation or performance.
Please see Azure Arc for SQL Server PAYG: Installation, Connectivity Requirements and Operational Best Practices, and how to Fix Vulnerable Veeam Backup and Replication 13.0.1.2067 and Earlier.
Step 1 – Backend Pool
Create or reuse a backend pool.
- Define target VMs or services by IP
- Ensure network connectivity (NSG, routing)
- Group services logically
In this case, it is not necessary; it already exists. If it needs to be created, the client must specify the destination VMs, which must then be identified by their IP addresses.

Please see how to Integrate Trellix ePolicy Orchestrator with a Syslog Server, Veeam Backup and Replication: PowerShell must be Remote Signed, and how to Prevent Automatic Driver Updates in Windows and Xen-Orchestra.
Step 2 – Listener
Decide on the ‘standard names’ to be used for new items: to construct the ‘standard name’, you will need the three columns ‘Service’, ‘Prj’ and “Country”
These ‘standard names’ will be followed by the suffixes of the objects created (.listener, .probe, etc.)
Create a listener to accept incoming traffic.
- Bind hostname (if needed)
- Use HTTPS whenever possible
- Follow naming convention
| svc-alpha-resub.be.probe |
| svc-alpha-erp.be |
Next, create the listener:
add the suffix ‘.listener’ to the standard name:

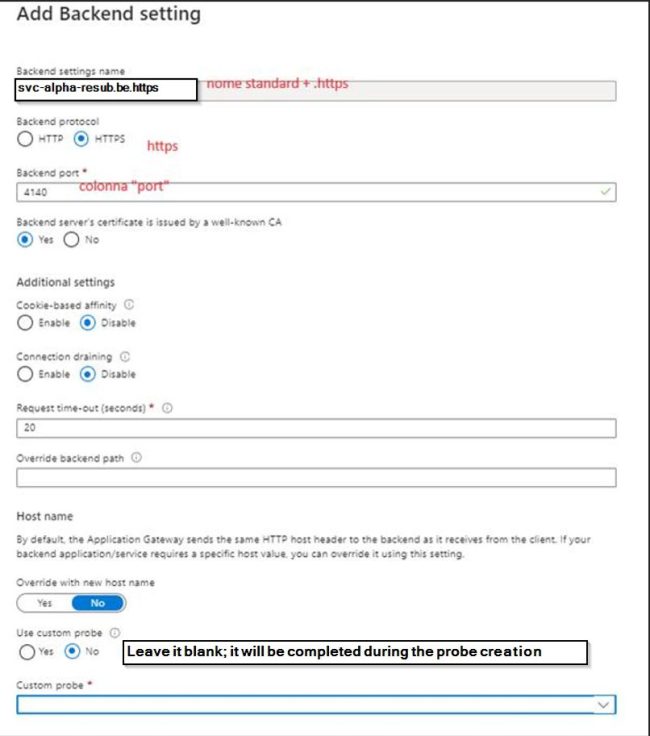
Step 3 – Backend Settings
Add the suffix ‘.https’ to the standard name. Define how traffic is forwarded:
- Protocol (HTTP/HTTPS)
- Port
- Timeout
- Cookie-based affinity (if needed)
Step 4 – Health Probe
add the suffix ‘.probe’ to the standard name. Configure a probe to monitor backend health:
- Use specific endpoint (not just ‘/’)
- Match expected HTTP codes
- Tune interval and timeout

Please see Switch from IP Addresses to DNS for Backup Infrastructure in VBR, how to remove a Repository from Veeam Backup and Replication, and how to Update Veeam Backup & Replication to Build 13.0.1.2067.
Step 5 – Routing Rule
add the suffix ‘.rule’ to the standard name. Create the rule that connects everything:
- Listener → Backend Pool → Settings → Probe
- Validate routing priority and specificity


Best Practices
– Always use HTTPS with valid certificates
– Prefer dedicated health endpoints (e.g., /health)
– Avoid overly generic probes
– Use clear, consistent naming
– Monitor with Azure metrics and logs
– Apply WAF if exposed externally
Troubleshooting Tips
– 502 errors often indicate backend unreachable or probe failure
– Check NSG and routing rules first
– Verify probe path returns expected status code
– Use Azure diagnostics logs for deeper analysis


