Skip to content

TechDirectArchive

Hands-on IT, Cloud, Security & DevOps Insights

  • Home
  • About
  • Advertise With US
  • Reviews
  • Contact
  • Toggle search form
Home » Windows » How to Configure Network Load Balancing on Windows Server
  • RDP Certificate Issues
    Connecting to the RDP host: Fix the Certificate could not be verified back to the root certificate Mac
  • APACHECASS FEATURE
    How to Install and Configure Apache Cassandra on Linux Server Linux
  • Header picture 1
    Find BIOS Serial Number and System Information on Windows 11 Windows
  • Featured image Windows Security
    How to clear Cache and Manually Update Microsoft Defender Anti-Virus Solution
  • Missing ADML File
    Fix an appropriate resource file could not be found for LAPS Windows
  • VBAWS comprehensive guide
    Deep Dive into Protecting AWS EC2, RDS Instances and VPC AWS/Azure/OpenShift
  • nonexistent AD
    Fix Active Directory Domain Controller (AD DS) for this domain could not be contacted Windows Server
  • BitLocker Recovery Password Rotation in Active Directory
    Perform BitLocker Recovery Password Rotation in Active Directory Windows Server

How to Configure Network Load Balancing on Windows Server

Posted on 21/12/202123/10/2024 Christian By Christian No Comments on How to Configure Network Load Balancing on Windows Server
Capture-37

Services and applications that are affected by high load require technologies to address this issue. Network Load Balancing is a technology that allows system administrators to configure clusters that distribute traffic between several servers. In this article, I will show you how to Configure Network Load Balancing on Windows Server. Please see How to Setup Public Load Balancer in Azure, How to Create a load balancer for Azure Stack Hub, How to disable power plan in Windows via GPO and Windows,

Suppose you have a website that receives a large number of requests and cannot be handled by one server.

In this case, you would configure a NLB cluster to distribute traffic across multiple web servers and thus ensuring that the website can serve all requests.

Also, see how to configure a remote server (windows) to Support Ansible, and how to deploy Azure VMware solution private cloud, how to fix Failover Cluster Manager failed while managing one or more clusters, the error was unable to determine if the computer exists in the domain.

Add Network Load Balancing Role on Windows Server

Open your VM server manager and then select Add Roles and Features.

Capture-9

Then click Next. Please see the steps in Deploying a load balancer from scratch and adding backend servers.
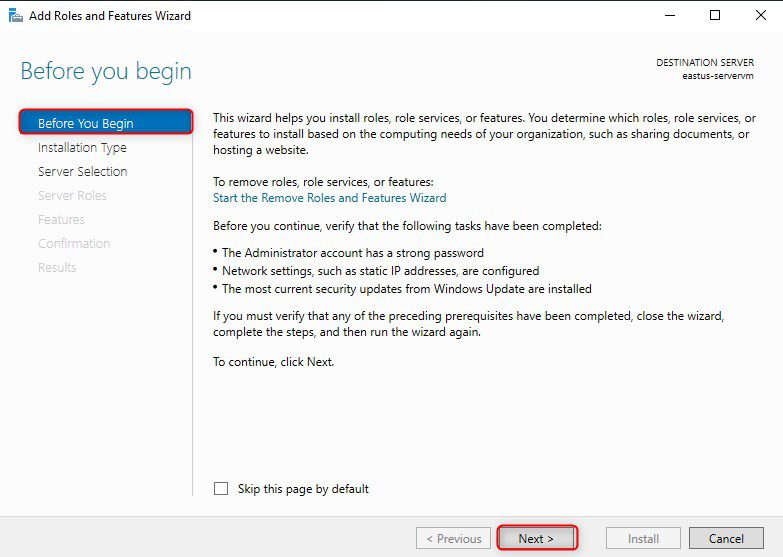
Capture-10

Click Next.

Capture-11

Select your server name from the server pool and then click Next.

Capture-12

Check the WEB Server (IIS) roles box, click add features, then select Next.

Capture-13

Check the Network Load Balancing box, click add features, then select next.

Capture-14

Now, click Next.

Capture-15

Click Next.

Capture-16

Click Install.

Capture-17

Configuring Network Load Balancing in Windows Server 2019 After installing the Network Load Balancing feature on all the participating NLB nodes, the subsequent step is to configure Network Load Balancing. For this, you would like to perform the subsequent steps.

Please see how to manage azure resource manager resource groups by using Azure CLI, and how to configure azure resources with tools. Also, see how to install and configure Ansible on Ubuntu.

Create a New Cluster

On the Server Manager console of the SRV2019-1 NLB node. Click Tools and then choose Network Load Balancing Manager.

Capture-18

Right-click Network Load Balancing Clustering and then choose New Cluster

Capture-19

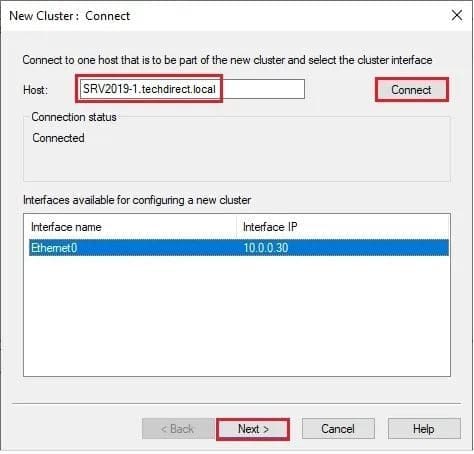
On the New Cluster: Connect panel, type SRV2019-1.techdirect.local (or IP Address) in the Host field then click Connect. Verify that the Interface name is listed then click next.

Capture-20

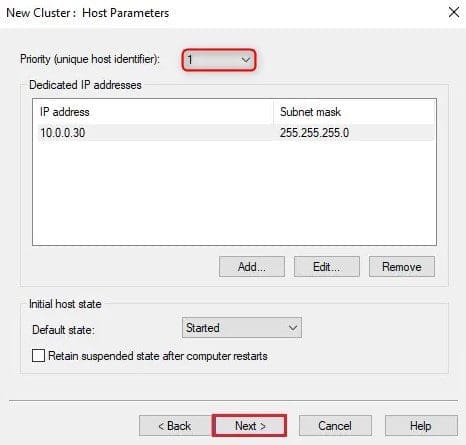
On the New Cluster, set the priority (unique host identifier) value 1. This NLB node will reply to the clients’ queries, first, also ensure that the default status has set as Started and click next.

Capture-21

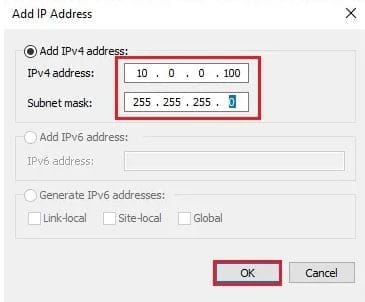
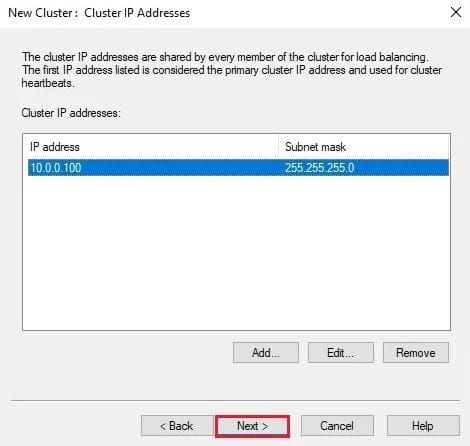
Click the Add button to add a new Cluster IP address.

Capture-22
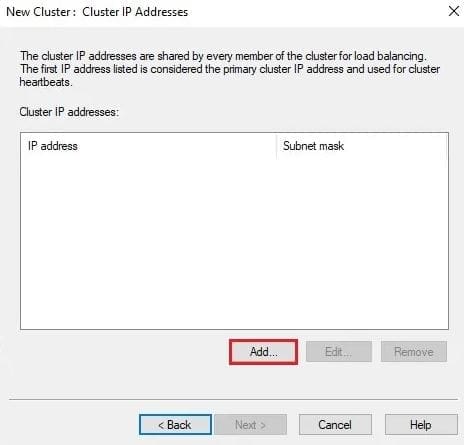
PS Note: The Cluster IP address is the new virtual IP address on which the host service, during this case, IIS will run.

Type Cluster IP Address such as 10.0.0.100 and click ok.

Capture-23

Then click Next.

Capture-24

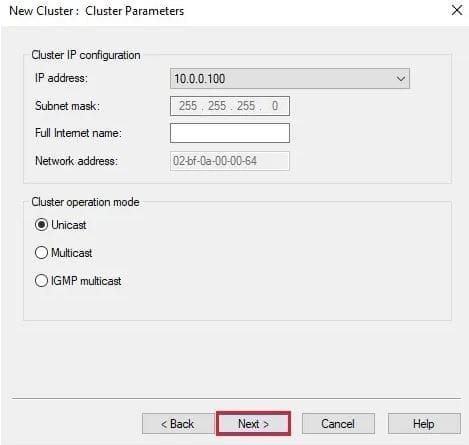
On the New dialog box, Select a cluster operation mode, Unicast and then click next.
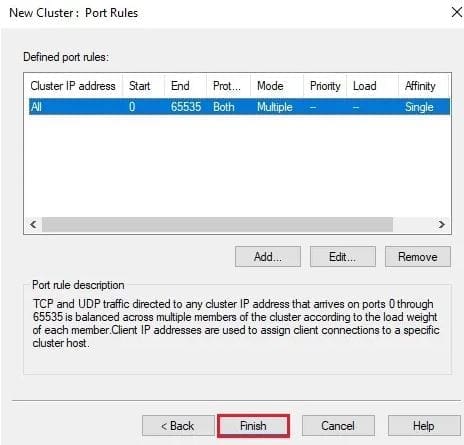
Capture-25

Then click Finish

Capture-27

Then wait until the SRV2019-1 NLB node is added successfully. The Icon Color of the added NLB node should be green.

Capture-28

Right-click on the Cluster name and then select Add Host to Cluster.

Capture-29

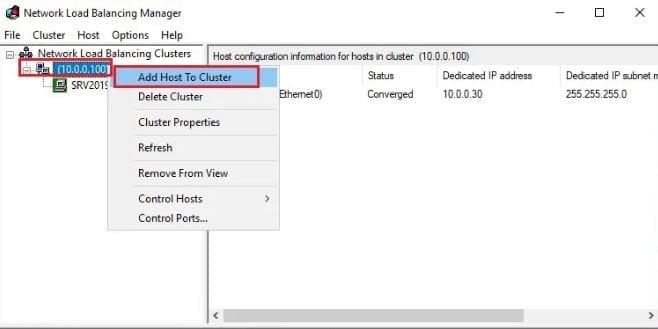
Connect dialog box, type SRV2019-2, and then click Connect to add one more NLB node, and click next.

Capture-30

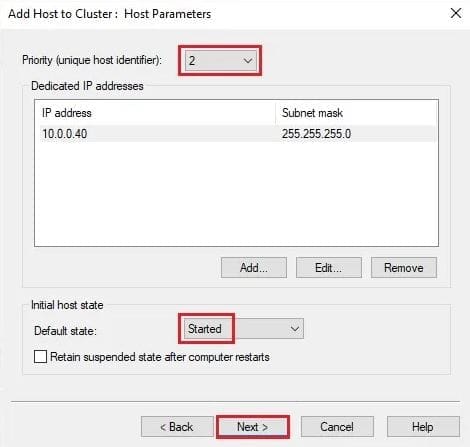
On the Add Host to Cluster Dialog box: Host Parameters dialog box, set the priority value as 2 and proceed to next.
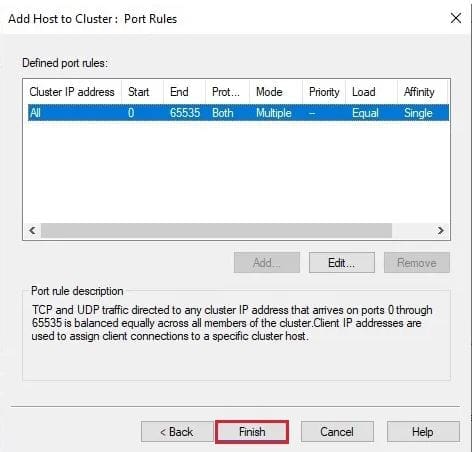
Capture-31

Then click Finish

Capture-32

Finally, verify that the second NLB node SRV2019-1 is added successfully.

Capture-33

Please see how to install Ansible on Windows with Cygwin, how to automate infrastructure deployments in the cloud with ansible and azure pipelines, and how to install Kerberos packages in Windows via Cygwin.

Verifying Network Load Balancing Configuration

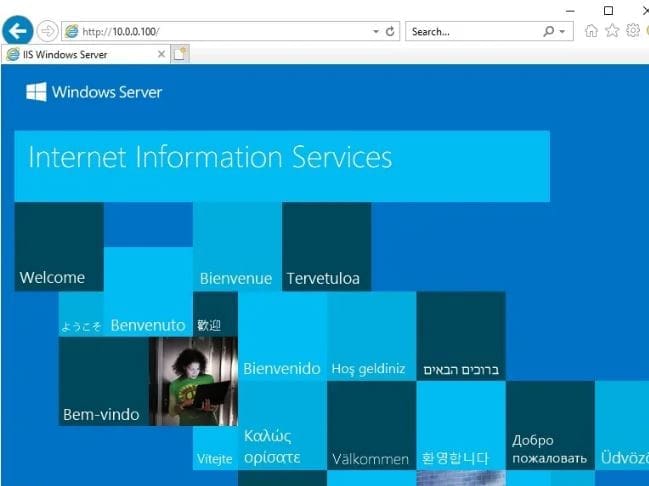
To verify that your NLB Cluster is configured successfully and functioning properly, perform the subsequent steps. Type 10.0.0.100 within Internet Explorer and verify that you simply are ready to access the Default Webs

Capture-34

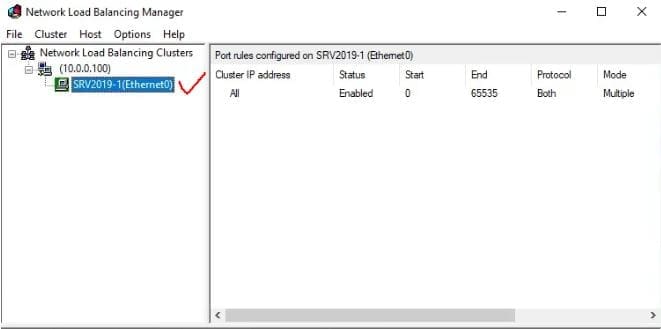
Close Internet Explorer. On the SRV2019-1 node. Then open the Network Load Balancing Manager window, select and right-click SRV2019-1(Ethernet), select Control Host and then select Stop to stop this node temporarily.

Capture-35

Then switch back to SRV2019-DC and try again to open the Default Website. the Default Website should still be displayed. However, this time, the SRV2019-2 NLB node will serve the Website.

Capture-34

I hope you found this article useful on how to Configure Network Load Balancing In Windows Server. Please let me know in the comment section if you have any questions.

5/5 - (1 vote)

Thank you for reading this post. Kindly share it with others.

  • Click to share on X (Opens in new window) X
  • Click to share on Reddit (Opens in new window) Reddit
  • Click to share on LinkedIn (Opens in new window) LinkedIn
  • Click to share on Facebook (Opens in new window) Facebook
  • Click to share on Pinterest (Opens in new window) Pinterest
  • Click to share on Tumblr (Opens in new window) Tumblr
  • Click to share on Telegram (Opens in new window) Telegram
  • Click to share on WhatsApp (Opens in new window) WhatsApp
  • Click to share on Pocket (Opens in new window) Pocket
  • Click to share on Mastodon (Opens in new window) Mastodon
  • Click to share on Bluesky (Opens in new window) Bluesky
  • Click to share on Threads (Opens in new window) Threads
  • Click to share on Nextdoor (Opens in new window) Nextdoor
Backup, Windows, Windows Server

Post navigation

Previous Post: How to enable Amazon S3 default bucket encryption using S3 Console
Next Post: Install and manage IP Address Management on Windows Server

Related Posts

  • 1 WeXxkEX0JG3oB781HD8Hrg 1
    How to convert a GPT disk into an MBR disk error: Windows cannot be installed on drive 0 Partition 1 Windows
  • windows update 03
    Fix Windows cannot check for updates in Windows 8, 7, and 10 Windows
  • BitLocked suspended and resumed
    Query MBAM-protected Client for non-compliance [Part 2] Windows
  • Disk Cleanup
    Create Disk Cleanup Shortcut: Perform disk cleanup in Windows Windows
  • 1 kajkbmlyehn0inifwrh 8w
    How to install Kerberos packages with Cygwin on Windows Windows Server
  • microsoft warns windows 10 cumulative update kb4494441 breaks down some websites 526066 2
    Launch an application automatically during startup on Windows Windows

More Related Articles

1 WeXxkEX0JG3oB781HD8Hrg 1 How to convert a GPT disk into an MBR disk error: Windows cannot be installed on drive 0 Partition 1 Windows
windows update 03 Fix Windows cannot check for updates in Windows 8, 7, and 10 Windows
BitLocked suspended and resumed Query MBAM-protected Client for non-compliance [Part 2] Windows
Disk Cleanup Create Disk Cleanup Shortcut: Perform disk cleanup in Windows Windows
1 kajkbmlyehn0inifwrh 8w How to install Kerberos packages with Cygwin on Windows Windows Server
microsoft warns windows 10 cumulative update kb4494441 breaks down some websites 526066 2 Launch an application automatically during startup on Windows Windows

Leave a Reply Cancel reply

You must be logged in to post a comment.

Microsoft MVP

VEEAMLEGEND

vexpert-badge-stars-5

Virtual Background

GoogleNews

Categories

veeaam100

sysadmin top30a

  • RDP Certificate Issues
    Connecting to the RDP host: Fix the Certificate could not be verified back to the root certificate Mac
  • APACHECASS FEATURE
    How to Install and Configure Apache Cassandra on Linux Server Linux
  • Header picture 1
    Find BIOS Serial Number and System Information on Windows 11 Windows
  • Featured image Windows Security
    How to clear Cache and Manually Update Microsoft Defender Anti-Virus Solution
  • Missing ADML File
    Fix an appropriate resource file could not be found for LAPS Windows
  • VBAWS comprehensive guide
    Deep Dive into Protecting AWS EC2, RDS Instances and VPC AWS/Azure/OpenShift
  • nonexistent AD
    Fix Active Directory Domain Controller (AD DS) for this domain could not be contacted Windows Server
  • BitLocker Recovery Password Rotation in Active Directory
    Perform BitLocker Recovery Password Rotation in Active Directory Windows Server

Subscribe to Blog via Email

Enter your email address to subscribe to this blog and receive notifications of new posts by email.

Join 1,839 other subscribers
  • RSS - Posts
  • RSS - Comments
  • About
  • Authors
  • Write for us
  • Advertise with us
  • General Terms and Conditions
  • Privacy policy
  • Feedly
  • Telegram
  • Youtube
  • Facebook
  • Instagram
  • LinkedIn
  • Tumblr
  • Pinterest
  • Twitter
  • mastodon

Tags

AWS Azure Bitlocker Microsoft Windows PowerShell WDS Windows 10 Windows 11 Windows Deployment Services Windows Server 2016

Copyright © 2025 TechDirectArchive


Loading Comments...
 

You must be logged in to post a comment.