
The Docker executor when used with GitLab CI, connects to Docker Engine and runs each build in a separate and isolated container using the predefined image that is set up in .gitlab-ci.yml and in accordance with the config. Kindly refer to these related guides: How to create and deploy a local Registry Server with Docker Image, how to Pull your first Nginx Container Image from Docker Hub and deploy it to your local machine, Azure DevOps and GitHub integration for Docker and Kubernetes deployment, how to create a static pod in Kubernetes, and how to install, register and start GitLab Runner on Windows. In this article, you will learn how to Install Docker Desktop and register GitLab-Runner with Docker-windows executor: Deploying and using Windows containers with GitLab CI.
GitLab Runner can use Docker to run jobs on user-provided images. The Docker executor when used with GitLab CI, connects to Docker Engine and runs each build in a separate and isolated container using the predefined image that is set up in .gitlab-ci.yml and in accordance in config.toml. That way you can have a simple and reproducible build environment that can also run on your workstation. In the past, I have written on how to install, register and start GitLab Runner on Windows, and how to uninstall GitLab from your Windows device.
Docker Desktop License Requirement
Before proceeding to install Docker-Desktop, kindly pay attention to the Commercial use of Docker Desktop in larger enterprises (more than 250 employees OR more than $10 million USD in annual revenue) now requires a paid subscription. The grace period for those that will require a paid subscription ends on January 31, 2022. Kindly refer to how to install and uninstall Docker Desktop on Windows 10 and Windows Server.
Install the Prerequisites
Before installing Docker Desktop, your Windows machine must meet the following requirements to successfully install Docker Desktop. Below are the hardware prerequisites required to successfully run Client Hyper-V on Windows 10:
- 64-bit processor with Second Level Address Translation (SLAT),
- 4GB system RAM, and
- BIOS-level hardware virtualization support must be enabled in the BIOS settings. And, If this is not done, you will be prompted with the following error “Please enable the Virtual Machine Platform Windows Feature and ensure Virtualization is enabled in the BIOS“.
Your Windows machine must meet the following requirements to successfully install Docker Desktop.
- Windows 10 64-bit: Pro 2004 (build 19041) or higher, or Enterprise or Education 1909 (build 18363) or higher.
- For the WSL2 backend, please enable the WSL 2 feature on Windows.
Install Windows Subsystem for Linux
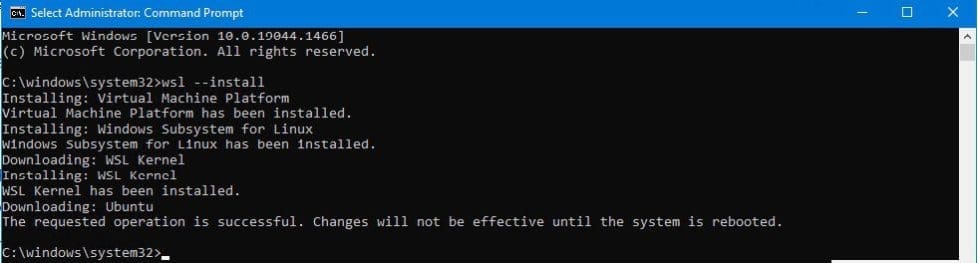
For detailed instructions, refer to these guides: What is Windows Subsystem for Linux (WSL), how to install WSL on Windows Server via Server Manager and PowerShell, and how to install WSL on Windows 10. You can install WSL with the following command wsl --install by entering the command either in PowerShell or the Command Prompt.

As you can see below, we have sucessfully installed
Alternatively, you can use the following command to install it very quickly as well.
Dism.exe /online /enable-feature /featurename:Microsoft-Windows-Subsystem-Linux /all /norestartInstall the WSL2 Linux Kernel Update Package
Download and install the WSL2 Linux kernel update package for x64 machines. You can also see this guide for more information Linux kernel update package.

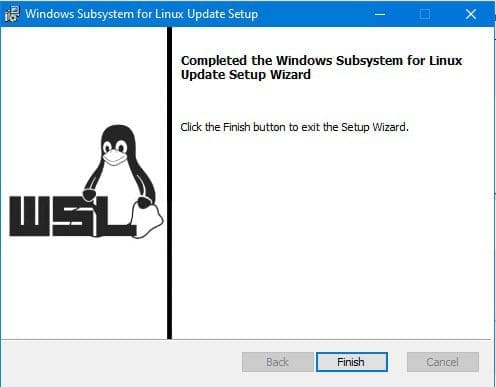
As you can see, the Windows Subsystem for Linux Update Setup setup is complete. Just click on “Finish” to complete this step.
Enable Hyper-V and Containers Windows Features
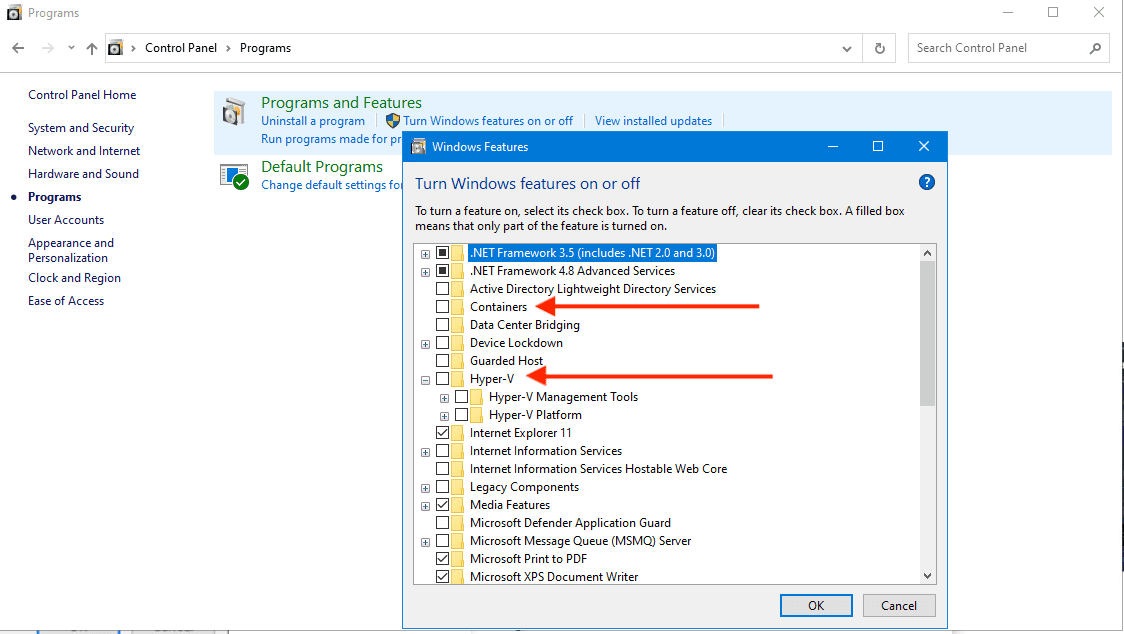
Hyper-V and Containers Windows features must be enabled. Here is a similar guide to work you through how to install RSAT on Windows 10 via Windows features, and on a server. See how to install RSAT on Windows Server. You may also want to see this very detailed guide discussing “how to enable or disable DotNet Framework (NetFx3) via PowerShell, Control Panel, and DISM in Windows“.
To do this, launch the Windows Control Panel and click on Programs, and then on “Turn Windows features on or Off”. As you can see, we already have the Hyper-V feature installed. We will have to check the “Container” feature as shown below. Ensure both the Hyper-V and Containers Windows features must be enabled. When you are done, click on OK.


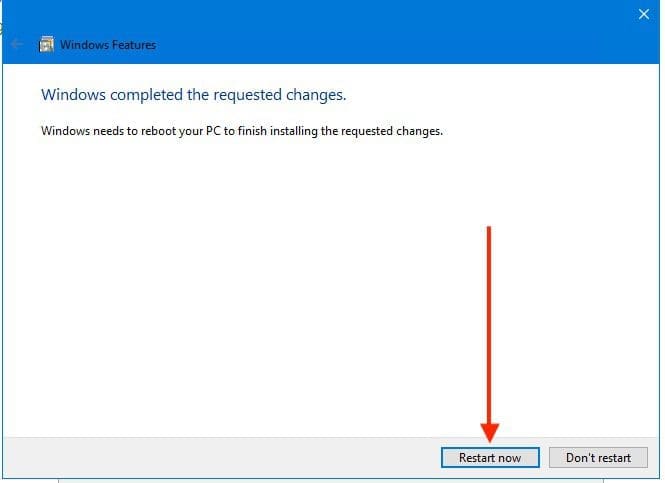
After these steps, Windows will search and apply the settings and you will be required to restart afterward.
Windows Server Containers use Hyper-V isolation by default on Windows 10 in order to provide developers with the same kernel version and configuration that will be used in production.
Install Docker Desktop
GitLab Runner can use Docker to run jobs on user-provided images. This is possible with the use of a Docker executor. If you fail to install Docker and proceed to run jobs by specifying a Docker executor, you will end up having the following issue “Failed to remove network for build: Error during connect in the default daemon configuration on Windows, the Docker client must be run with elevated privileges.
To install Hyper-V manually, see Install Hyper-V on Windows 10. A reboot is required after installation. If you install Hyper-V without rebooting, Docker Desktop does not work correctly. You can install Docker on Windows 10 Professional and Enterprise editions by using the following steps. The Docker Desktop can be downloaded from the following link as shown below.

When prompted, ensure the install required Windows components for WSL 2 option is selected on the Configuration page.
– This will unpack and install as shown below


The Docker menu displays the Docker Subscription Service Agreement window. It includes a change to the terms of use for Docker Desktop.

When the initialization is complete, Docker Desktop launches the Quick Start Guide. This tutorial includes a simple exercise to build an example Docker image, run it as a container, push and save the image to Docker Hub. I will be skipping this step. As you can see, Docker is now installed and started.


Install GitLab-Runner
Next, let’s install the GitLab-Runner. To install GitLab runner on Windows, please follow the steps. Create a folder somewhere in your system, For instance on the C drive. This can be created on any other drive.
C:\GitLab-Runner– Download the binary for 64-bit or 32-bit and put it into the folder you created.
– Upon clicking on the 64-bits, the GitLab runner executable will be downloaded and placed in the downloads folder. Copy the GitLab runner executable that has just been downloaded and paste it into the location we have created “C:\GitLab-Runner“.
– The following assumes you have renamed the binary to GitLab-runner.exe (This step is optional). IF you chose to rename the executable, please be mindful of this error “GitLab-runner is not recognized as an internal or external command, operable program, or batch file“.

Note: Make sure to restrict the Write permissions on the GitLab Runner directory and executable. If you do not set these permissions, regular users can replace the executable with their own and run arbitrary code with elevated privileges.
You can verify this by following the steps below. You can right-click on the GitLab Runner directory, click on Properties, and then Security. Ensure the regular users do not have the Write Permission assigned.

Next, run an elevated command prompt as shown below. This will ensure the Command Prompt opens as an Administrator as shown.
– Navigate to the GitLab-Runner directory. Run service using Built-in System Account: Now, we have to install the GitLab Runner as a service using the command below.
gitlab-runner.exe installStart the GitLab Runner Service: To do this, use the command below. From the image below, the installed GitLab-Runner is already running.
gitlab-runner.exe start
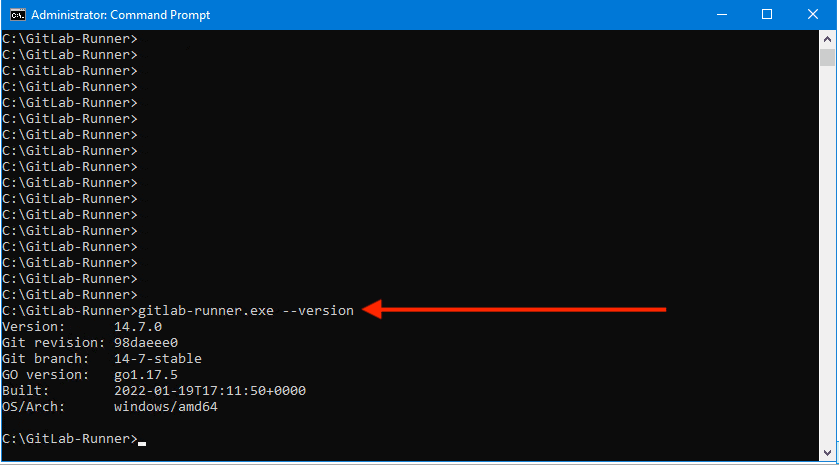
To view the version of the installed GitLab Runner, run the command as shown in the image below. As you can see, it will display the version, OS/Architecture, etc
Switch to Windows Container
Since we are using a Windows Daemon and a Docker-windows executor, we will have to switch to the “Windows container” as shown below. Else, we will have the following error “The executor requires OSType=windows, but Docker Engine supports only OSType=linux“.

docker-windows“, this is because, the GitLab-runner is installed on Windows, and also we are using the Windows containerClick on “switch” to switch to the Windows container. As you can see in the second image, the Docker Desktop is currently being switched.


Ensure the Host OS version matches the Container OS version
Windows requires the host OS version to match the container OS version. If you want to run a container based on a newer Windows build, make sure you have an equivalent host build. Otherwise, you can use Hyper-V isolation to run older containers on new host builds. The default entry point is for this image is Cmd.exe.. You could also use the docker pull command to pull an image locally to your disk. To run the image, kindly run this command.
docker run mcr.microsoft.com/windows/servercore:20H2
The Images view is a simple interface that lets you manage Docker images without having to use the CLI. By default, it displays a list of all Docker images on your local disk. To view images in remote repositories, click Sign in and connect to Docker Hub. This allows you to collaborate with your team and manage your images directly through Docker Desktop.
Please see How to uninstall GitLab from your Windows device, how to fix “Error: cannot lock ref ‘refs/remotes/origin/windows’: unable to resolve reference ‘refs/remotes/origin/windows’, Not a directory“, and how to fix ‘Unable to bind to LDAP or AD in Pleasant Password Server“.
The Images view allows you to perform core operations such as running an image as a container, pulling the latest version of an image from Docker Hub, pushing the image to Docker Hub, and inspecting images. In addition, the Images view displays metadata about the image such as the tag, image ID, date when the image was created, and the size of the image. It also displays In Use tags next to images used by running and stopped containers. This allows you to review the list of images and use the Clean up images option to remove any unwanted images from the disk to reclaim space.


Register GitLab-Runner with Docker-windows executor
Registering a runner is the process that binds the runner with one or more GitLab instances. After you install the application, you register individual runners, or multiple runners on the same host machine, each with a different configuration, by repeating the register command. Runners are the agents that run the CI/CD jobs that come from GitLab.
Since we are using a Windows Daemon, we will have to use the docker-Windows executor. This guide discusses the error you may encounter if you specify a different executor: The executor requires OSType=windows, but Docker Engine supports only OSType=linux. Before registering a runner, you need the following parameters:
- Have the GitLab-Runner is installed. (
This we have done in the steps above). - Obtain a token (See this guide for more information about the steps “how to install, register and start GitLab Runner on Windows“.
- Run the command below to Register GitLab-Runner:
gitlab-runner.exe register - Next, you will be required to enter your
GitLab instance URL(also known as thegitlab-ci coordinator URL) as shown below. If you do not use the right URL, you may run into the following error “Panic: Failed to register the GitLab-runner, you may be having network issues“. - Enter the Registration Token and
- Also enter a description for the runner. You can change this value later in the GitLab user interface.
- Enter the tags associated with the runner, separated by commas. You can change this value later in the GitLab user interface.
- Please enter the
Runner executorsuch as: ssh, docker+machine, docker-ssh+machine, Kubernetes, Docker, parallels, Virtualbox, docker-ssh, shell: docker. I will be using the “docker-windows” executor.

Windows Support for GitLab Runner
Note: GitLab Runner only supports the following versions of Windows which follow our support lifecycle for Windows as at the time of writing this guide: Windows Server 20H2, Windows Server 2004, and Windows Server 1809.
You can only run containers based on the same OS version that the Docker daemon is running on. For example, the following Windows Server Core images can be used as shown below.
mcr.microsoft.com/windows/servercore:20H2
mcr.microsoft.com/windows/servercore:20H2-amd64
mcr.microsoft.com/windows/servercore:2004
mcr.microsoft.com/windows/servercore:2004-amd64
mcr.microsoft.com/windows/servercore:1809
mcr.microsoft.com/windows/servercore:1809-amd64
mcr.microsoft.com/windows/servercore:ltsc2019
In order to show you a different way to start and restart the “GitLab-Runner” service: You can launch the services.msc as shown below to have the GitLab-Runner restarted in order to apply the recent changes.

Note: Also ensure to restart the Docker-Desktop service, else you will be faced with this error “ERROR, preparation failed: error during connect in the default daemon configuration on Windows, the docker client must be run with elevated privileges to connect“.
Now you can go run your jobs! I hope you found this blog post helpful on how to Install Docker Desktop and register GitLab-Runner with Docker-windows executor: Deploying and using Windows containers with GitLab CI. If you have any questions, please let me know in the comment session.


